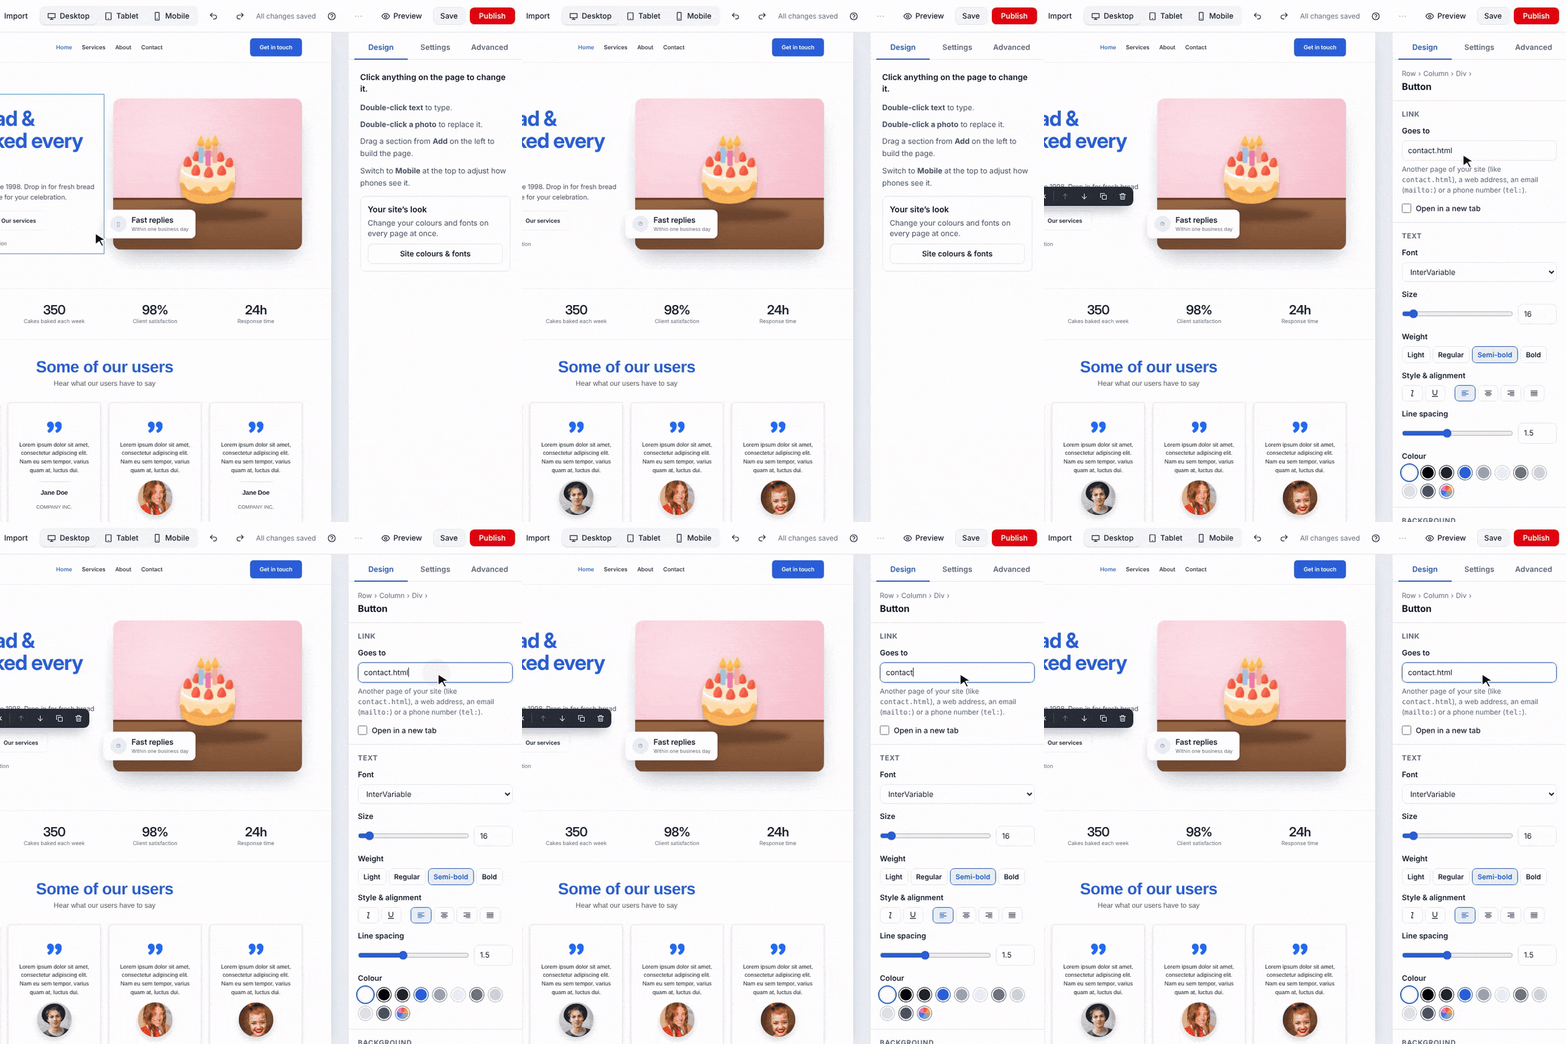
Everything you need to build, edit and publish your website.
Updated November 9, 2026
1. Getting started
1.1 Welcome to XSiteBuilder
What you can build, and the few ideas that make everything else make sense.
XSiteBuilder lets you build, edit and publish websites in your browser — no code needed. Start from a ready-made template, import a site you already have, copy the layout of your old website, or (optionally) describe your business and let AI write a first draft.
▶ Video: From a blank account to a live website in a few minutes — watch it at https://build.xsitebuilder.com/help/welcome
The videos in this Help Center have a spoken voiceover and on-screen captions, so you can follow along with the sound on or off.
How your account is organised
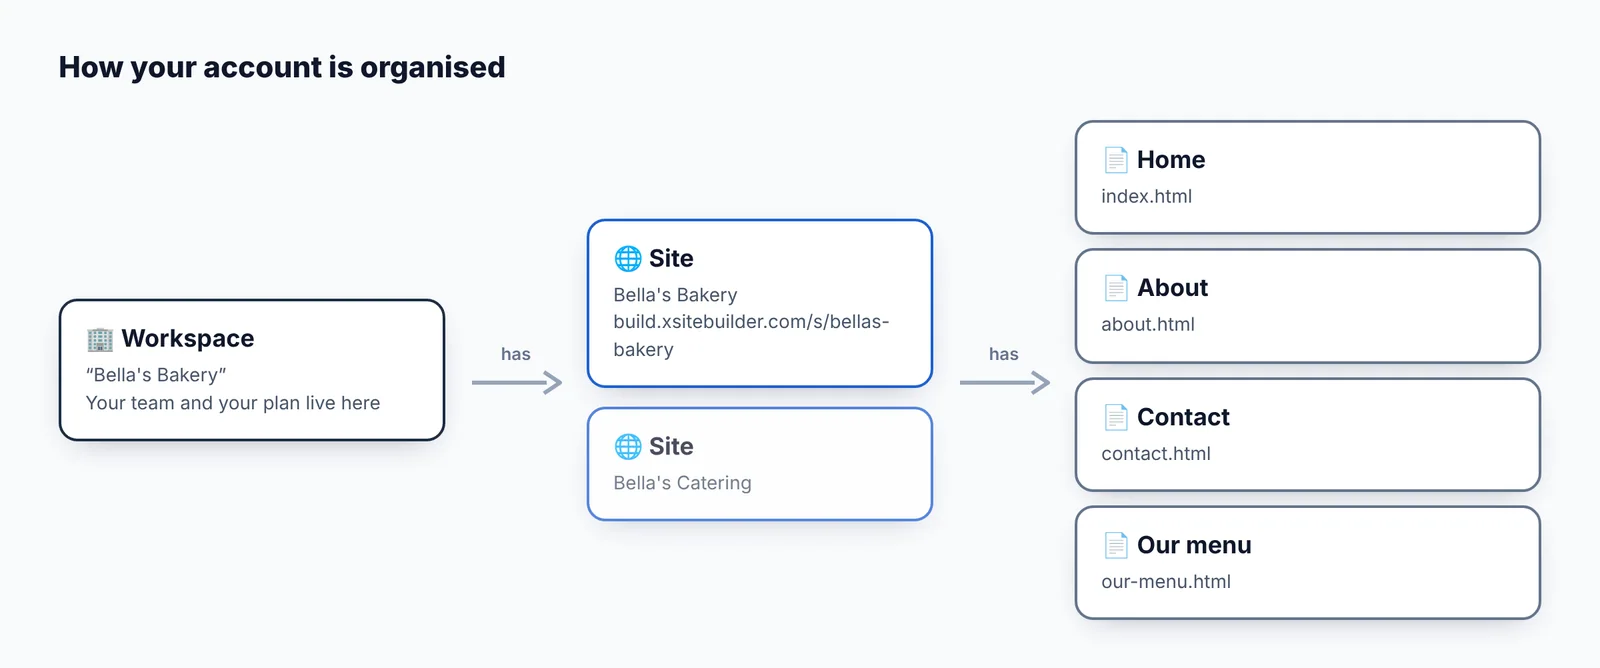
Workspaces hold sites, and sites hold pages
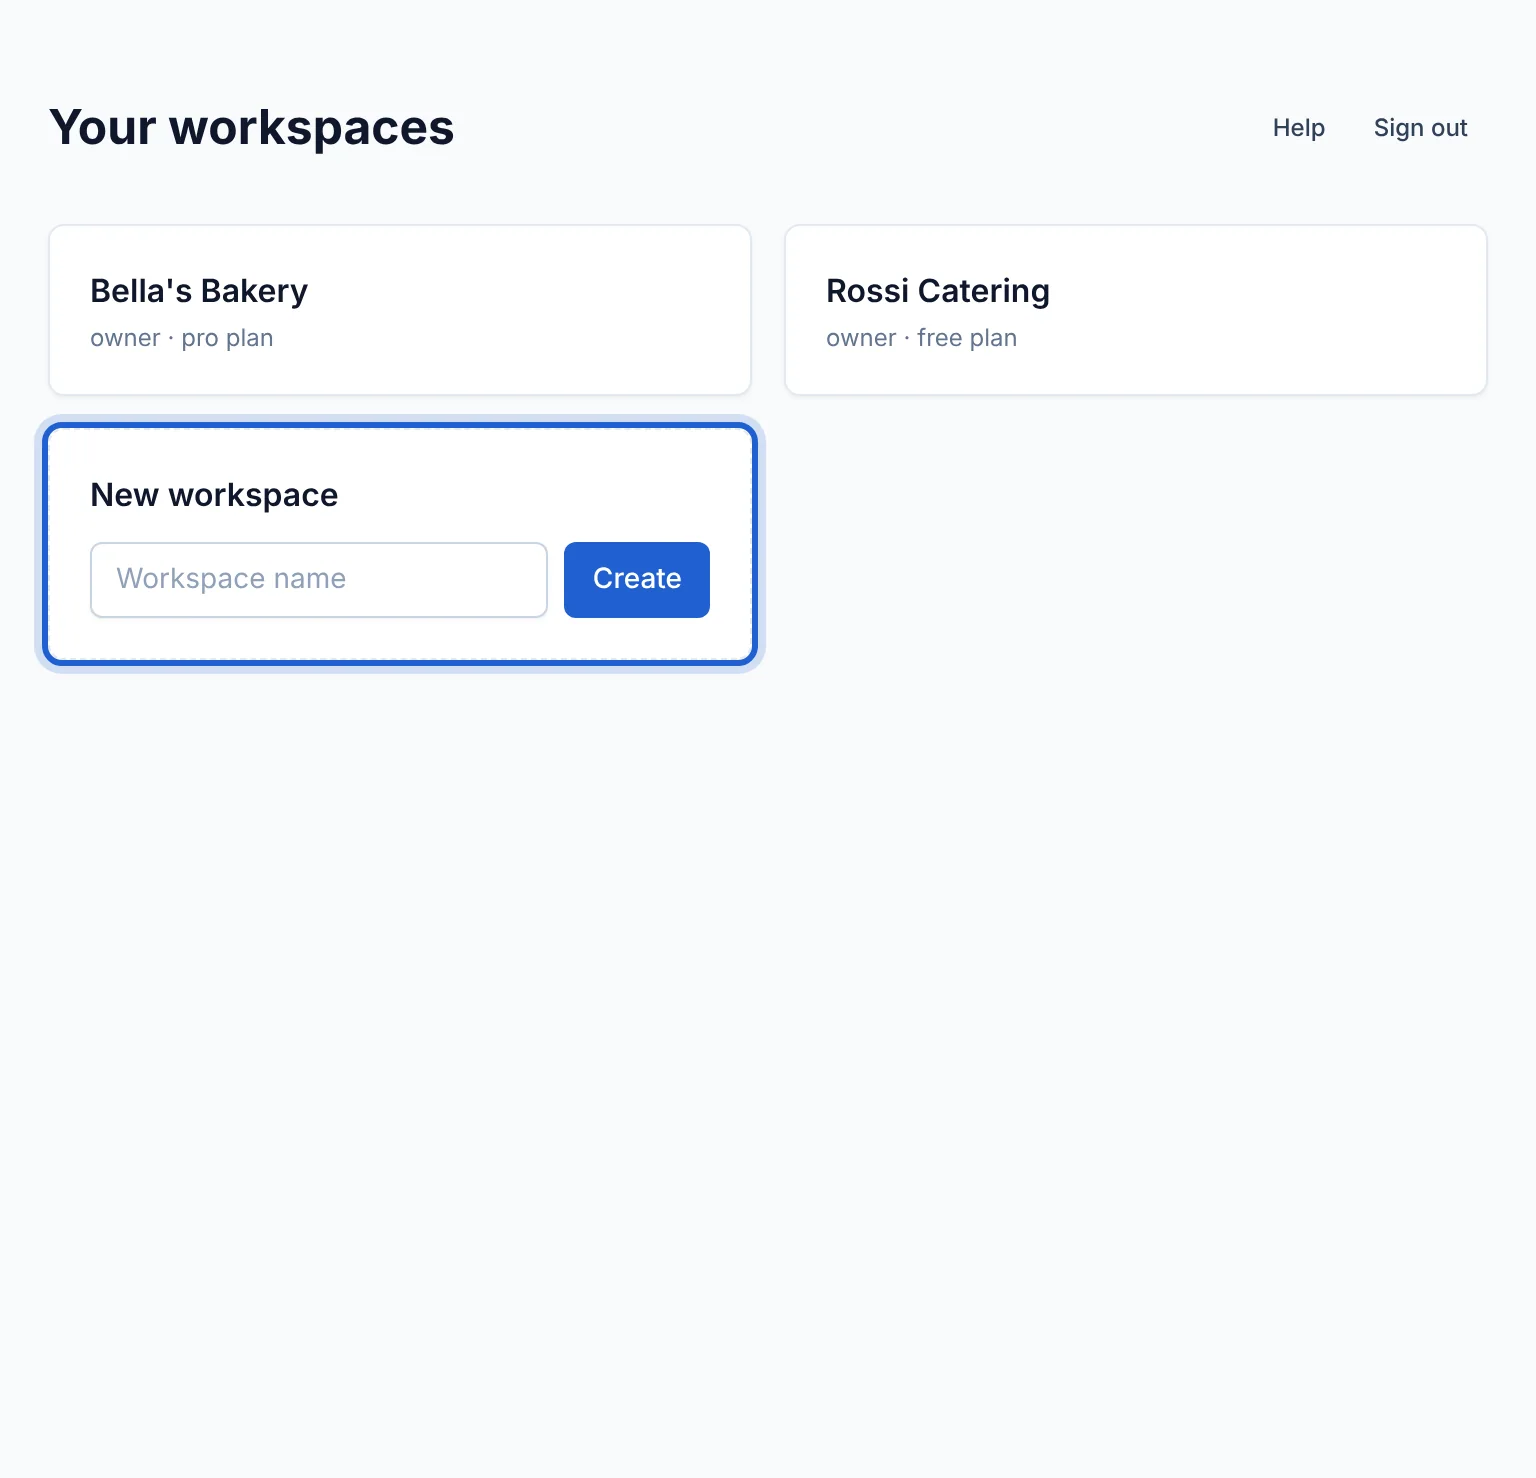
Workspaces. Everything lives in a workspace: your sites, your team and your plan. Most people only ever need one. Agencies often make one workspace per client.
Sites. A site is a collection of pages with its own web address. How many sites you can have depends on your plan.
Pages. Each page is edited visually in the editor. The home page is always index.html.
Draft and live
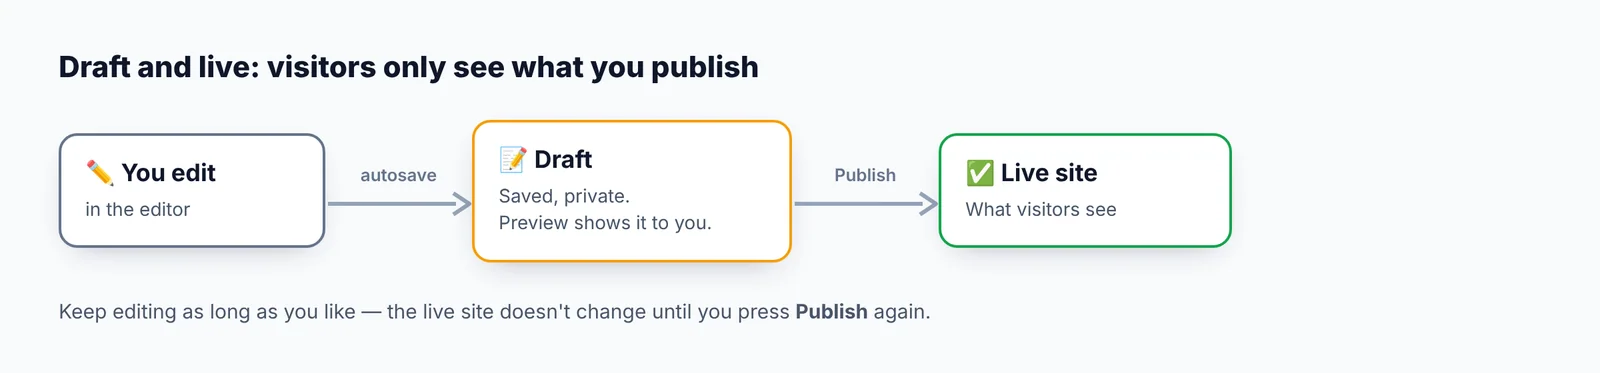
You edit a private draft; visitors only see what you publish
Everything you change is saved as a draft. Visitors only see your changes after you press Publish — so you can work on a site for days without anyone seeing a half-finished page.
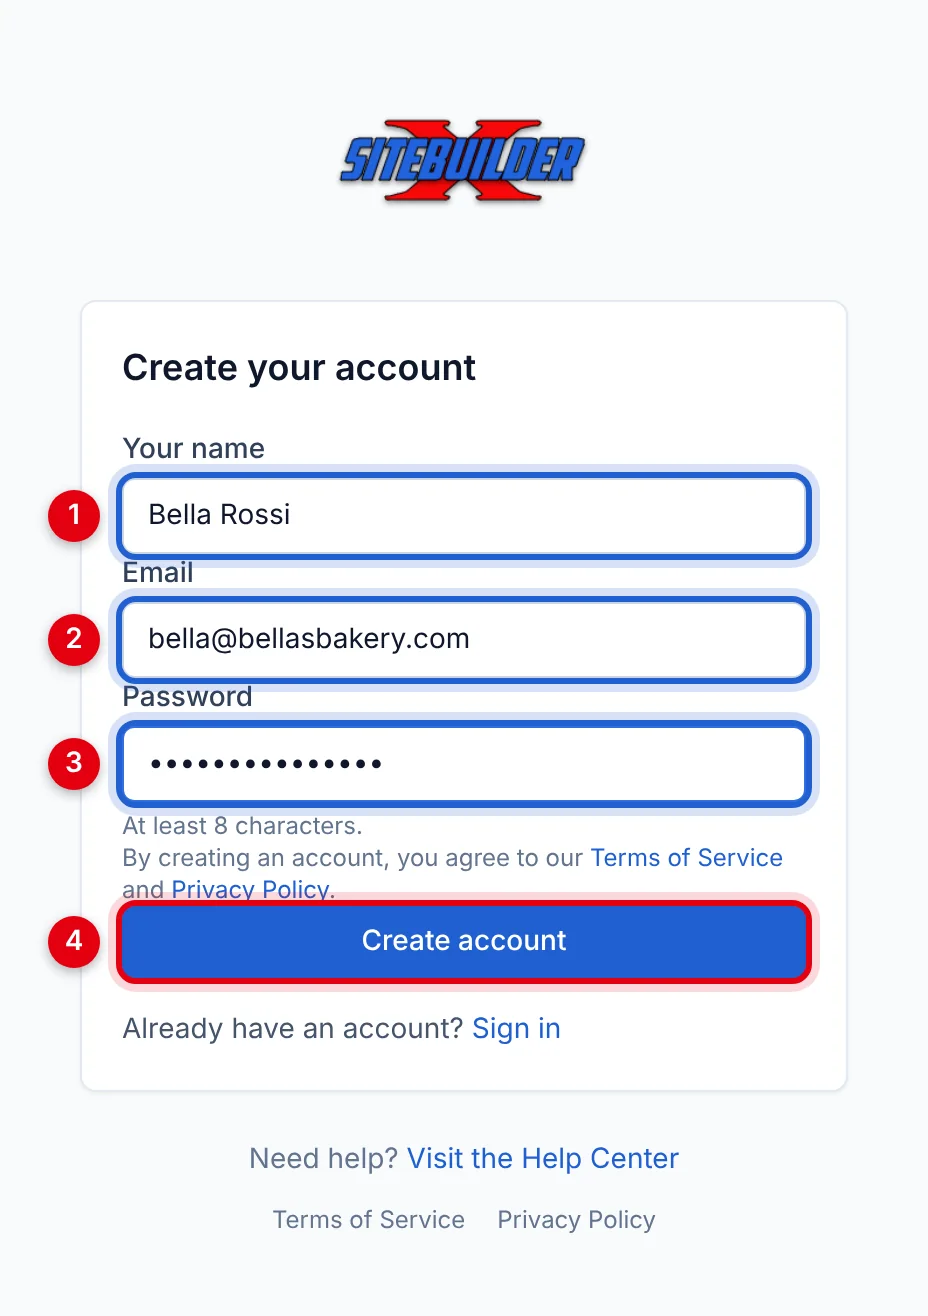
You're signed straight in and a workspace is created for you.
Your welcome email
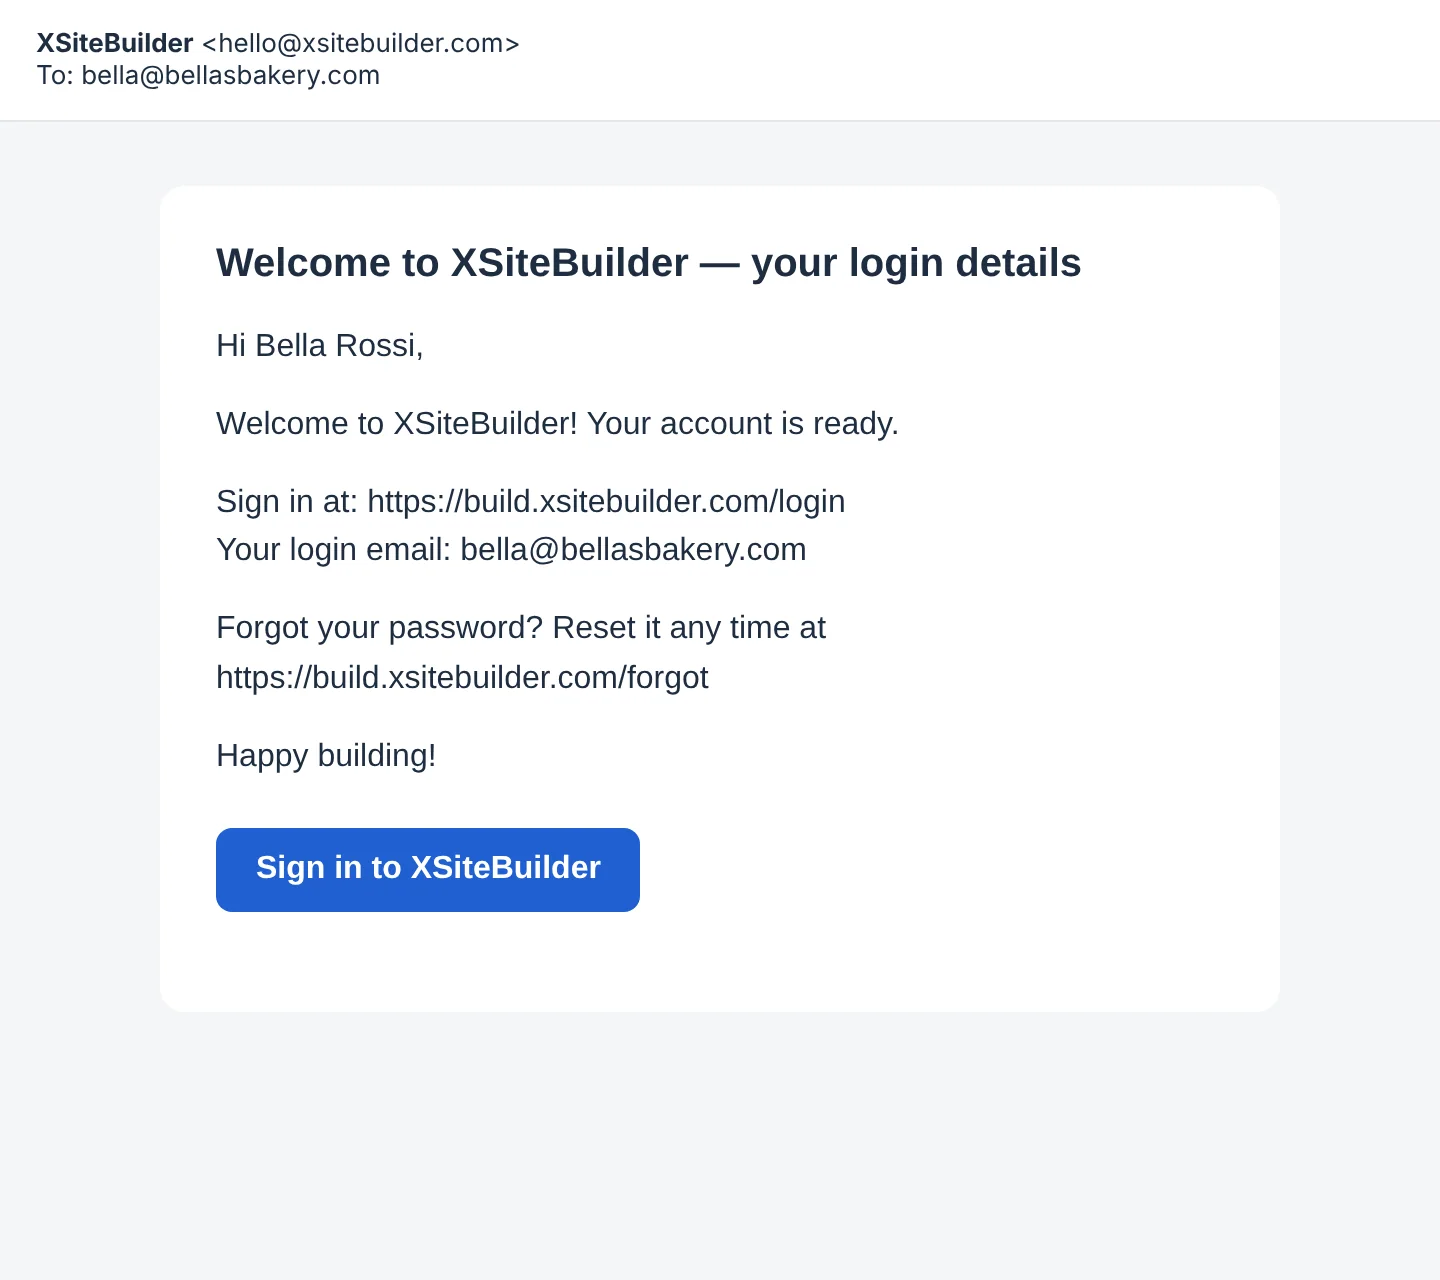
We also send a welcome email with your login details. Keep it somewhere safe. If it hasn't arrived within a few minutes, check your spam or promotions folder.
The welcome email
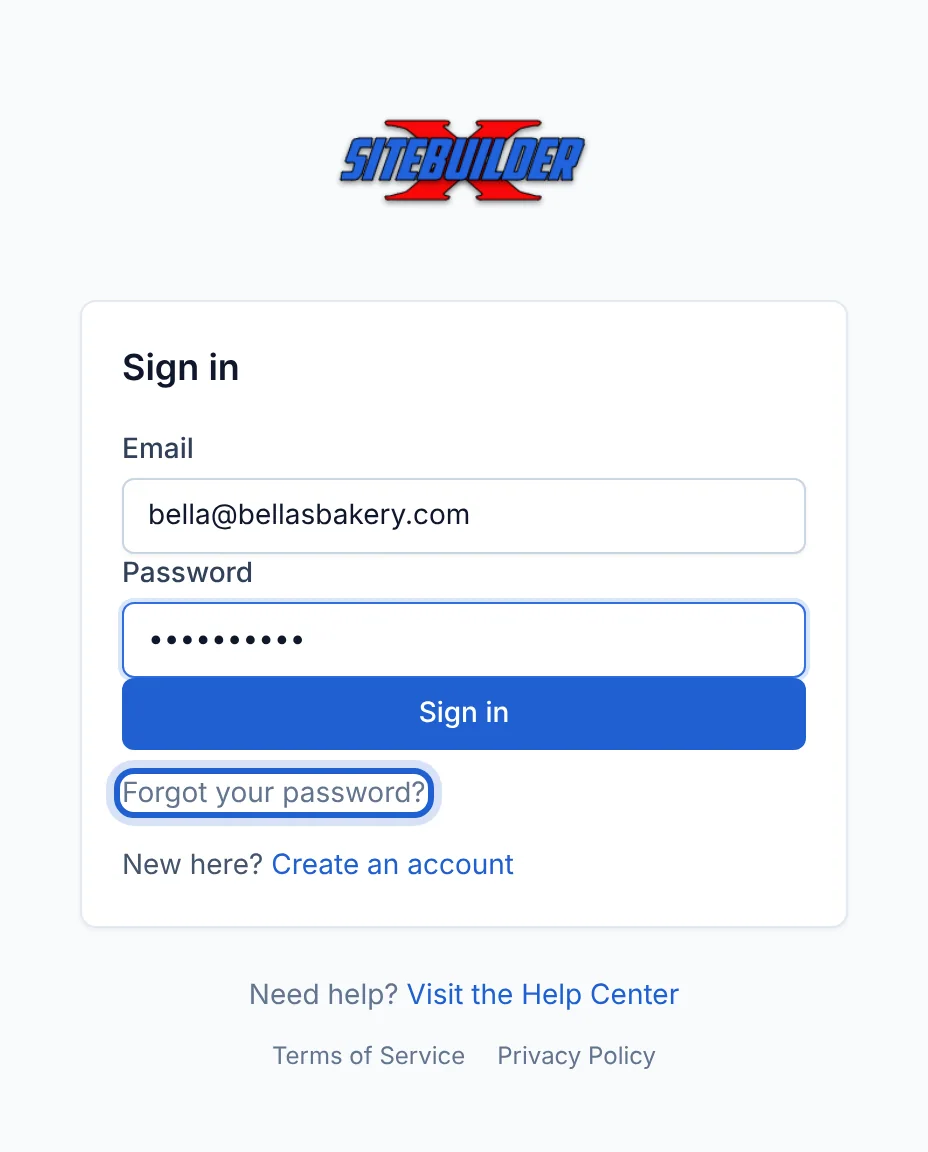
Bought a plan before signing up? Your account was created for you, and your welcome email contains a link to choose your password. The link works for 7 days — after that, use Forgot your password? on the sign-in page.
Sign in
Go to https://build.xsitebuilder.com/login, enter your email and password, and click Sign in. You can sign in on as many computers and browsers as you like.
The sign-in page — “Forgot your password?” is just below the button
Signing out
Click Sign out in the top-right corner of any page. Always do this on shared or public computers.
The Sites page, a site's own page, and Workspace settings — what each one is for.
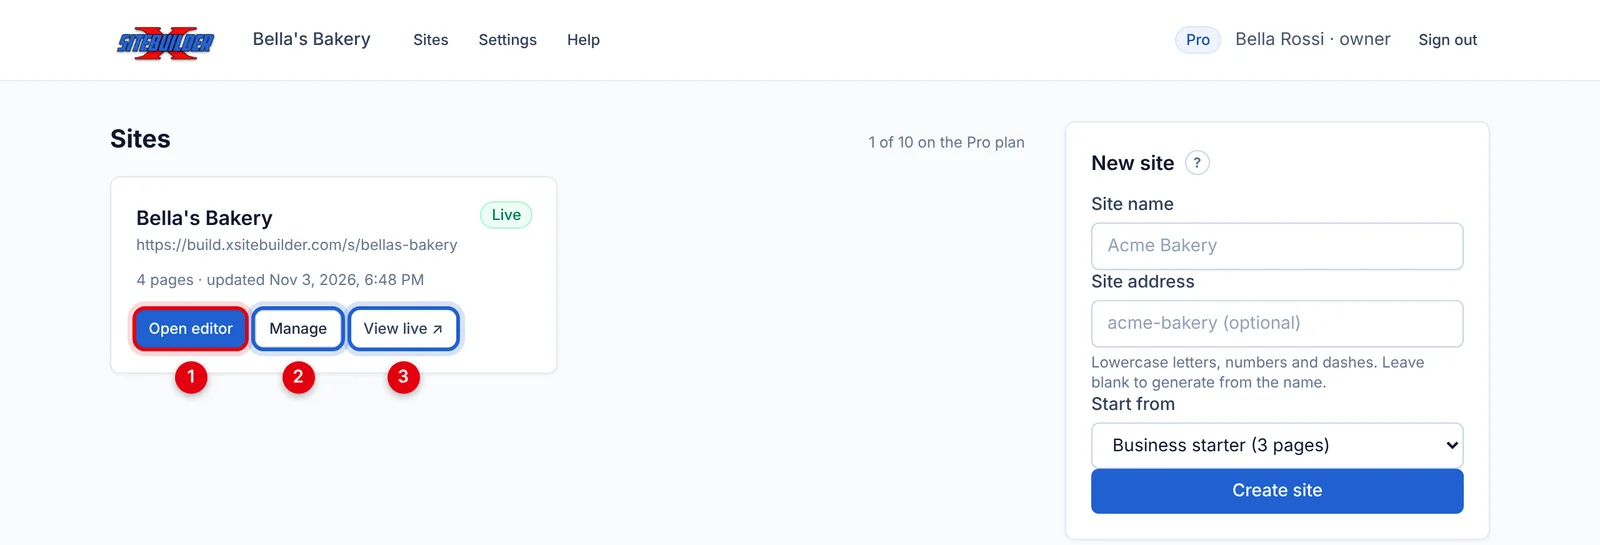
After signing in you land on your workspace's Sites page.
The Sites page
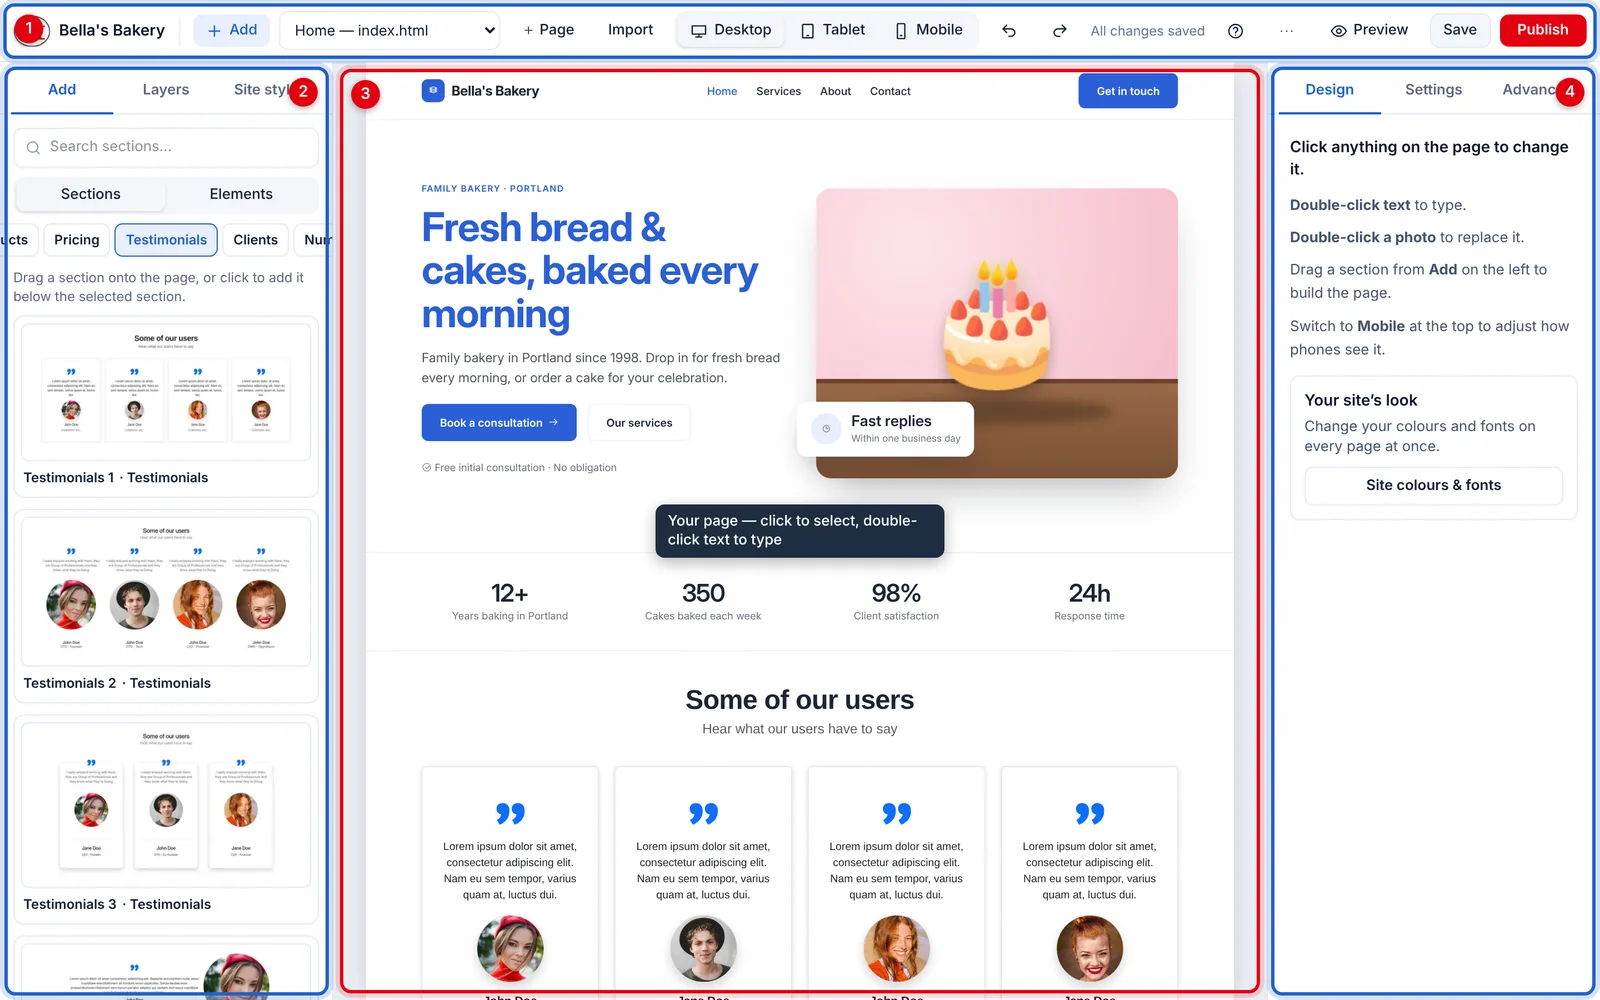
The bar along the top is always there: the logo (back to your sites), your workspace name (click it to switch workspaces), Sites, Settings, Help, your plan, your name and Sign out.
The Sites page
Each site has a card with three buttons:
Open editor — start editing pages.
Manage — the site's own page (below).
View live ↗ — the published site, once it's live.
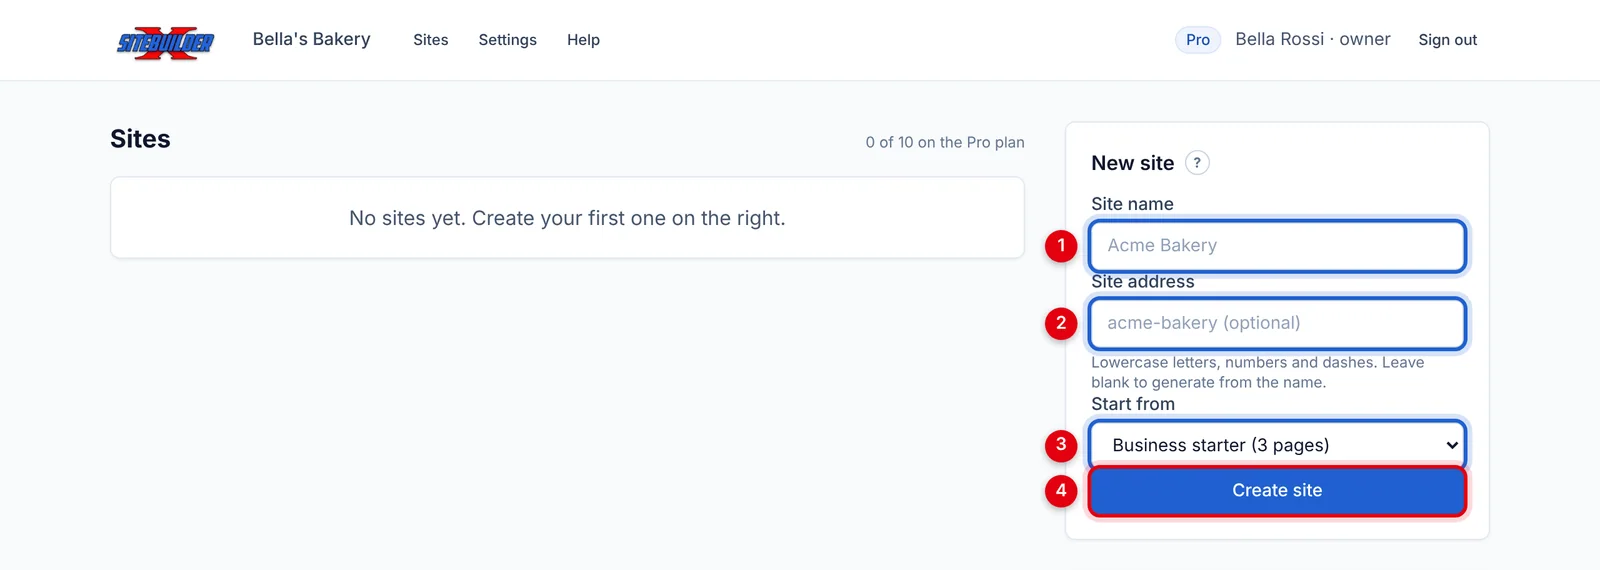
On the right you create new sites: from a template, with AI (optional), or by copying a website.
A site's page ("Manage")
A site's page
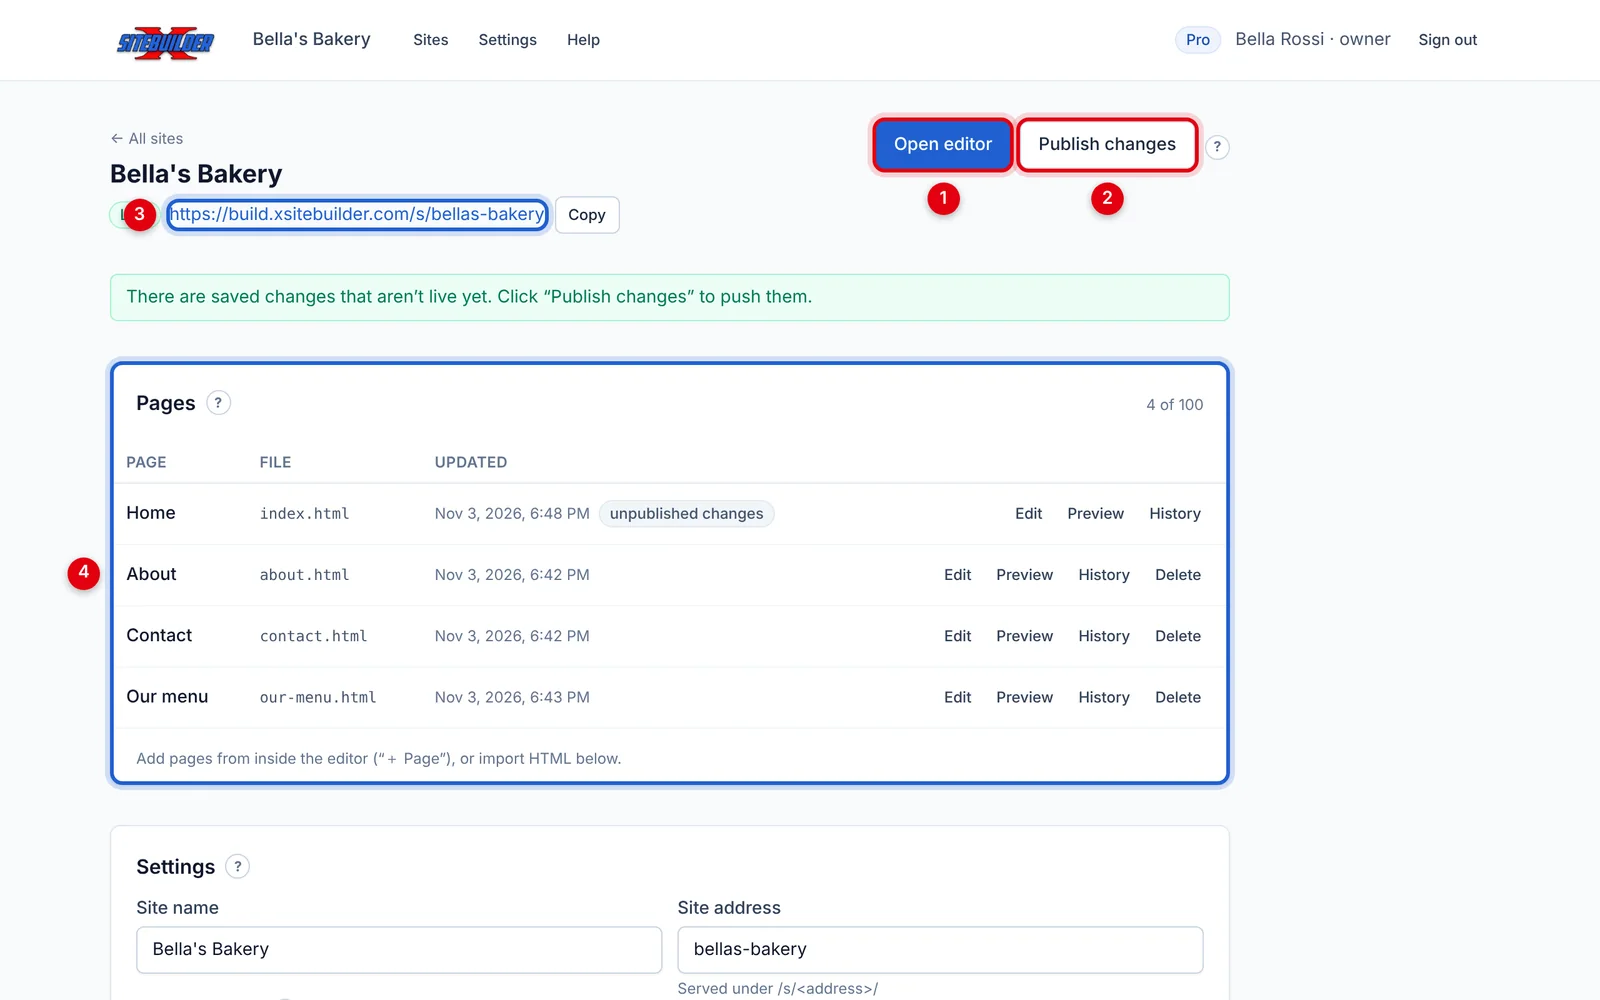
Open editor.
Publish site / Publish changes — make your saved changes visible to visitors.
The site's web address — click Copy to copy it.
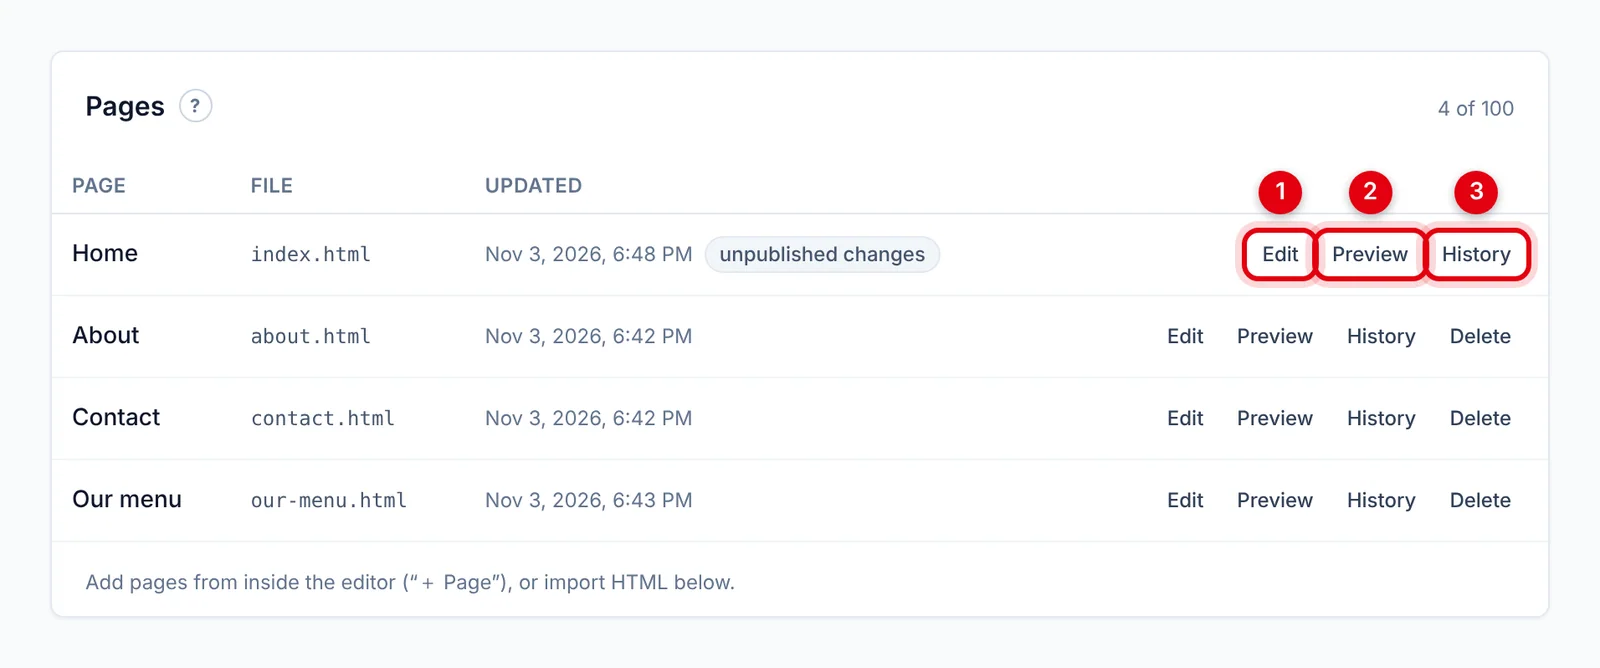
Pages — every page, with Edit, Preview, History and Delete.
Further down the same page: Settings (name, address, custom domain, form emails), Form messages, Import HTML, Copy a website, Export and the Danger zone.
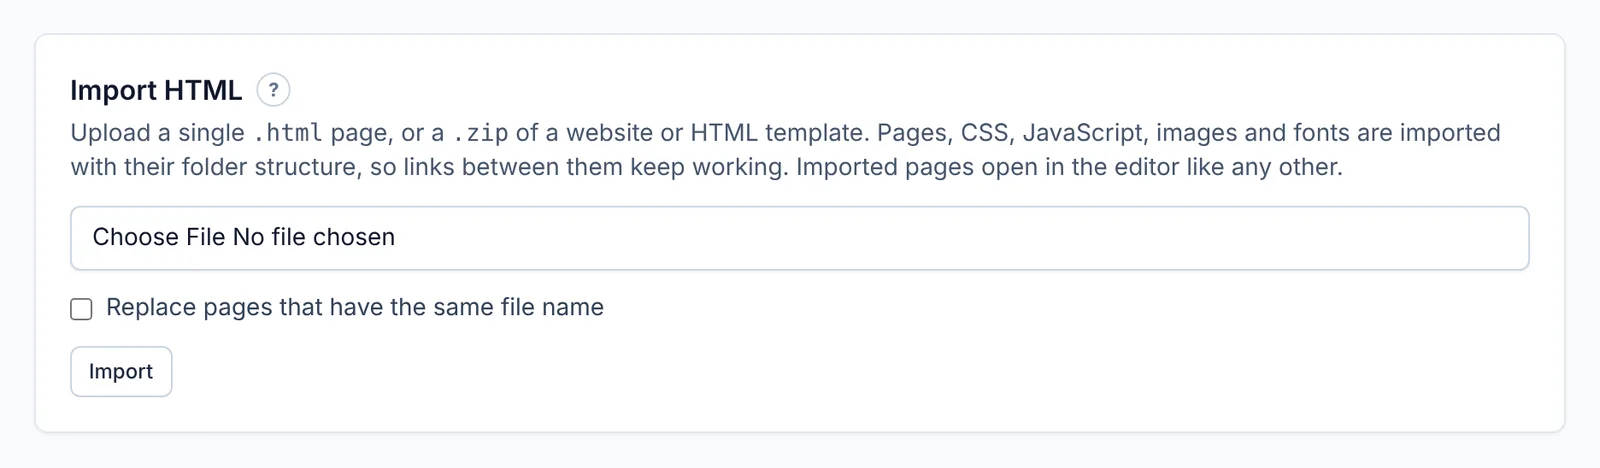
Import: bring in an HTML file, a .zip, or pasted code.
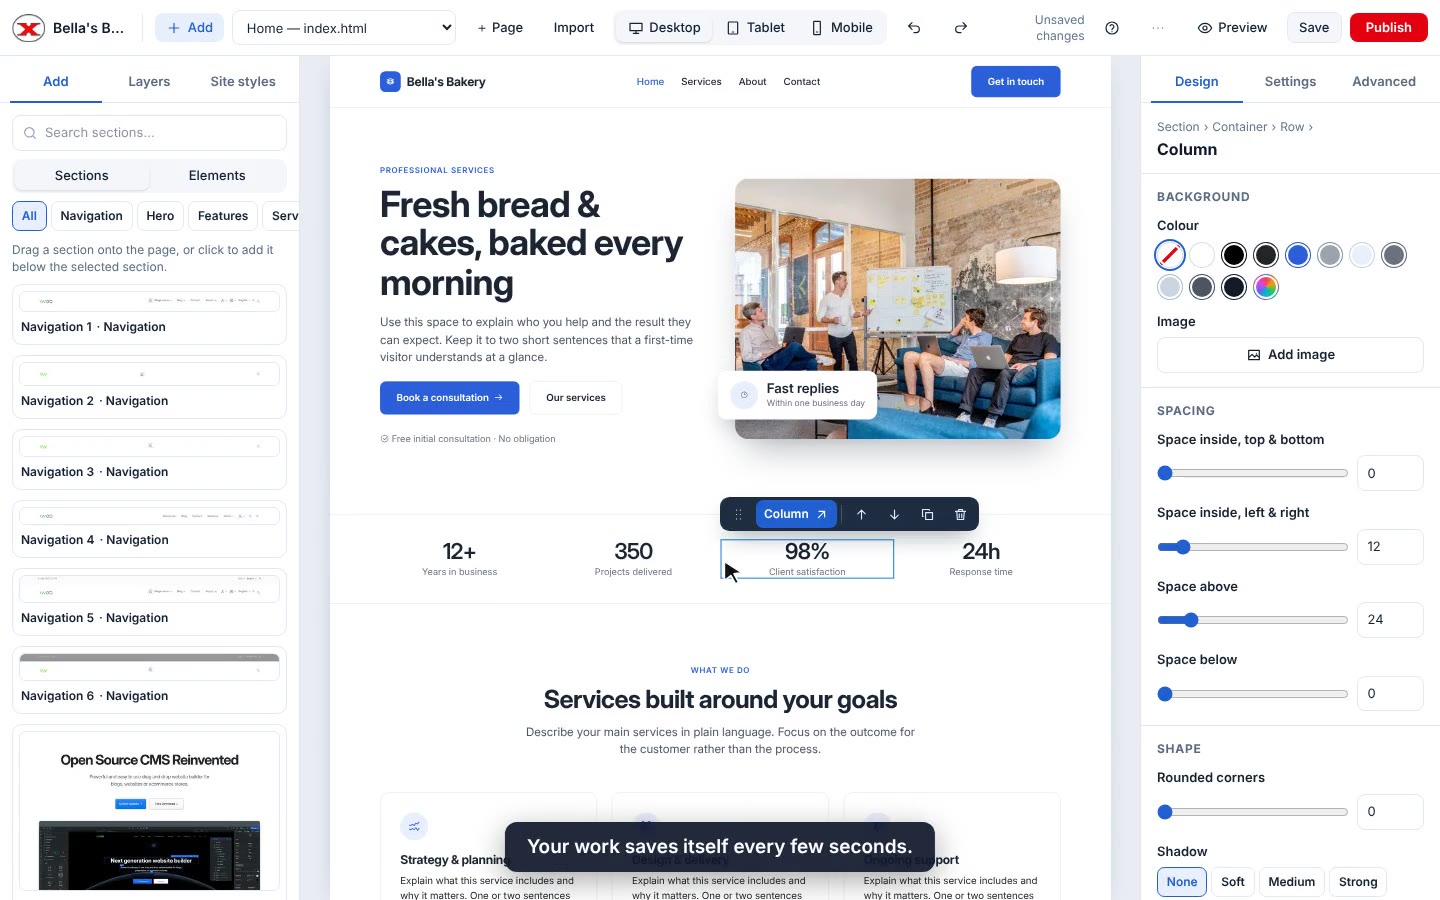
The right side of the toolbar
Desktop / Tablet / Mobile: see the page at different screen sizes. See Mobile and tablet views.
↶ ↷: undo and redo.
Save status: "All changes saved", "Unsaved changes" or "Saving…".
?: opens this Help Center.
⋯ More: show outlines around every element, or view the page's code.
Preview: the page as visitors see it, in a new tab.
Save: save now (it also happens automatically).
Publish: put your changes live.
The panels
On the left:
Add: ready-made sections (with pictures, so you can see them first) and single elements like text, images and buttons. See Adding sections.
Layers: an outline of everything on the page. It's handy for picking something that's hard to click, or for dragging things into a new order.
Site styles: your site's colours and fonts, changed on every page at once. See Site colours and fonts.
On the right, for whatever you've selected:
Design: text, colour, background, spacing, corners, shadow and links, in plain words. See Changing styles.
Settings: details like a picture's description, a video's address, or a form's options.
Advanced: every style setting there is, for when you need more control.
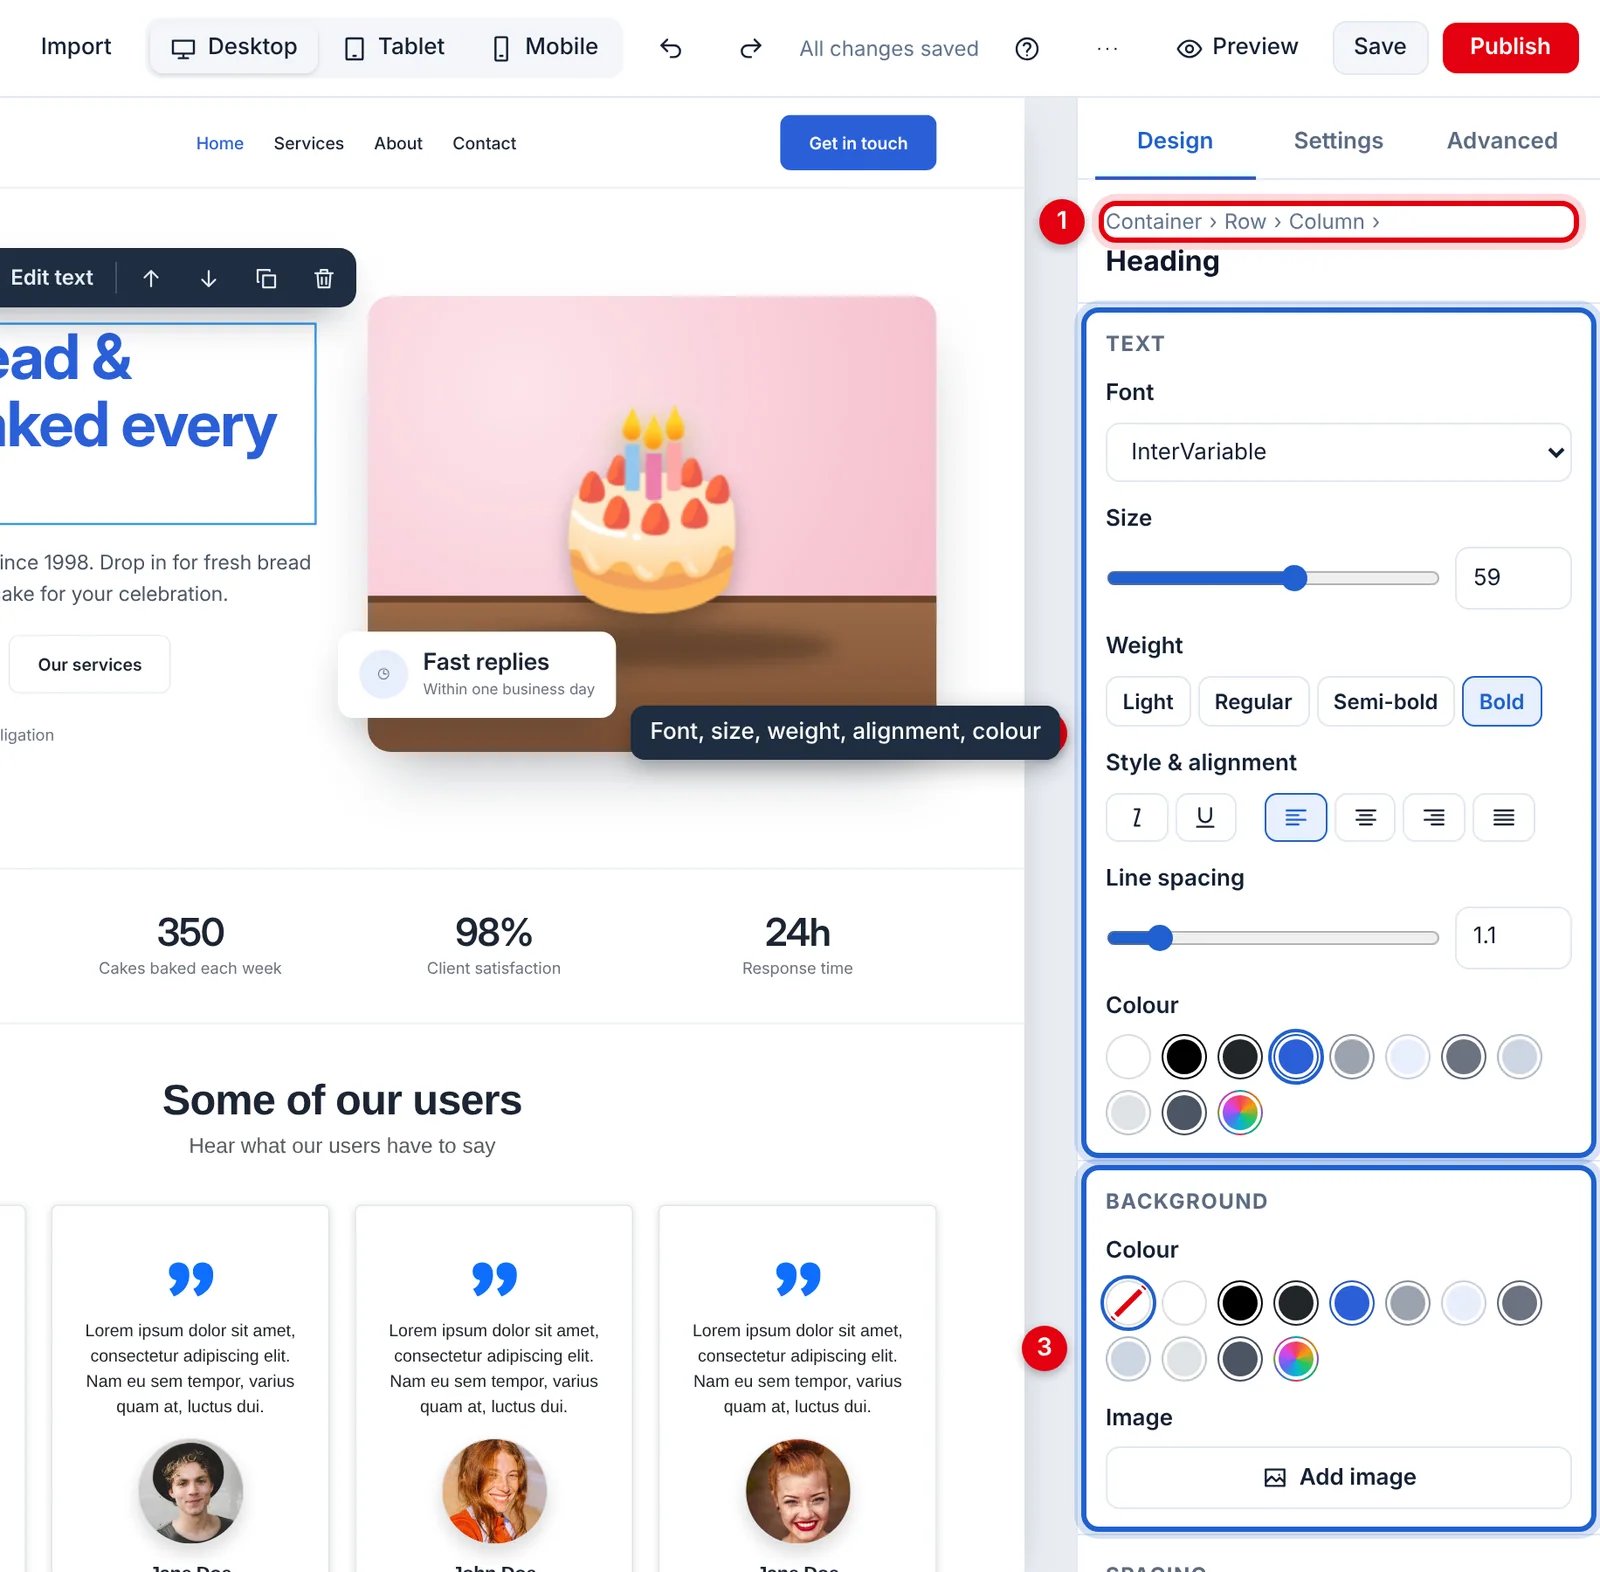
The Design panel shows what you've selected and the items around it at the top, for example Container › Row › Column › Heading. Click any of them to select it instead.
Selecting, moving and deleting
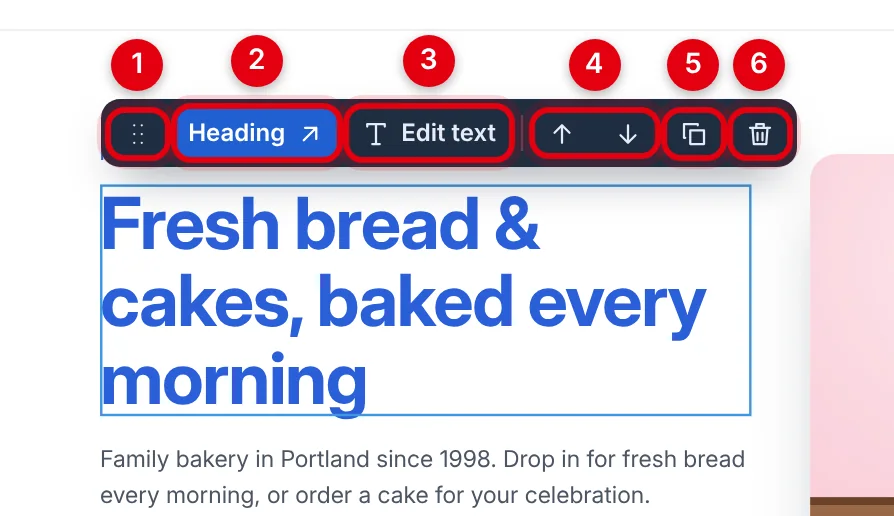
Click anything to select it. A blue outline and a small toolbar appear above it:
A selected heading and its toolbar
Drag handle: drag it to move the item somewhere else.
Its name, e.g. "Heading". Click it to select the item it sits inside (its "parent").
Edit text for text, Replace for a picture, or Link for a link or button.
Move up and Move down: swap it with the item before or after it.
Duplicate: put a copy just after it.
Delete: remove it.
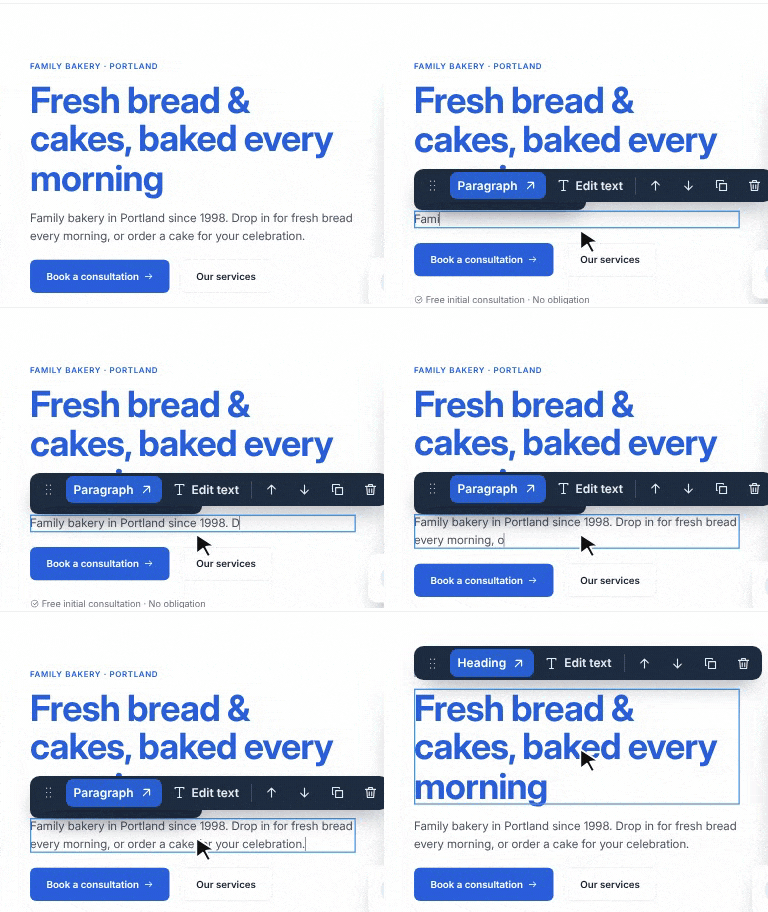
Double-click text to type. A text toolbar lets you add bold, italic, underline and links.
Keyboard shortcuts
Shortcut
What it does
Ctrl/⌘ + S
Save now
Ctrl/⌘ + Z
Undo
Ctrl/⌘ + Shift + Z
Redo
Ctrl/⌘ + C, Ctrl/⌘ + V
Copy and paste the selected item
Delete
Delete the selected item (when you're not typing in it)
2.2 Adding sections and elements
Add ready-made sections, columns, text, images, videos, maps and forms to your page.
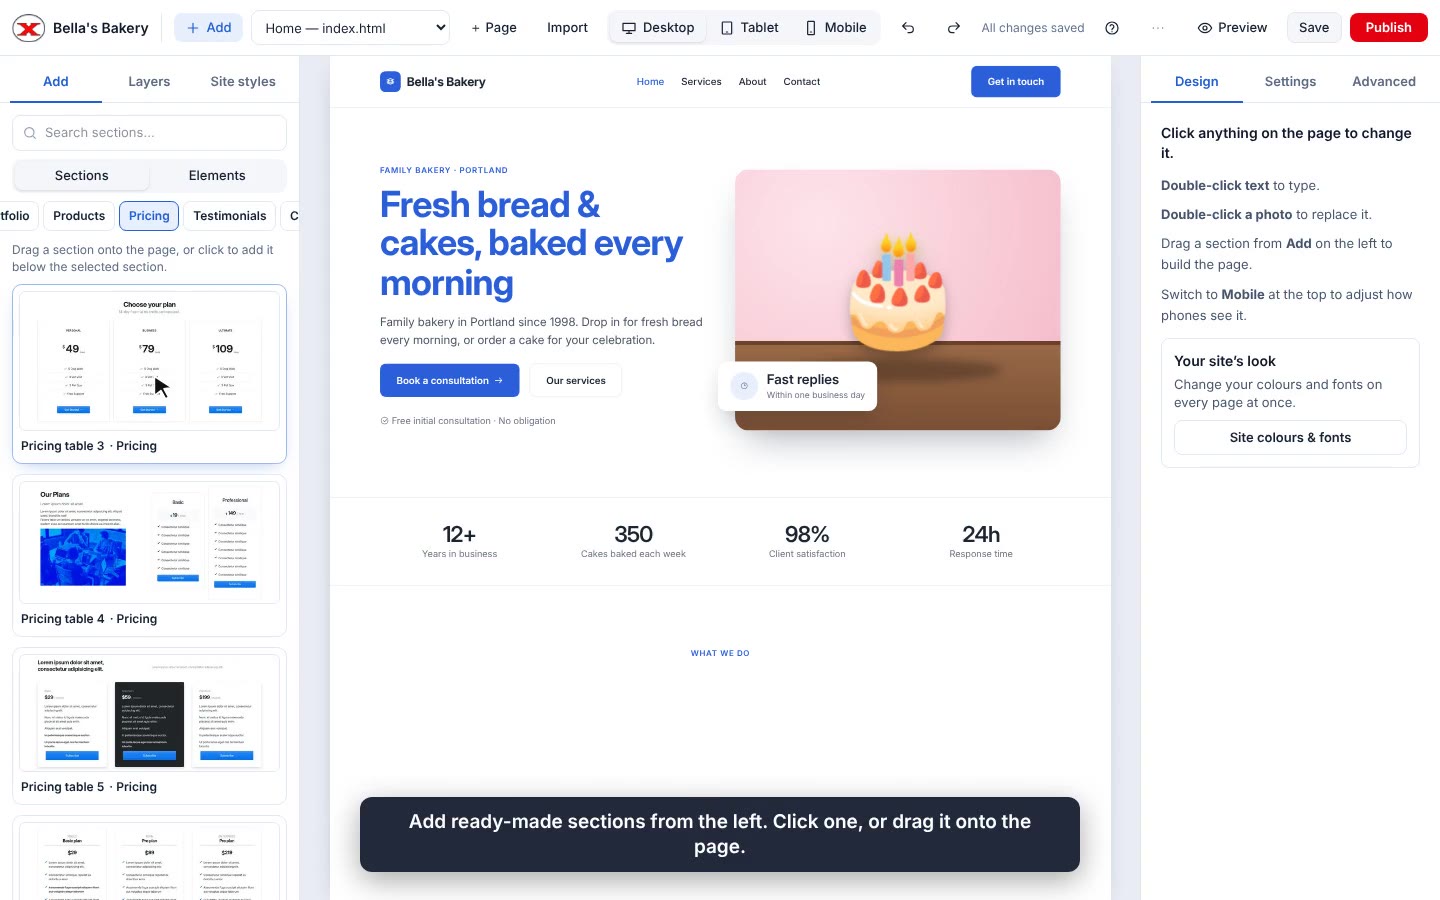
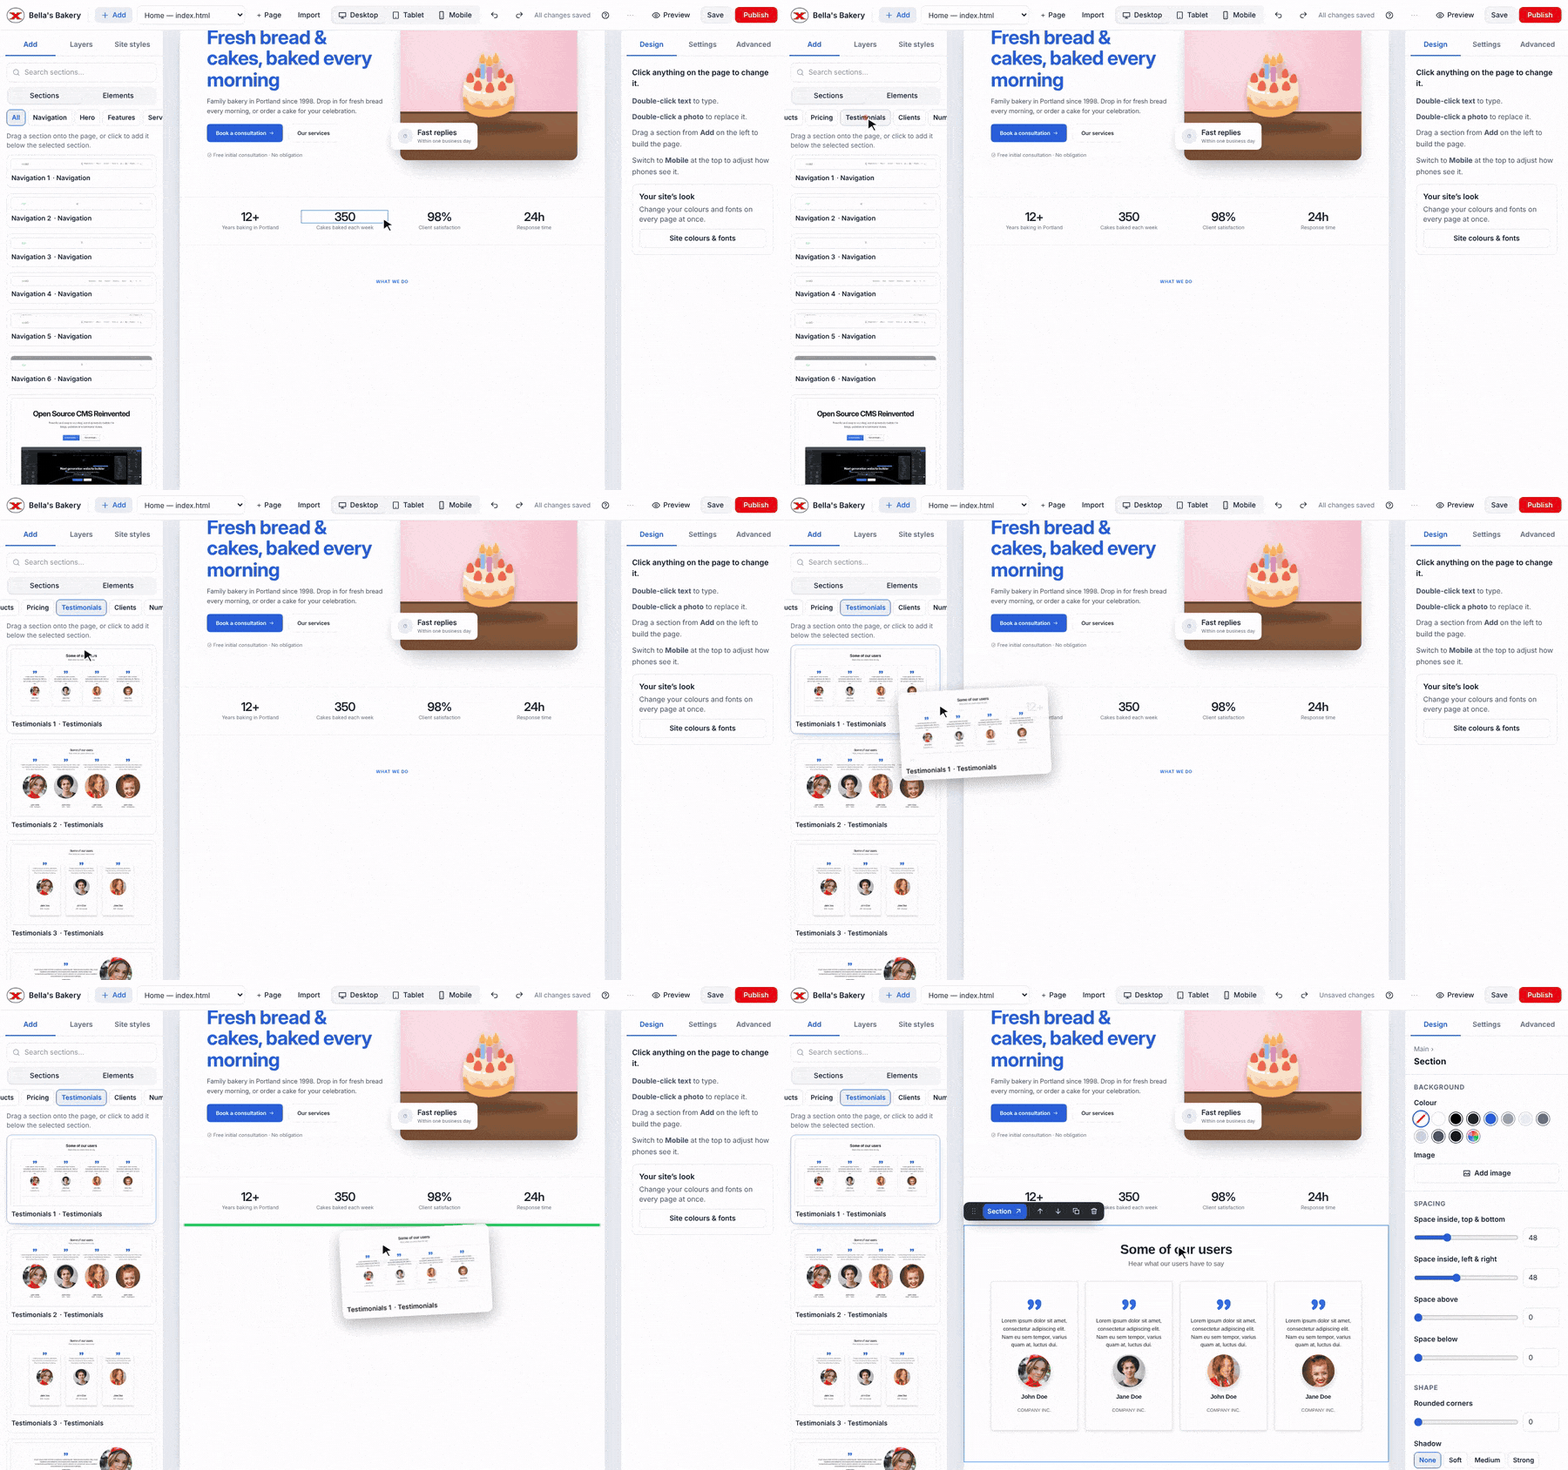
Dragging a Testimonials section onto the page
Open Add on the left (click Add in the toolbar if the panel is hidden).
Under Sections, pick a type like Hero, Pricing or Testimonials, or search for one.
Click a section to add it below the one you've selected (or at the end of the page). Or drag it onto the page, and a green line shows where it will land.
The new section is selected and scrolled into view, ready for your text and pictures.
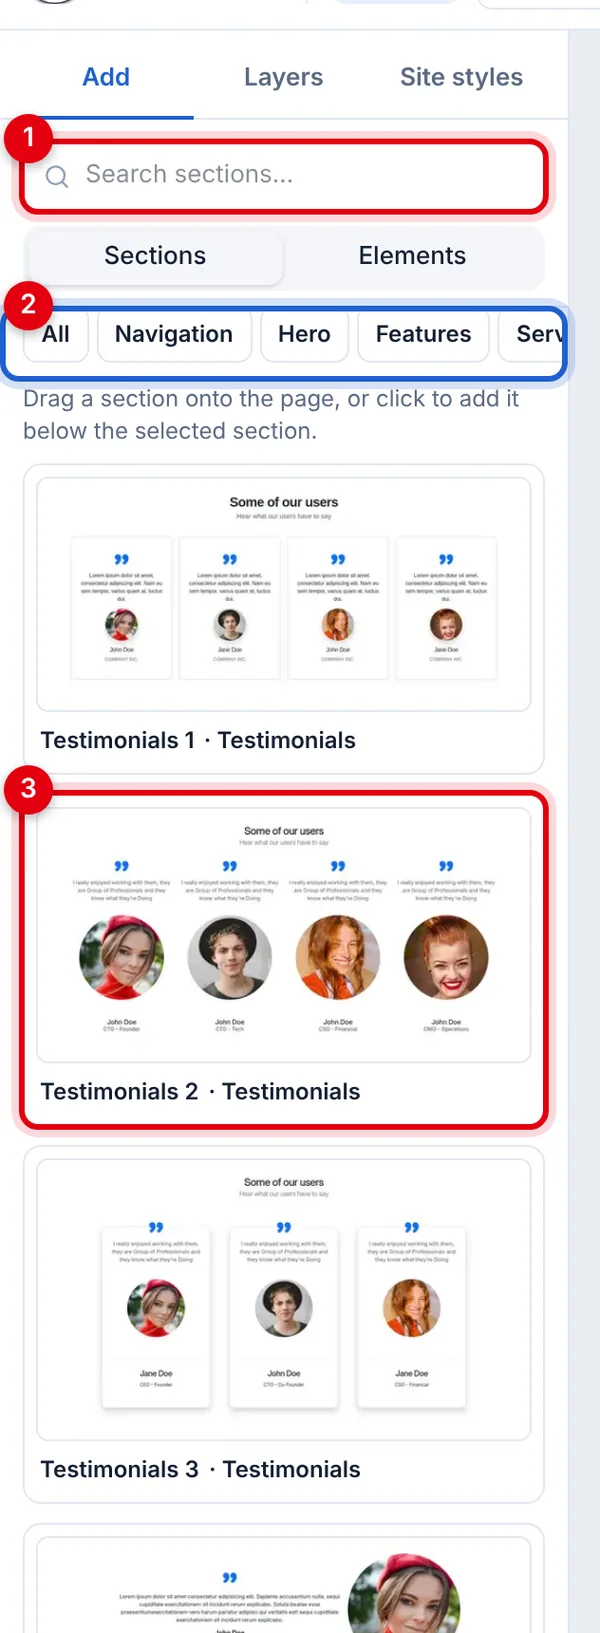
Sections in the Add panel
Search sections by name or type.
Section types: All, Navigation, Hero, Features, Pricing, Testimonials, FAQ, Footer and more.
A picture of each section, so you can see it before you add it.
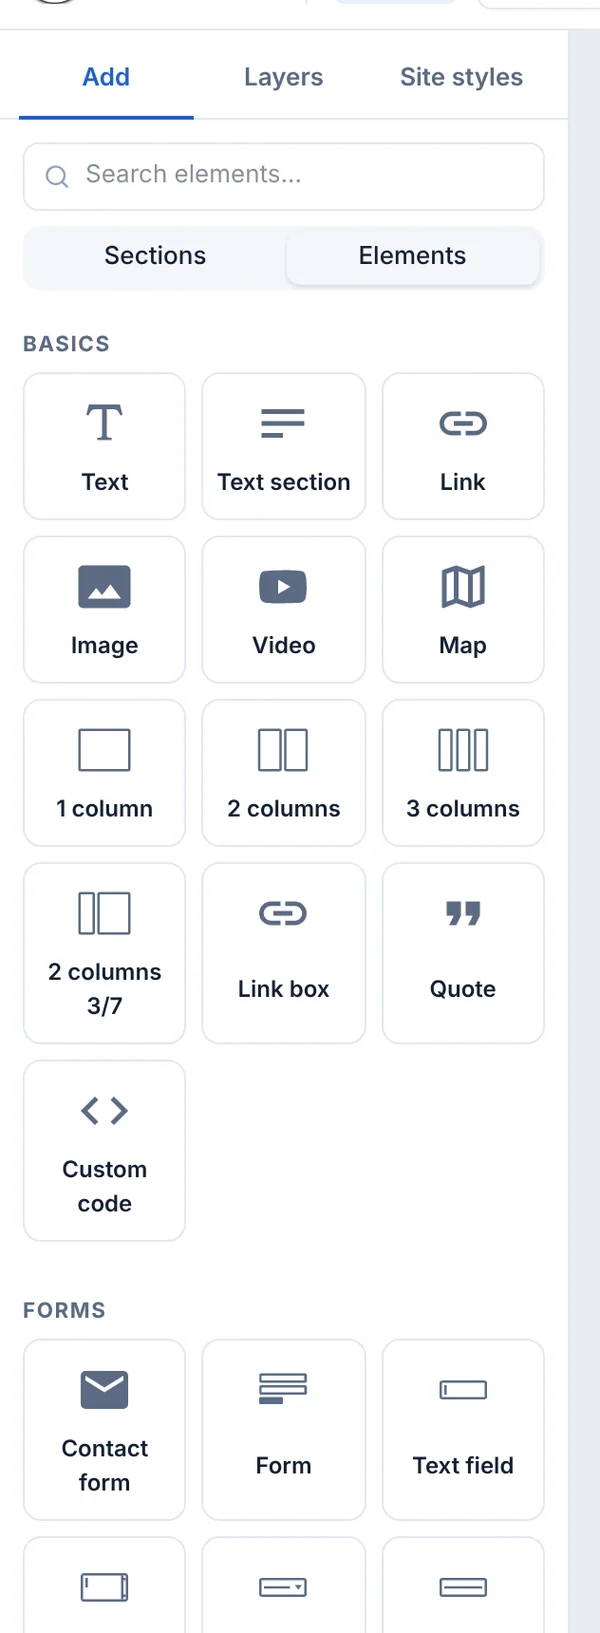
Elements
Switch to Elements for single pieces you can put anywhere:
Drag an element into a column or section to put it inside it, and watch the green line.
Tips
To move a section, select it and use Move up and Move down on its toolbar. Or drag the handle on the left of the toolbar, or drag it in Layers.
To duplicate a section you've already styled, select it and click Duplicate.
The Custom code element takes embed code from other services, such as booking widgets, maps and social feeds. It runs on the published site, not in the editor, so use Preview to see it working.
2.3 Changing styles (colours, fonts, spacing)
Use the Design panel to change how anything looks, and how to style just the mobile version.
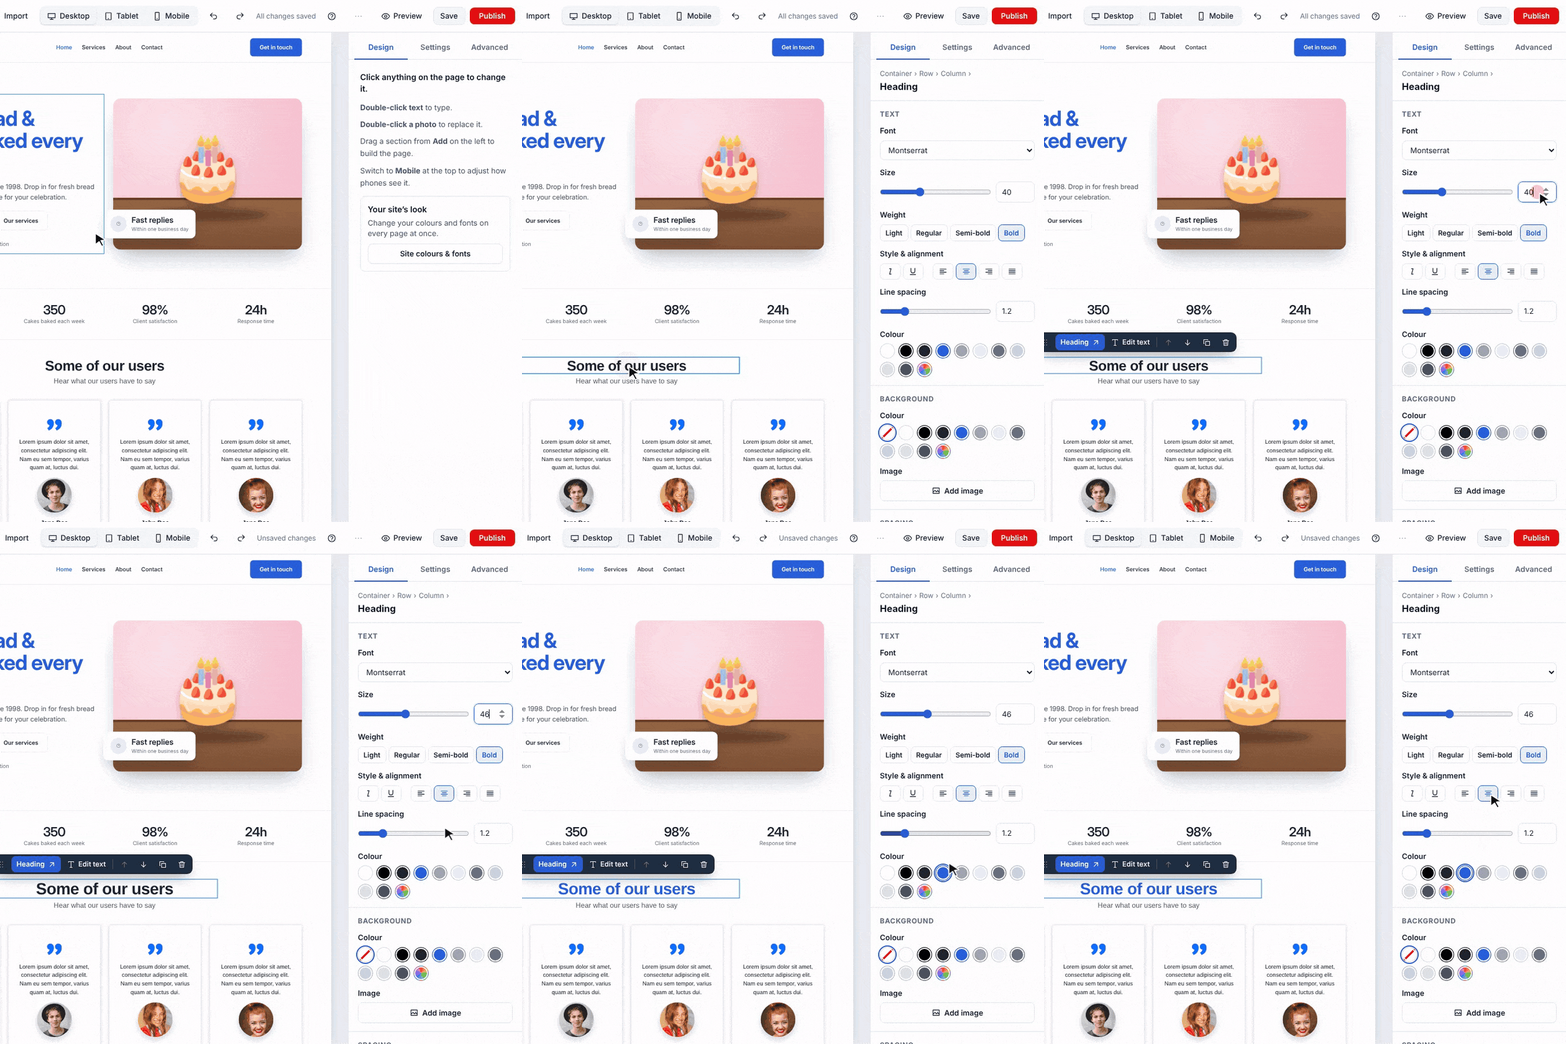
Changing a heading's size and colour
Click the item you want to change.
In Design on the right, change what you like. Changes show straight away.
The Design panel for a heading
What's selected, and the items around it. Click one to select it instead.
Text: font, size, weight, style, alignment, line spacing and colour.
Background: a colour or a picture.
Further down are Spacing, Shape (rounded corners and shadow) and Visibility. For a link or button there's Link too, and for a picture, Image.
The colour circles are the colours your page already uses, so everything stays on-brand. The rainbow circle picks any other colour.
Where to find things
To change…
In Design, open
Text font, size, colour, alignment
Text
Background colour or picture
Background
Space inside or around an item
Spacing
Rounded corners, shadow
Shape
Where a link or button goes
Link
Hide something on phones
Visibility
To change the colours or fonts on every page at once, use Site colours and fonts instead.
Advanced
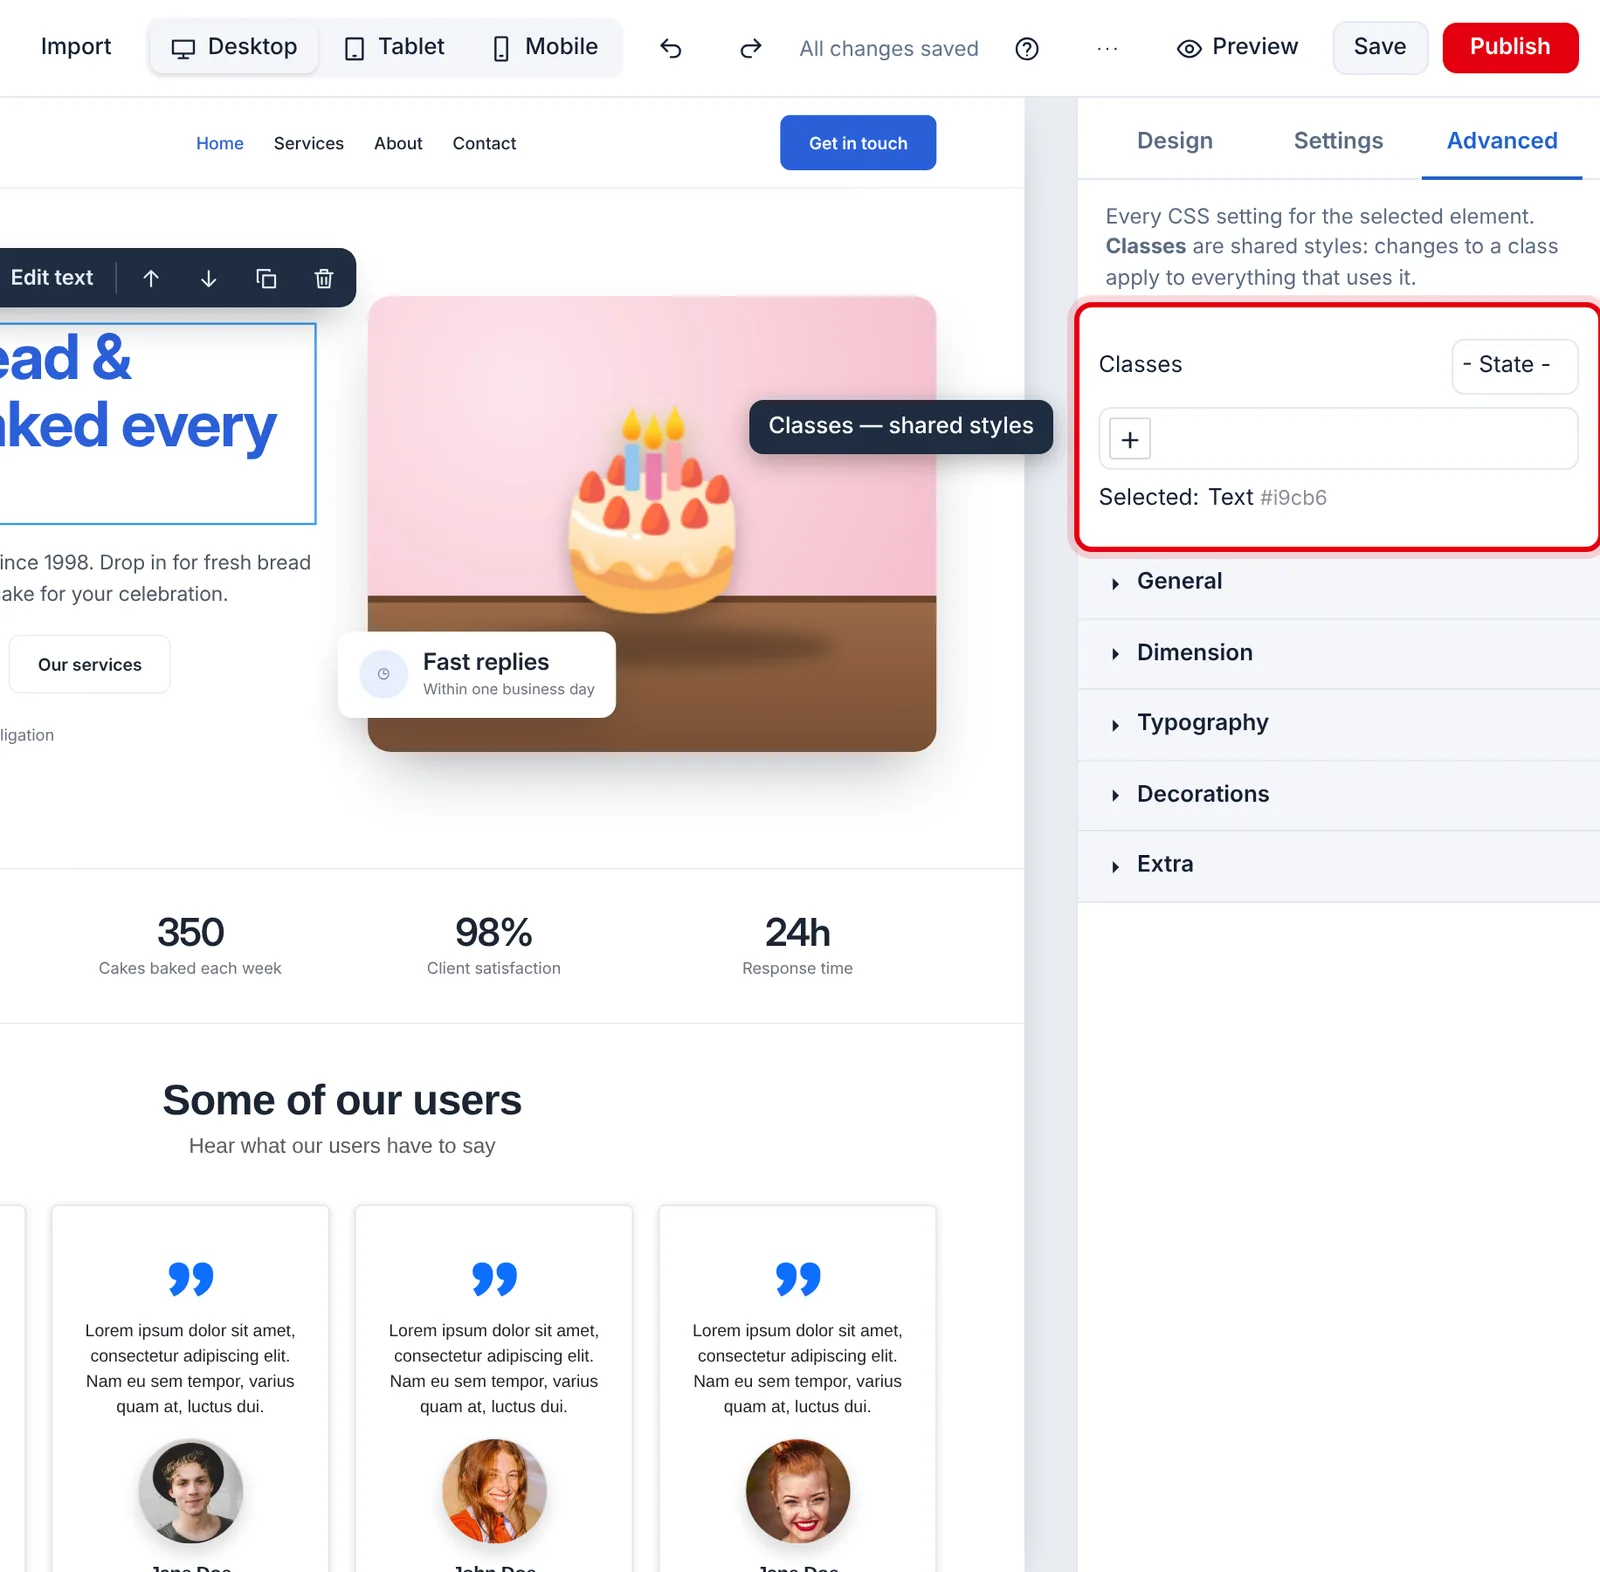
The Advanced tab
Advanced has every style setting there is (sizes, borders, positions, flex layouts and more) for when Design doesn't have what you need.
At the top are the item's classes: shared style names. While they're ticked, a change you make in Advanced applies to every item that shares them, which is handy for making all your buttons match. To change just this one item, untick the classes first. (Design always changes just the item you've selected.)
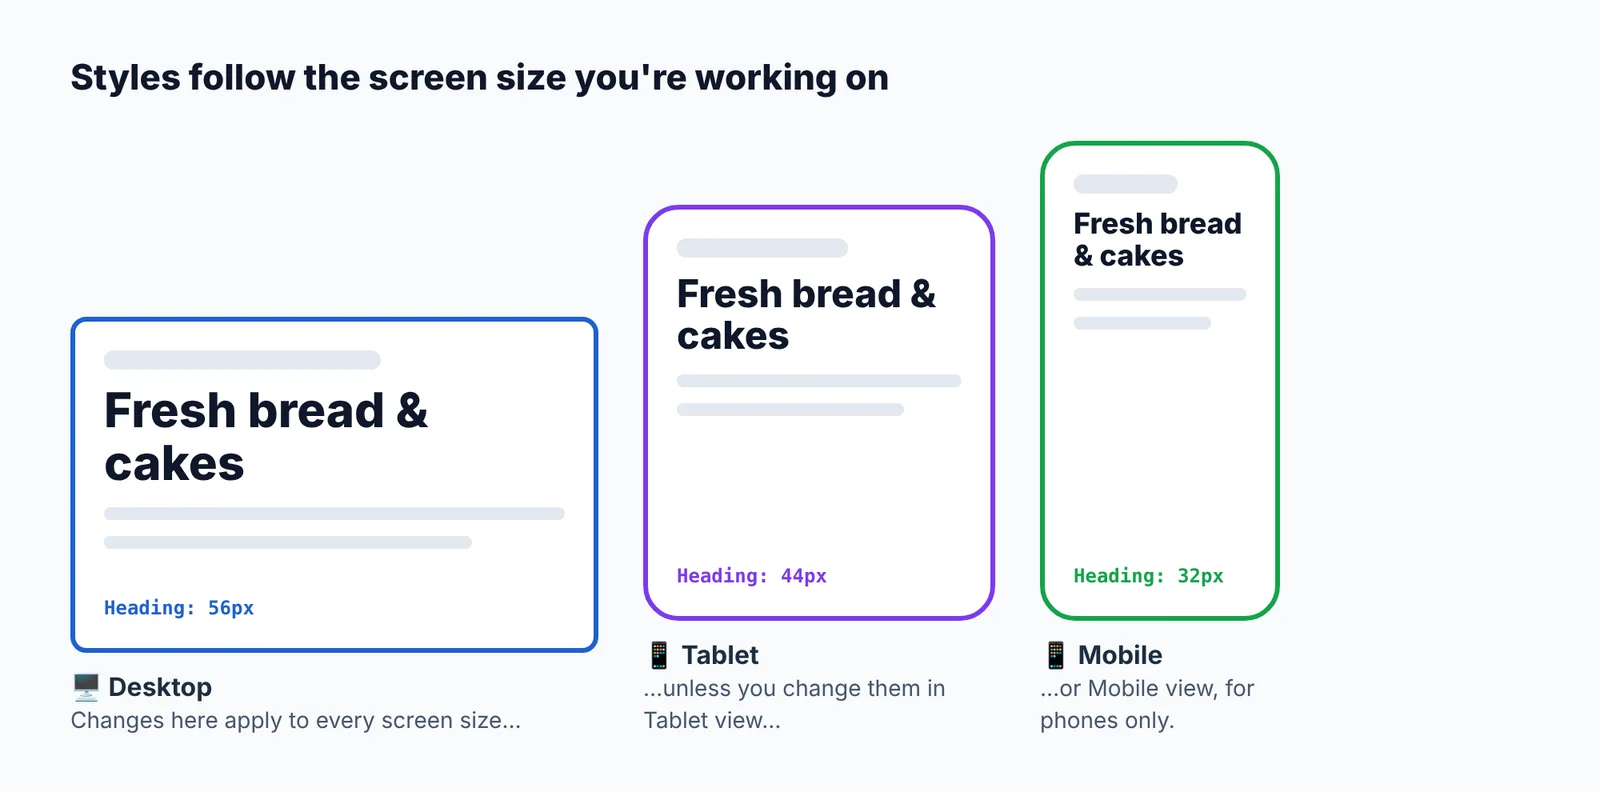
Phones and tablets
Styles follow the screen size you're looking at:
Desktop styles apply everywhere unless Tablet or Mobile changes them
So if a heading is too big on phones, click Mobile, select it, and make it smaller there. The desktop version stays as it is. See Mobile and tablet views.
2.4 Images, videos and your media library
Replace pictures, upload your own photos, and set background images.
Replace a picture
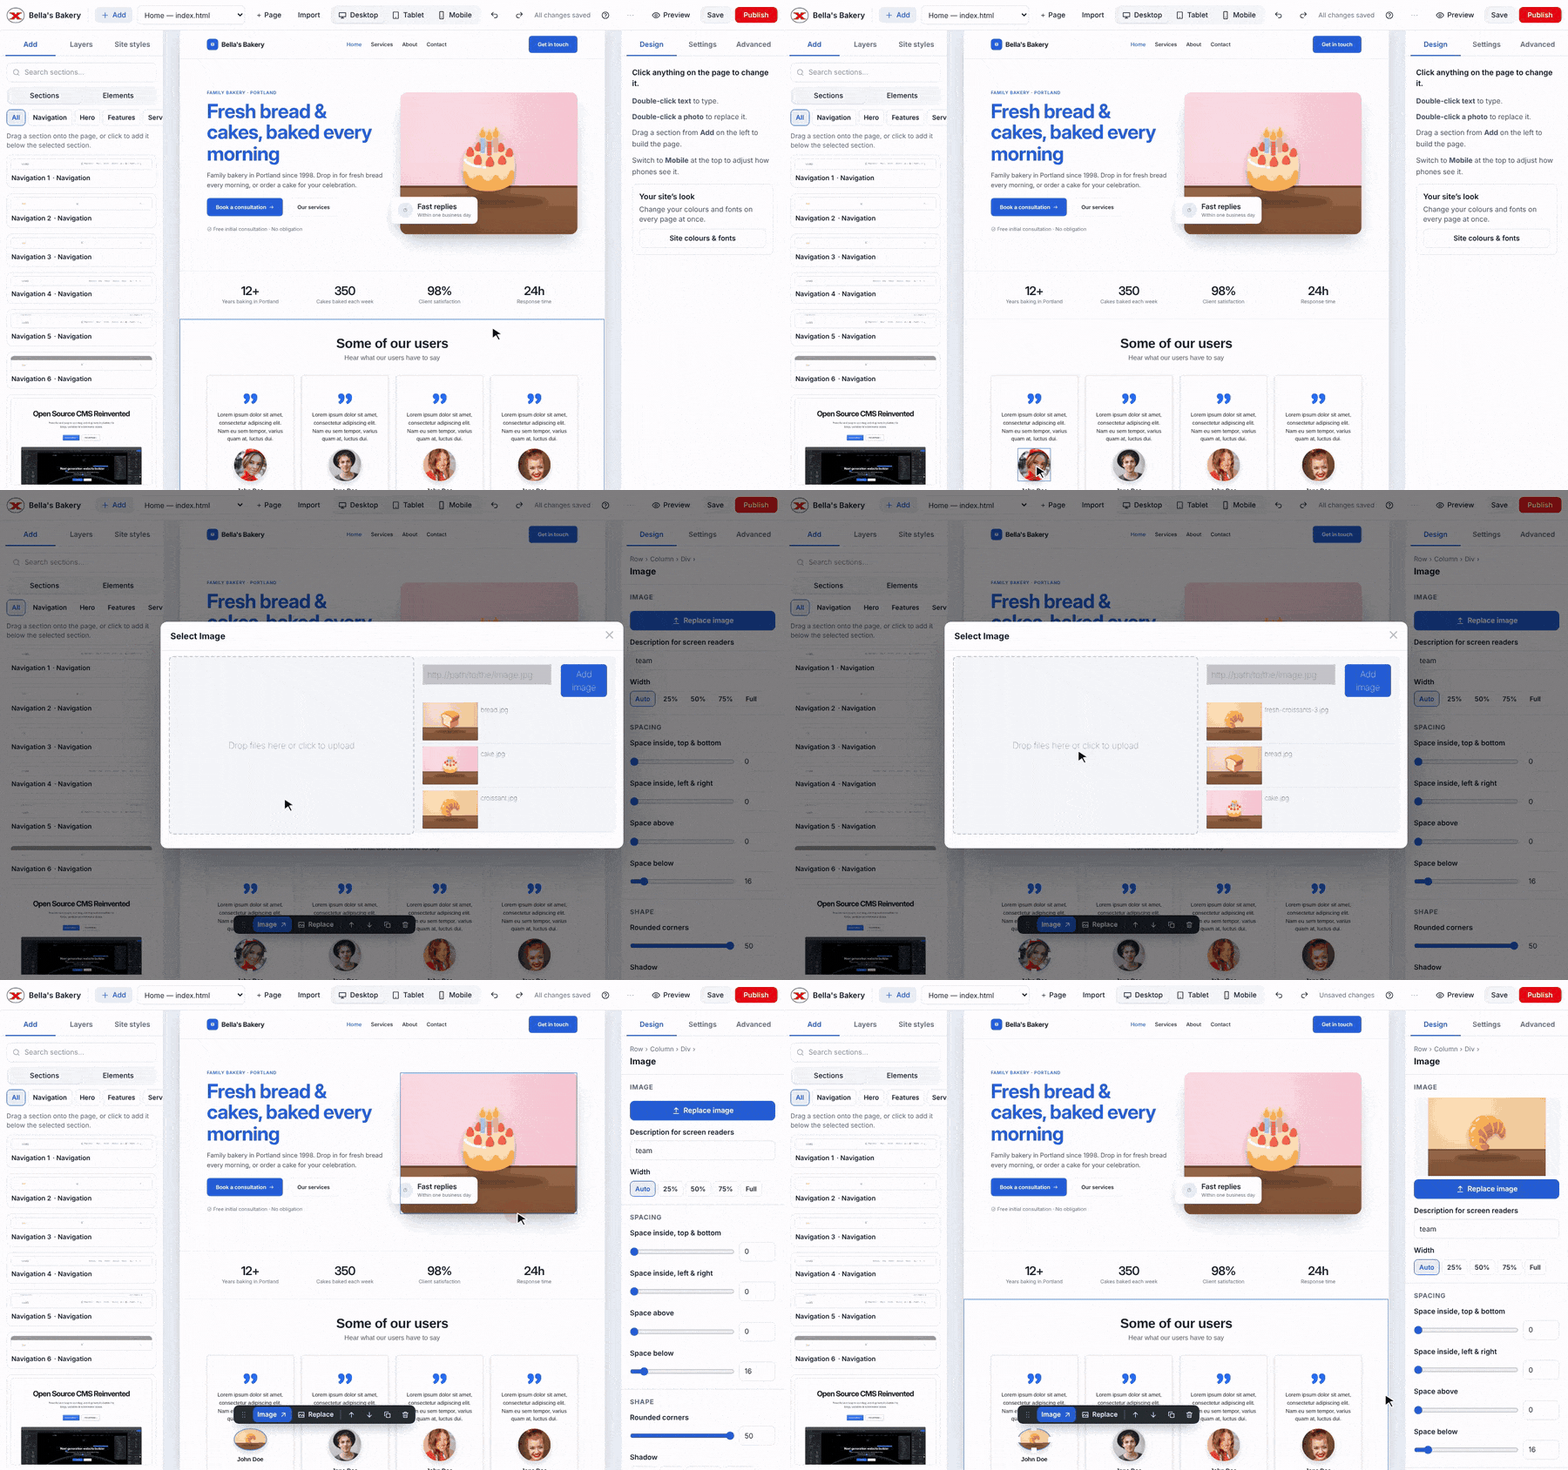
Double-click a picture, upload, double-click to use it
Double-click the picture on the page (or select it and click Replace on its toolbar). Your media library opens.
Drop photos onto the upload area (or click it to choose files).
Double-click the photo you want to use.
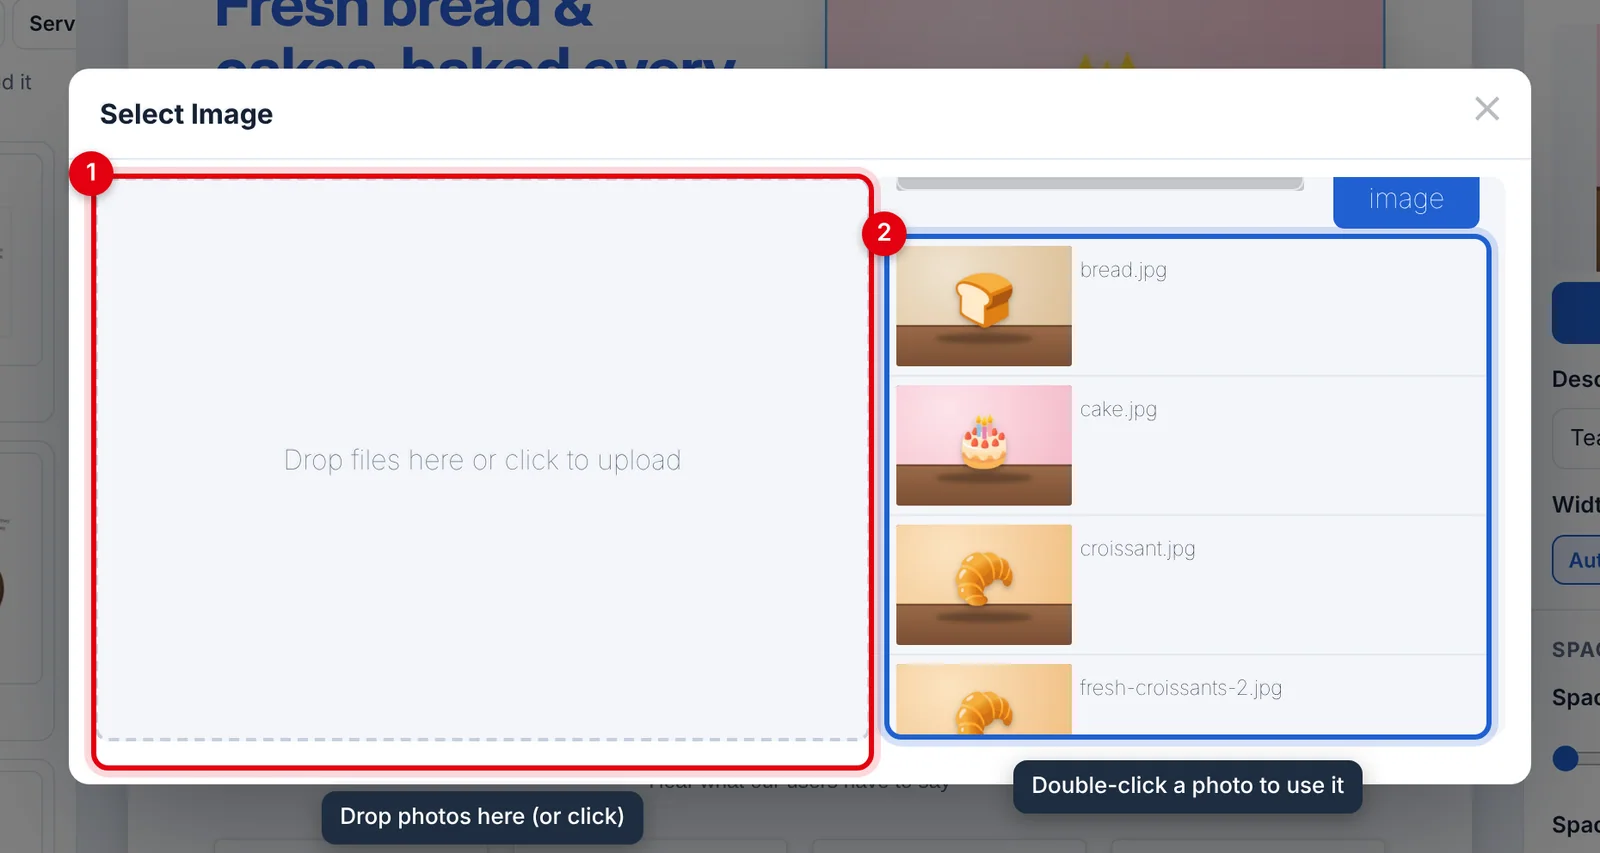
The media library
The upload area.
Your site's photos — reuse them on any page of the site.
JPG, PNG, GIF, WebP and SVG pictures, MP4 and WebM videos, audio and fonts are all fine.
Big photos slow your site down. For most websites, photos about 2000 pixels wide and under 500 KB look great. Free tools like Squoosh or TinyPNG can shrink them.
Background images
Many sections use a background picture rather than a normal one. Select the section and, in Design → Background, click Add image (or Change image). Remove takes it away again.
Picture descriptions (alt text)
Select a picture and fill in Description for screen readers in Design → Image. It also helps search engines understand the picture.
Video
Add Video from Add → Elements, then open Settings on the right to choose an uploaded video or paste a YouTube or Vimeo link.
2.5 Adding and managing pages
Add pages, switch between them, link them together, and delete the ones you don't need.
Add a page
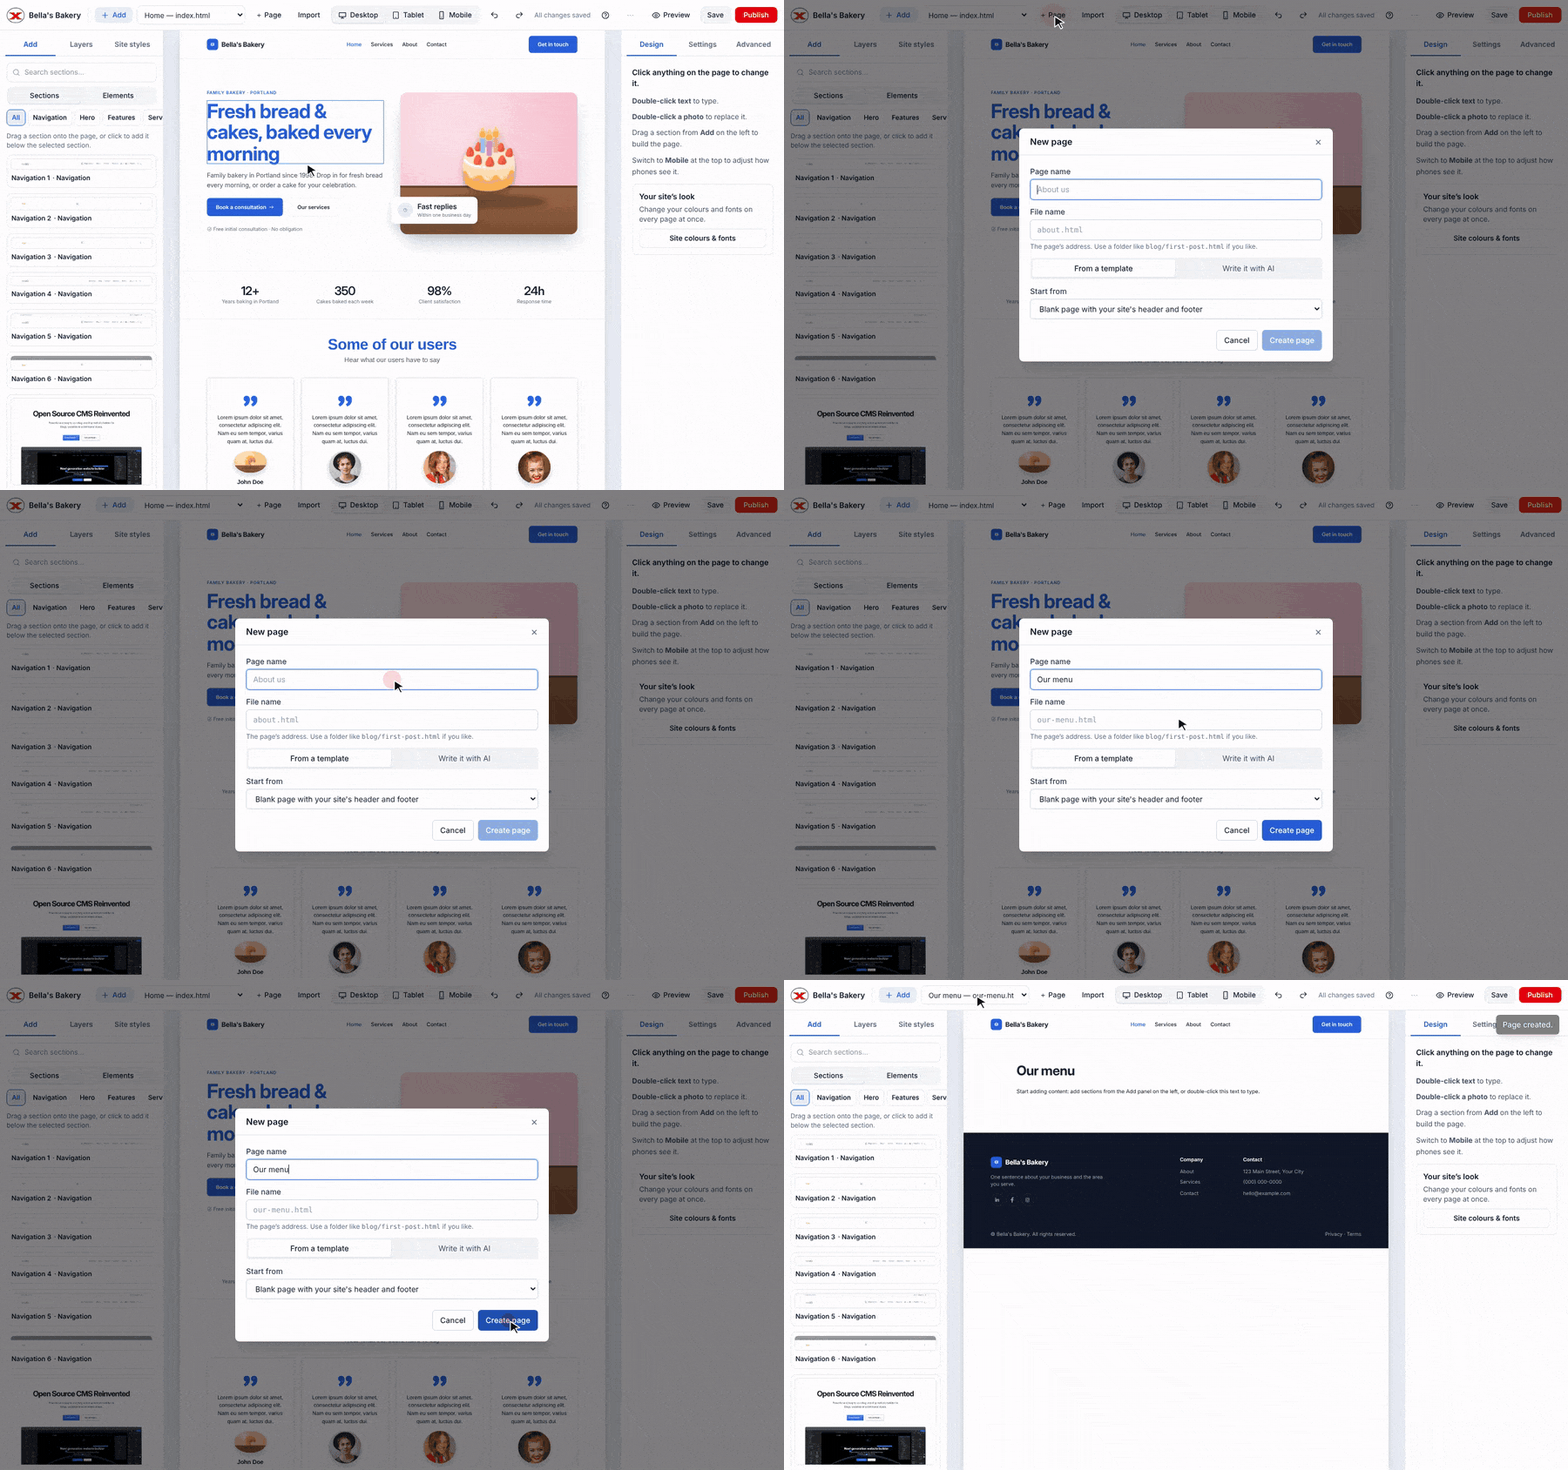
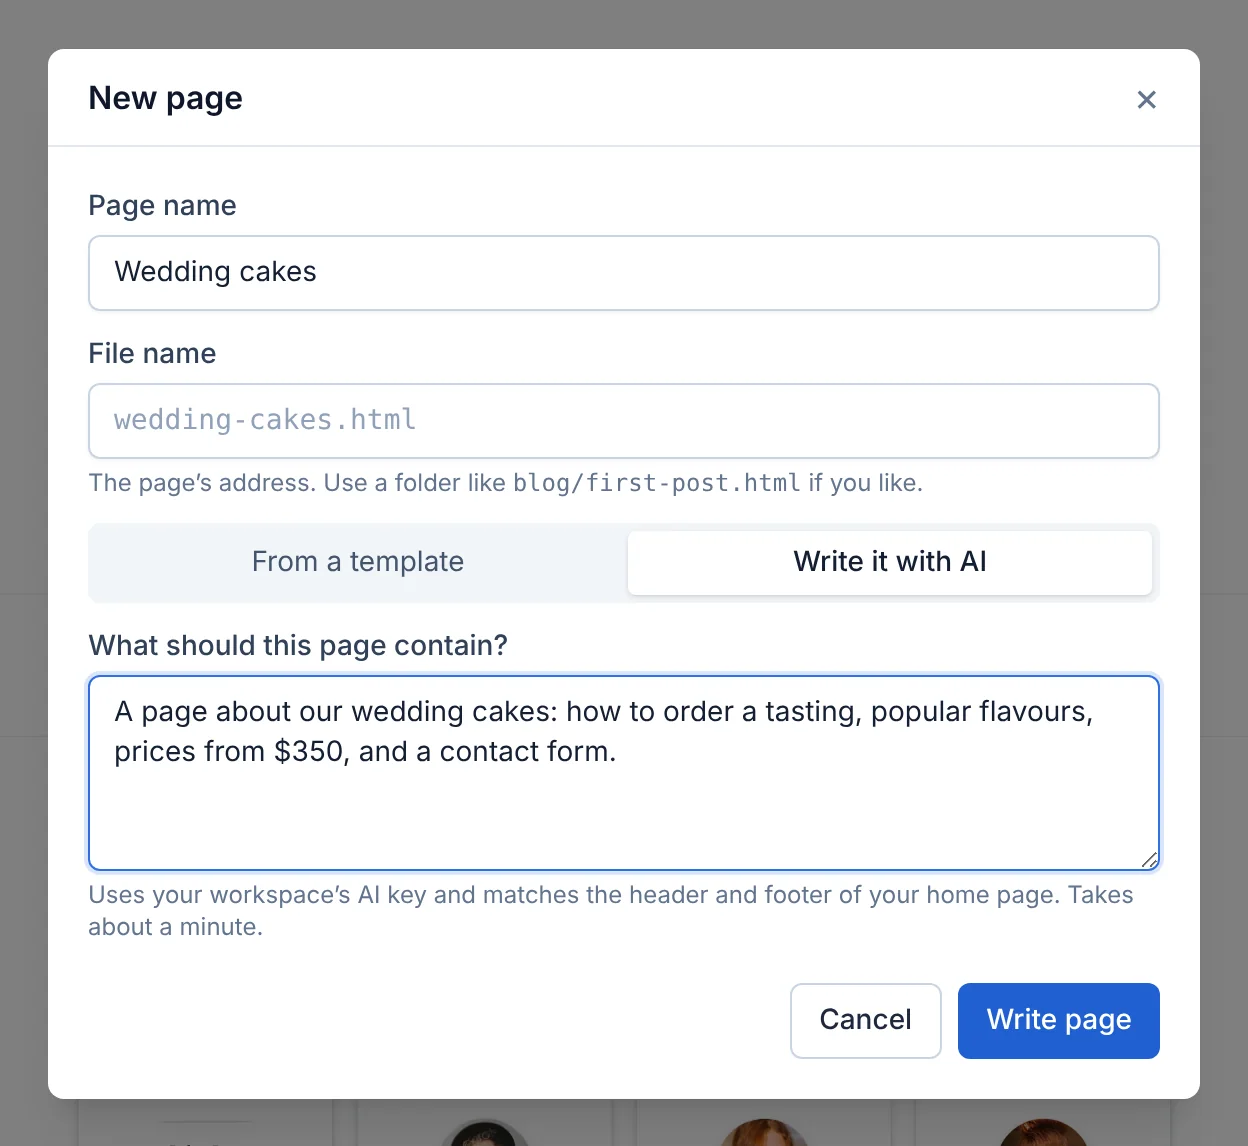
Adding a page called “Our menu”
In the editor, click + Page.
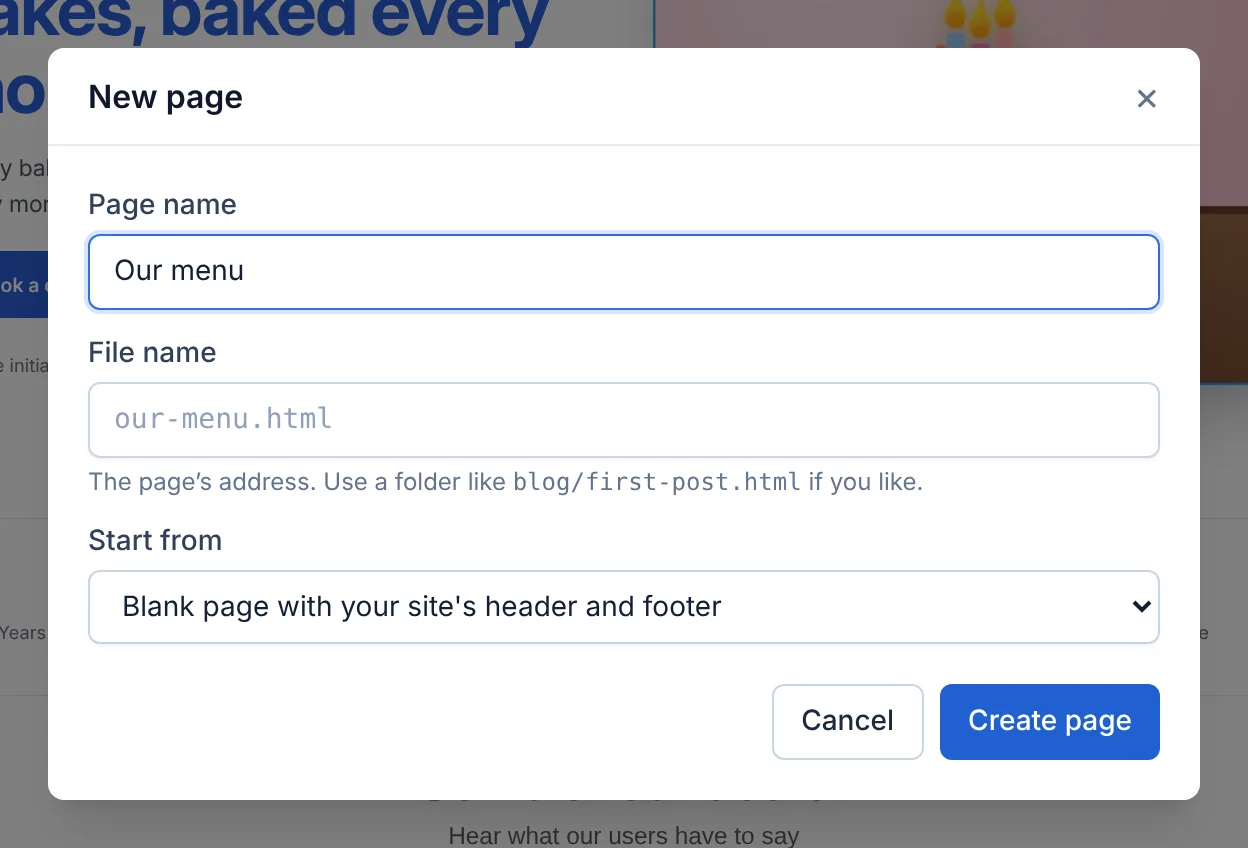
Page name — what you call it, e.g. "Our menu".
File name — the page's web address. Leave it blank to make one from the name (our-menu.html), or use folders, like blog/first-post.html.
Start from — the first option, Blank page with your site's header and footer, gives you an empty page that already matches the rest of your site. You can also start from a template, or write it with AI.
Click Create page.
The New page window
Switch pages
Use the page menu at the top left of the editor. Unsaved changes are saved before switching.
Link pages together
Pointing a button at the Contact page
Select the link or button (or select some text and click the link button on the text toolbar).
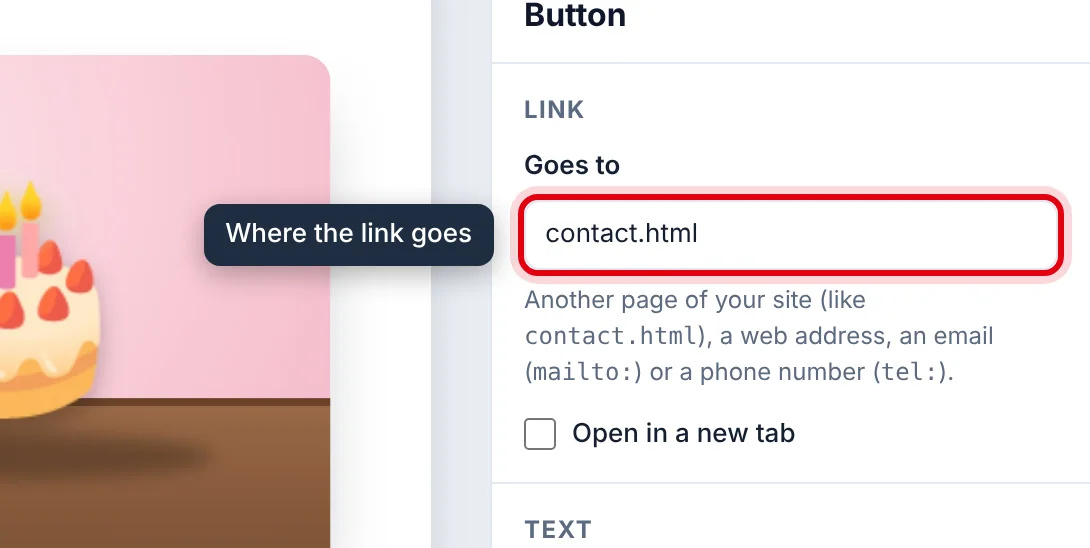
In Design → Link, type the page's file name, e.g. contact.html (or index.html for the home page), and press Enter.
The Link setting in the Design panel
To link to another website, type its full address starting with https://, and tick Open in a new tab if you like.
Check and adjust how your pages look on phones and tablets.
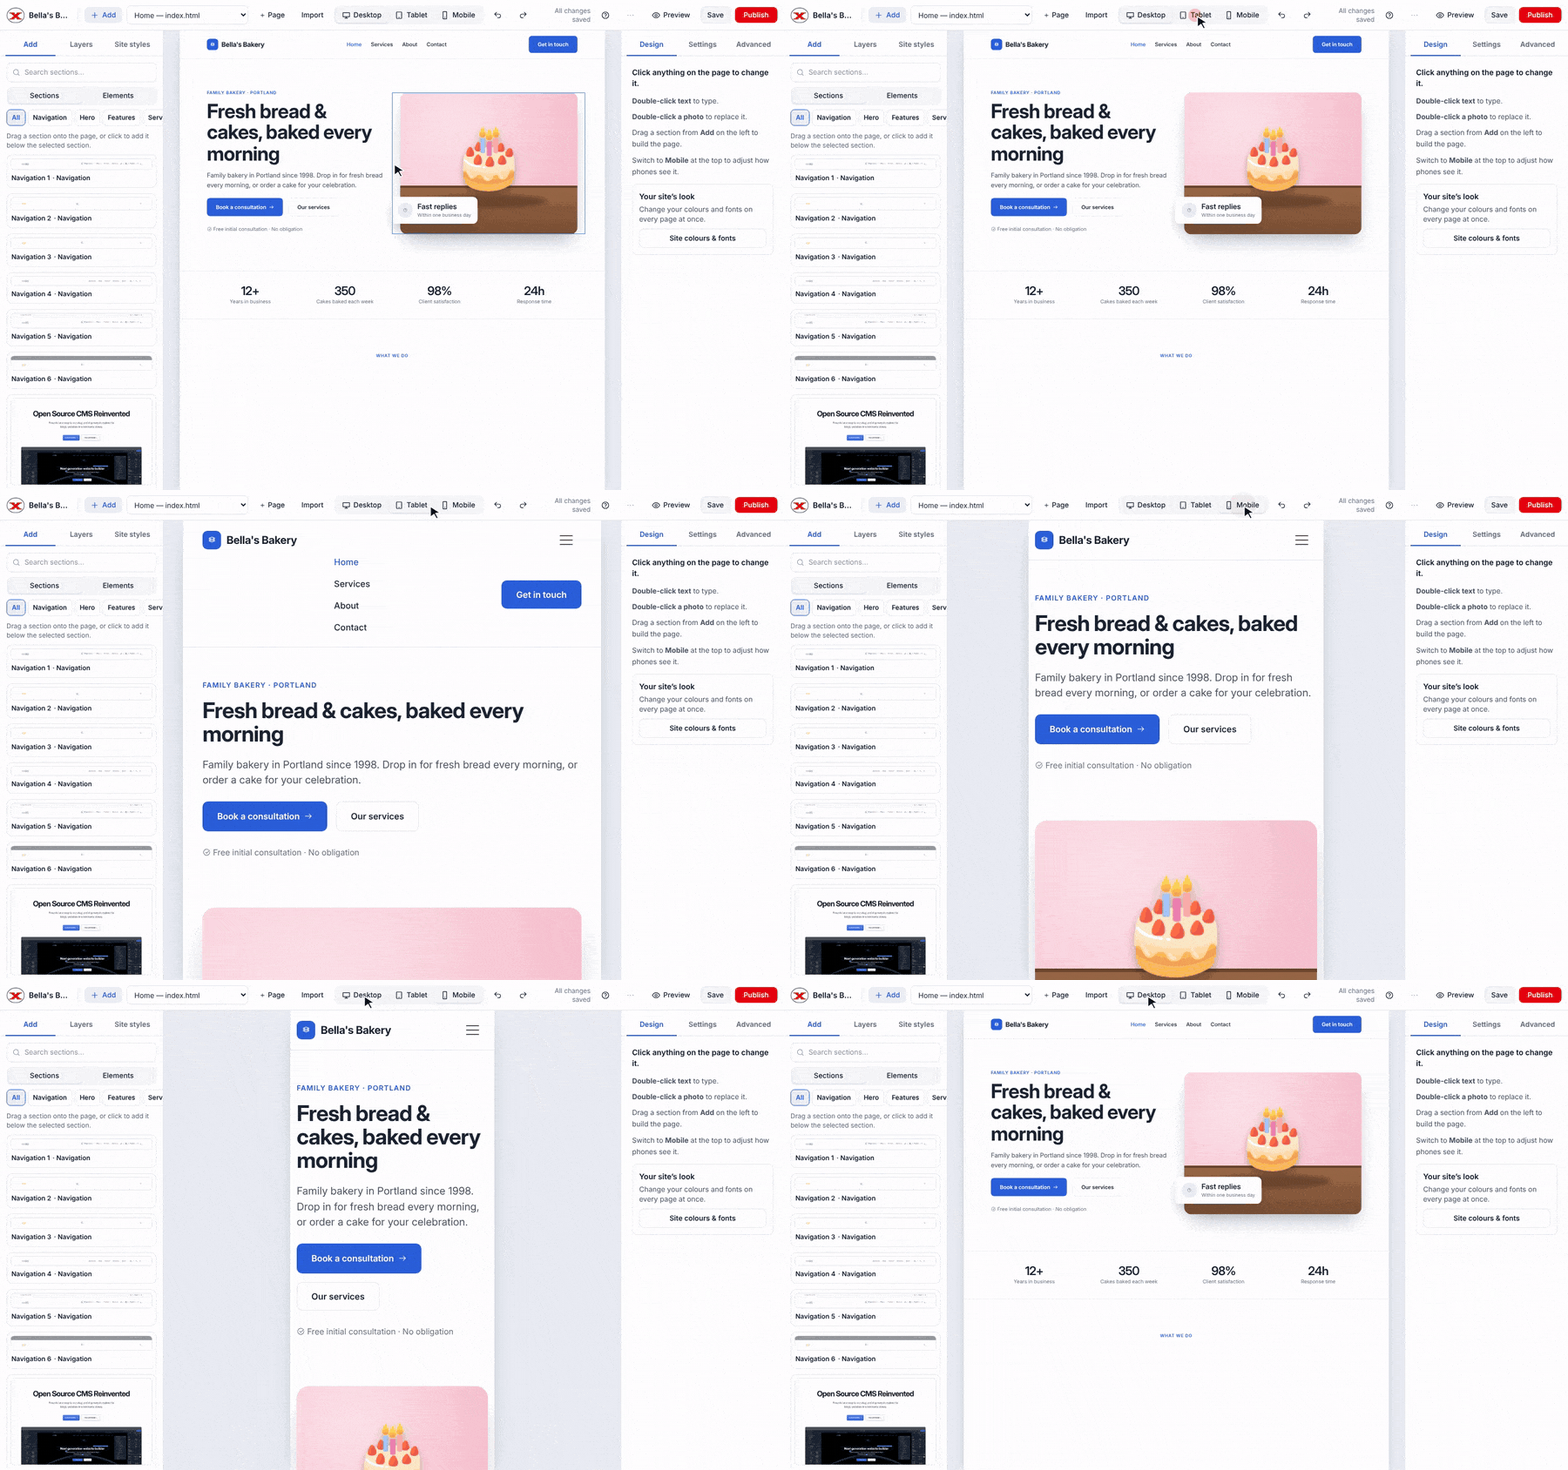
Switching between Desktop, Tablet and Mobile
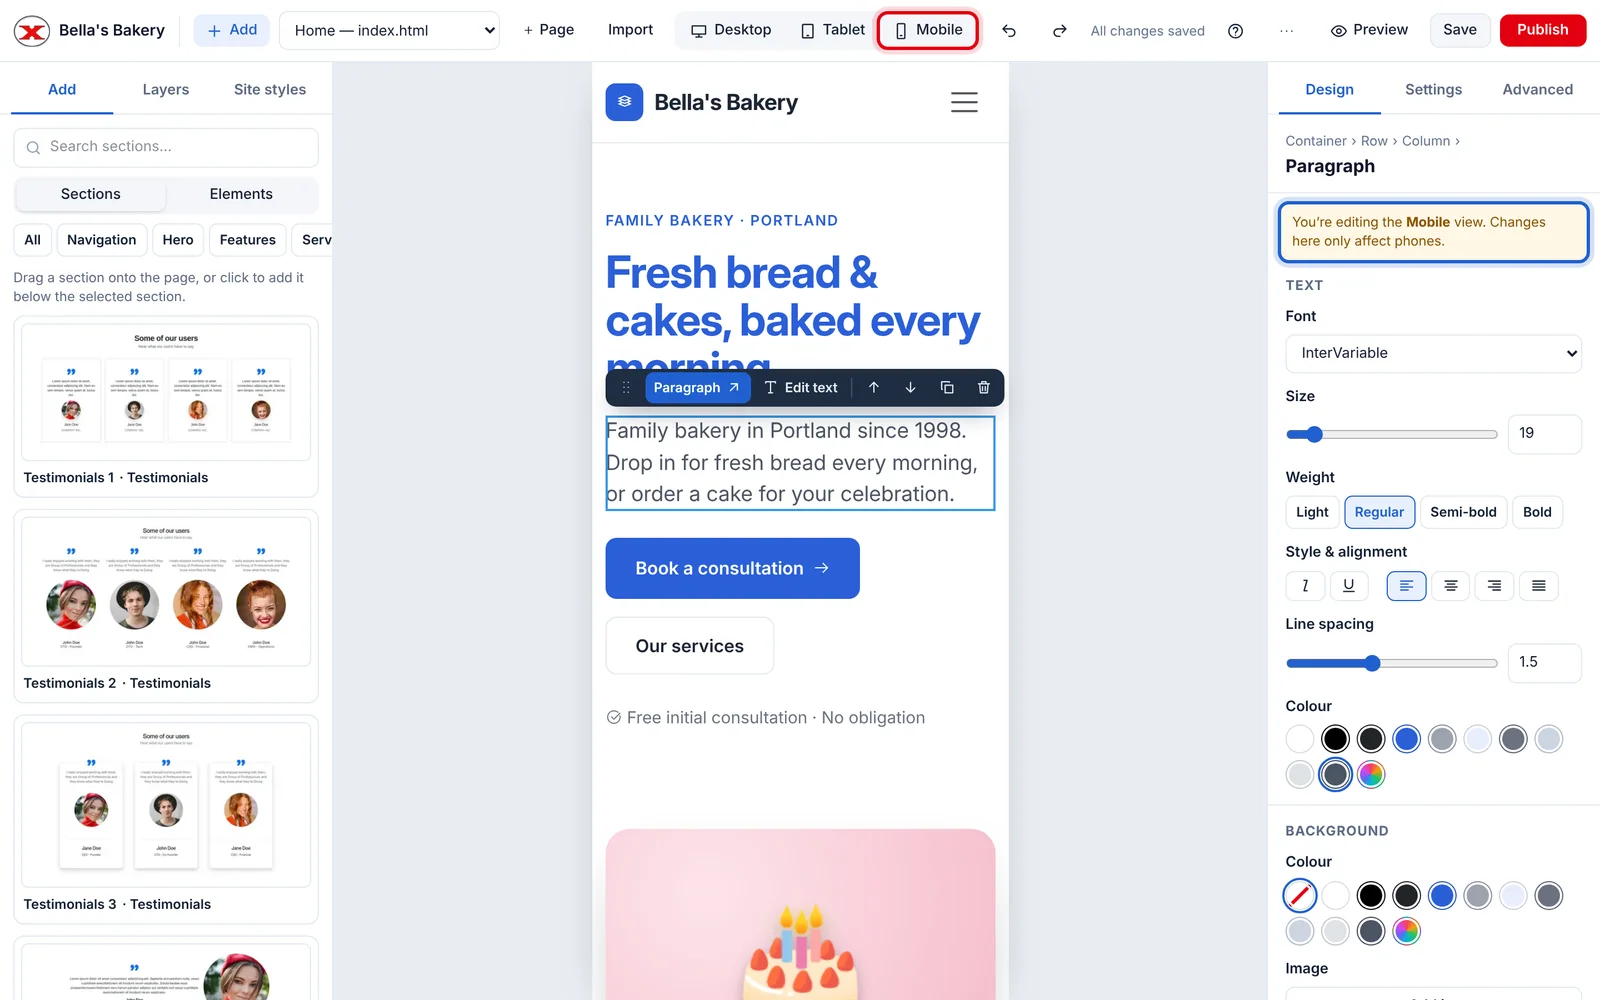
Use Desktop, Tablet and Mobile in the middle of the editor toolbar. The page is shown at that screen width, just as a visitor's device would show it.
Mobile view
Fixing things on mobile
Most templates already adapt to small screens. If something looks wrong on a phone:
Click Mobile.
Select the item that looks wrong.
Change it in Design, for example a smaller text size or less spacing. The panel reminds you that you're changing the Mobile view.
Changes made in Mobile view only apply to phones; the desktop design isn't affected. The same goes for Tablet.
Styles follow the screen size you're working on
Hiding something on phones
Click Mobile, select the item, and tick Hide on phones under Design → Visibility. It stays visible on bigger screens. Hidden items can still be found, and selected, in Layers.
Checking on a real phone
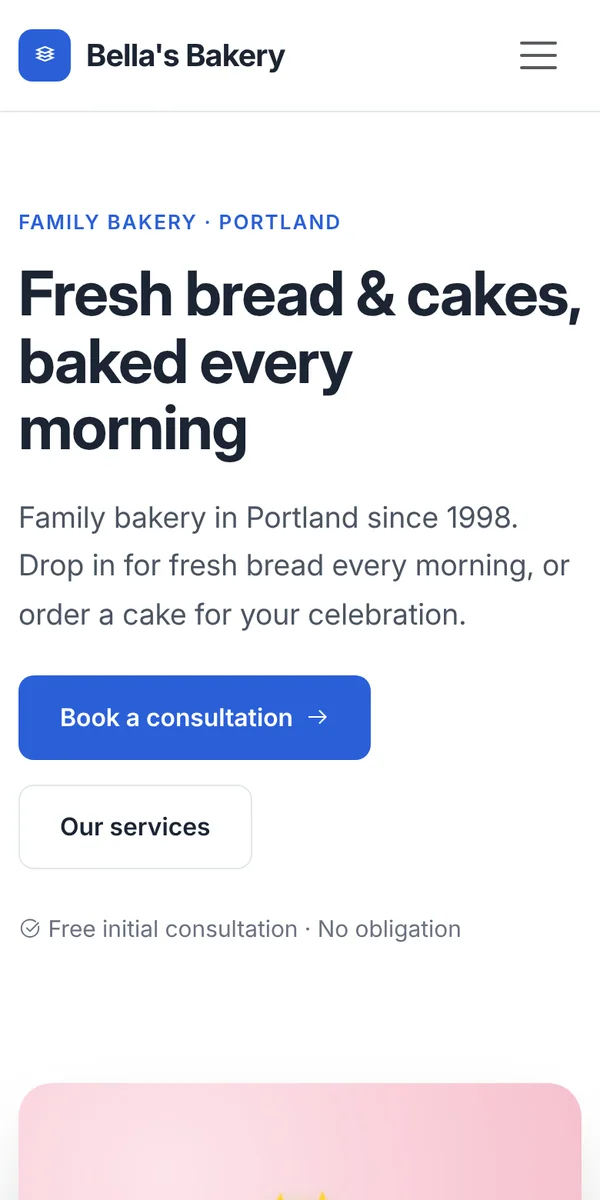
Publish, then open your site on your phone:
The live site on a phone
2.7 Saving, autosave and version history
How your work is saved, and how to go back to an earlier version of a page.
Autosave
The editor saves your work a few seconds after you stop making changes. Keep an eye on the status in the toolbar, next to undo and redo:
Save failed — check your internet connection, then click Save.
You can save any time with Save or Ctrl/⌘ + S. If you try to close the tab with unsaved changes, your browser warns you.
Saving never changes your live site — only Publish does. See Publishing your site.
Version history
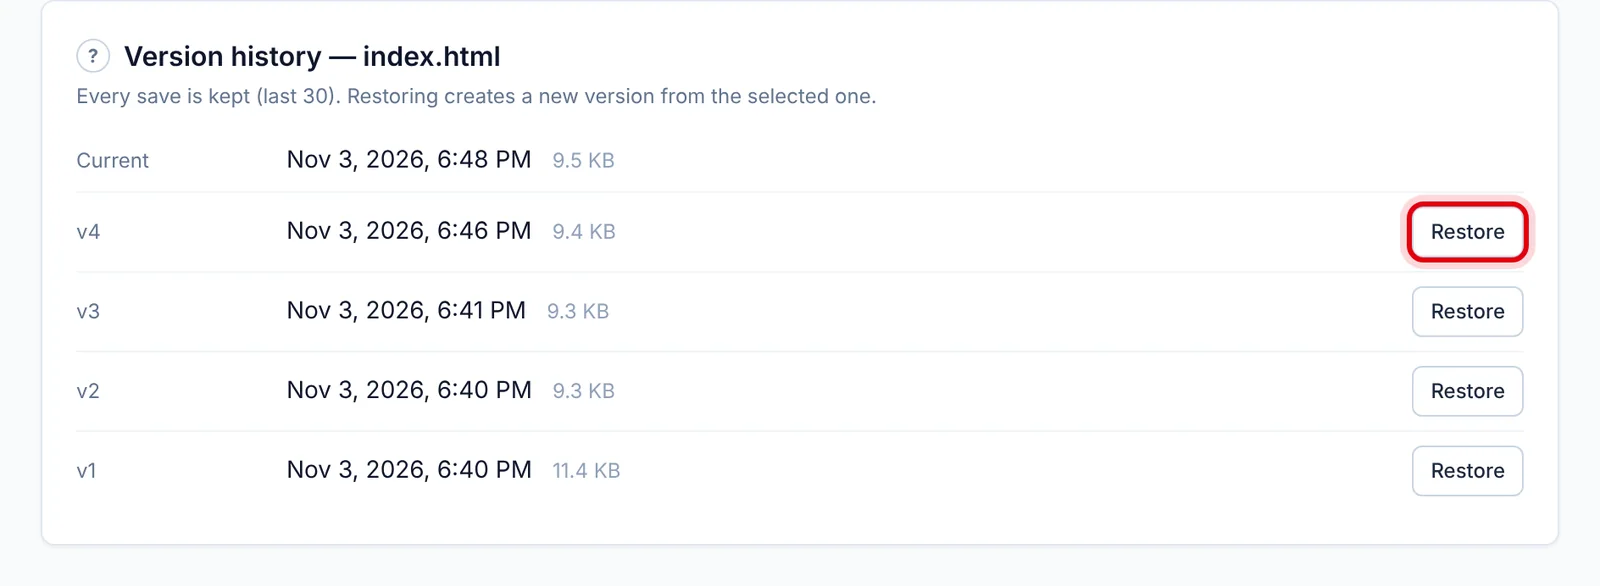
Each page keeps its last 30 saved versions.
Go to the site's page (Manage).
Click History next to the page.
Click Restore next to the version you want.
Version history for the home page
The restored version becomes your current draft — nothing is lost, the version you replaced stays in the list. Publish when you're happy with it.
2.8 Previewing your pages
See exactly what visitors will see before you publish.
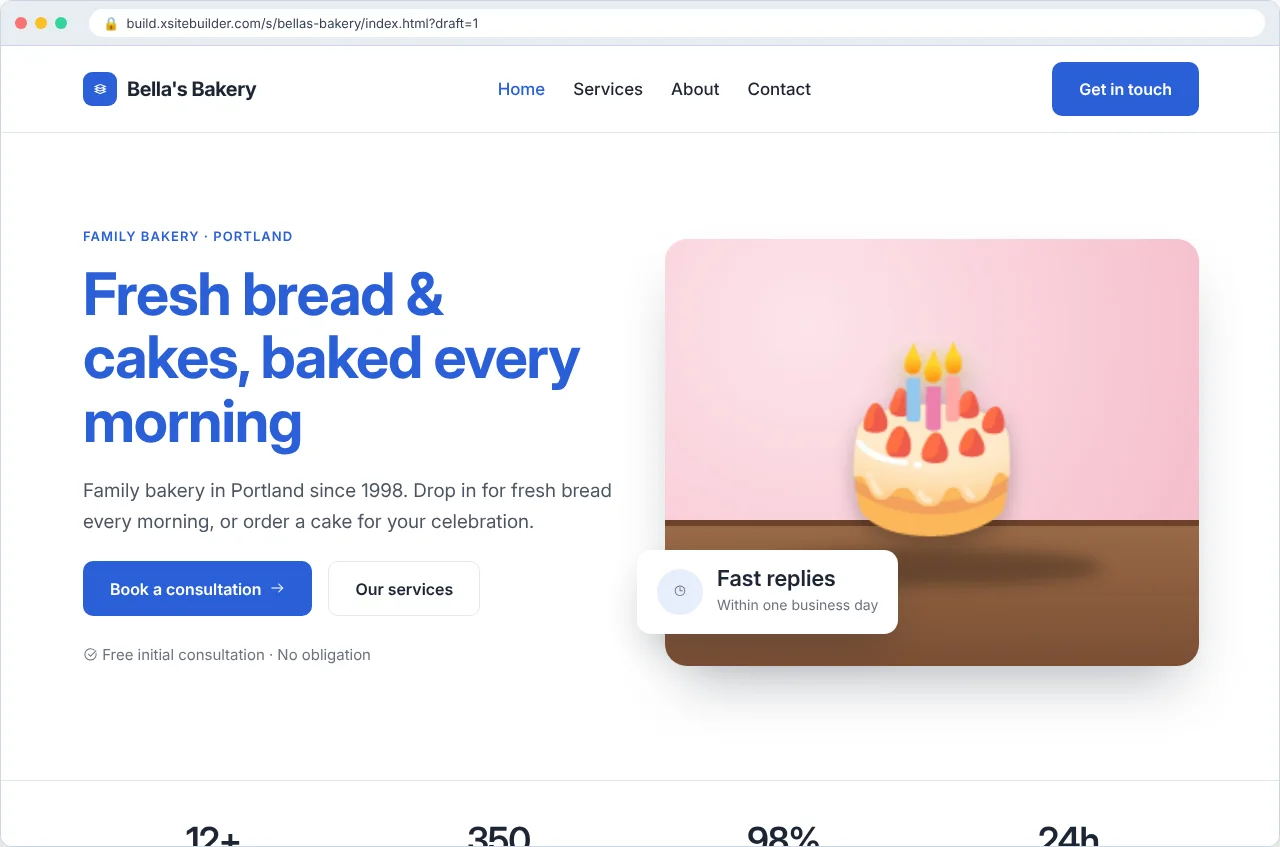
Click Preview in the editor toolbar. Your latest changes are saved and the page opens in a new tab, just as a visitor would see it — with menus, sliders, animations and embedded widgets working.
A draft preview in a new tab
You can also click Preview next to any page on the site's page (Manage).
Previews show your draft, and only people signed in to your workspace can open them. To show someone else, publish the site.
Why does the preview look different from the editor?
Change a colour everywhere it's used, or pick new fonts, on every page of your site at once.
Changing the main colour of a site
In the editor, open Site styles on the left. (With nothing selected, the Site colours & fonts button on the right opens it too.)
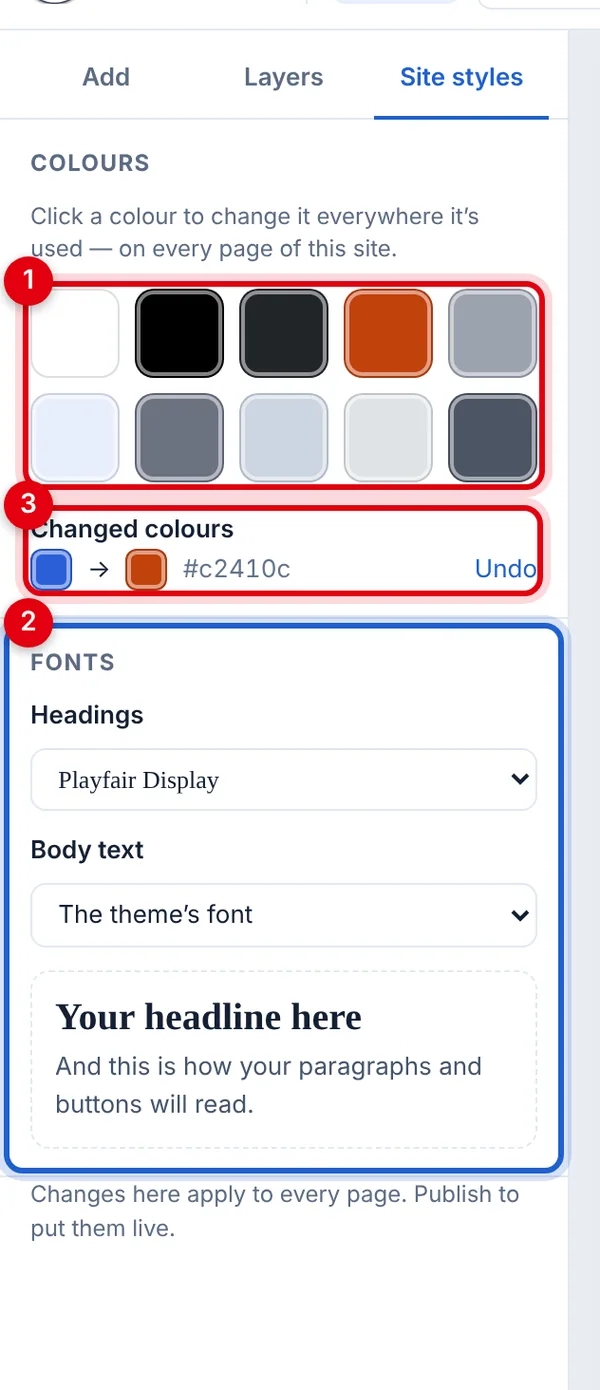
Site styles
Colours: the colours your site uses most.
Fonts: one for headings and one for body text.
Changed colours: what you've changed, with Undo.
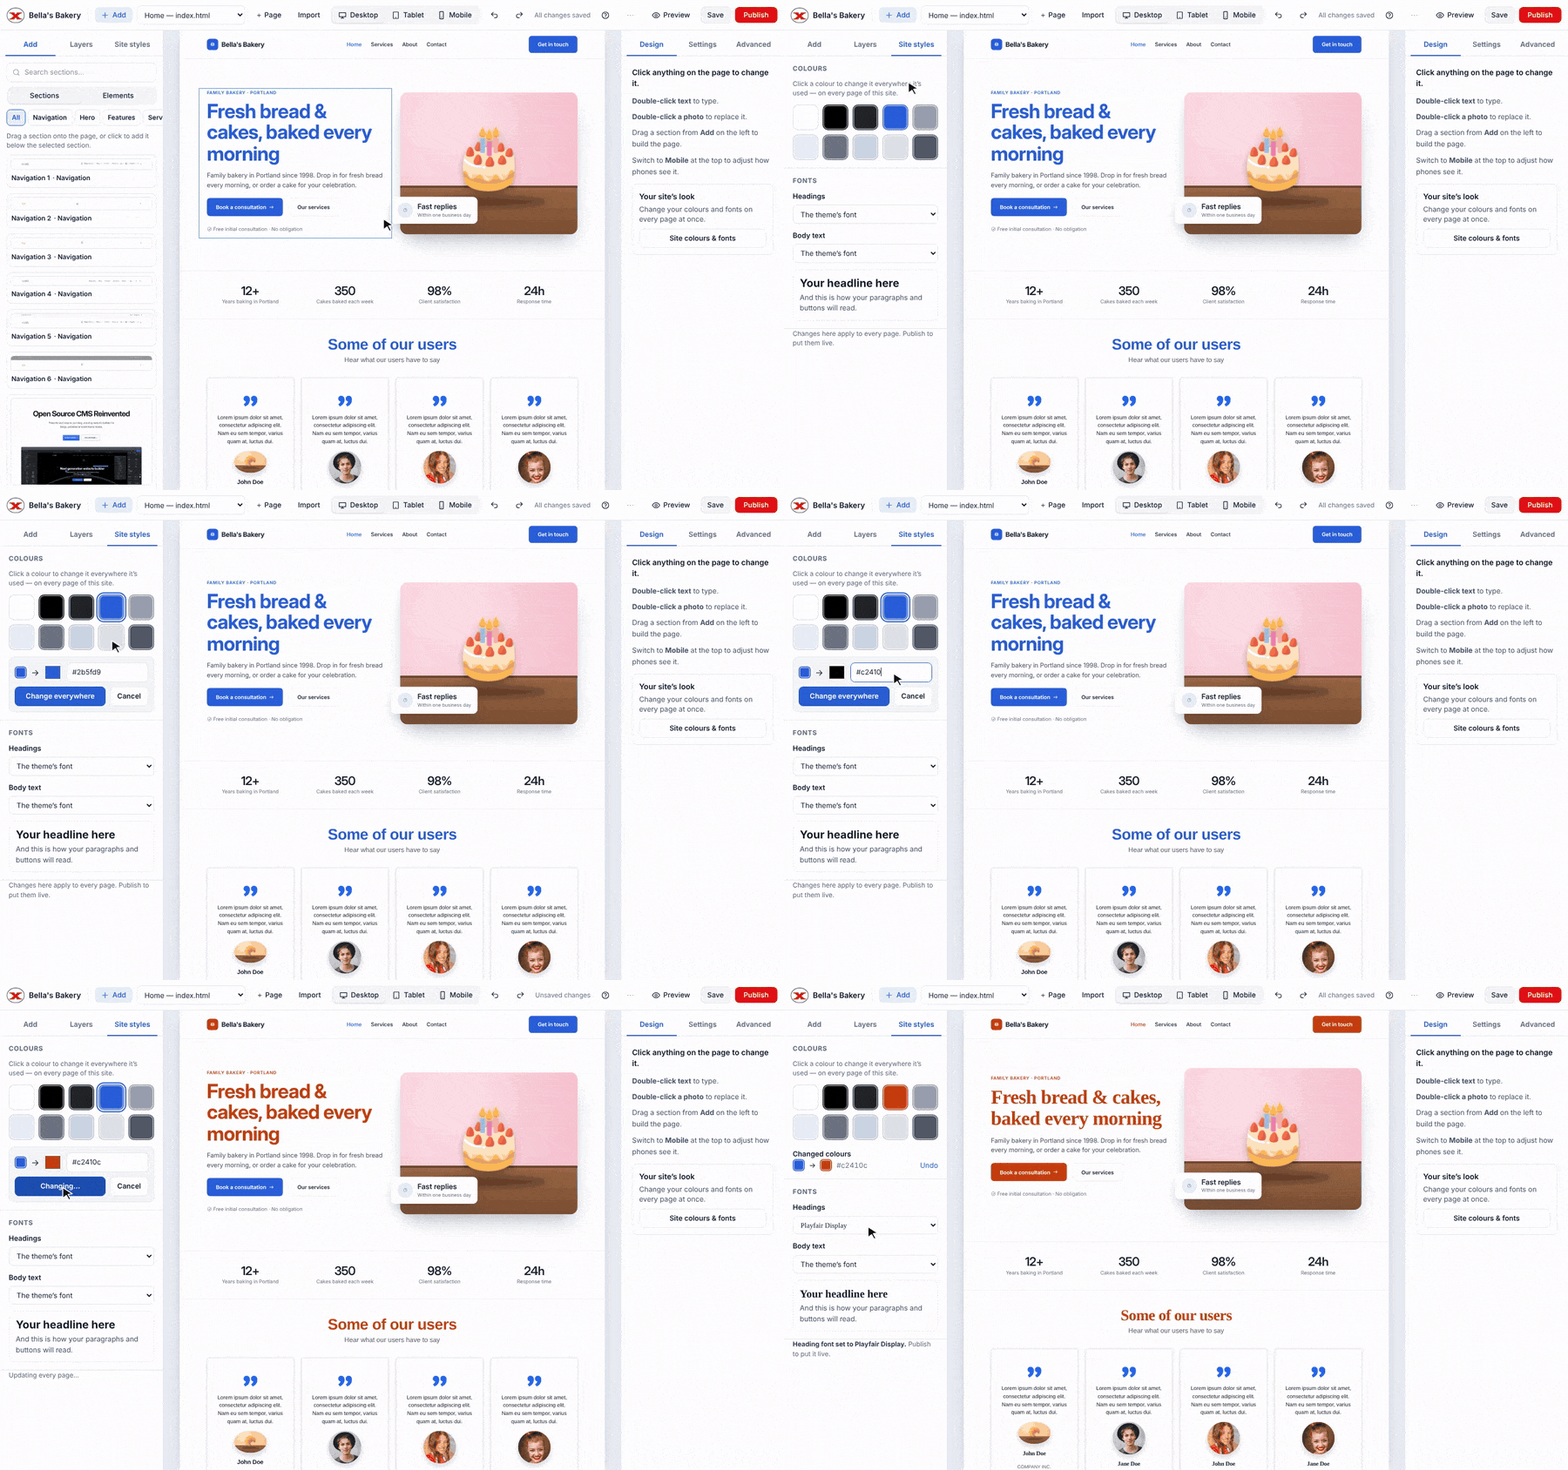
Change a colour everywhere
Click the colour you want to change, for example your brand blue.
Pick the new colour, or type its code (like #16a34a).
Click Change everywhere.
Every button, heading, link and background that used the old colour now uses the new one, on every page of the site. To go back, click Undo next to it under Changed colours.
Fonts
Choose a font for Headings and one for Body text (paragraphs, menus and buttons). There's a preview underneath. Choose The theme's font to go back to the original.
Good to know
Changes save straight away and show on every page in the editor and in Preview. Your live site changes when you Publish.
Anything you styled on a single item yourself (in Design or Advanced) keeps its own colour and font.
Restoring an older version of a page from its history keeps your current site colours and fonts.
3. Templates & importing
3.1 Starting from a template
Pick a ready-made design for a new site or a new page.
For a new site
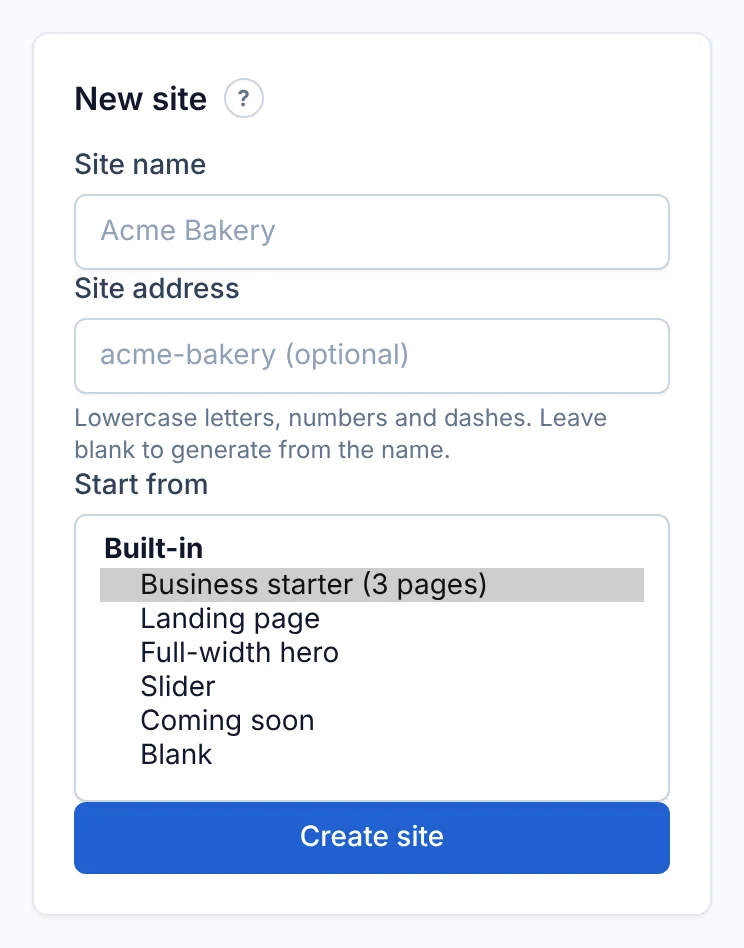
On the Sites page, the New site card has a Start from menu:
The templates you can start a site from
Templates are grouped by category. Those with more than one page say so, e.g. "(3 pages)" — all of those pages are created for you.
For a new page
In the editor, click + Page and choose from Start from:
The New page window
The first choice, Blank page with your site's header and footer, matches the rest of your site. Other templates also get your site's header and footer automatically, so every page looks like it belongs.
Making a template your own
A template is just a starting point — everything can be changed: text, pictures, colours, fonts and the order of sections. Delete the sections you don't need and add new ones from Add. To change the colours and fonts of the whole site, use Site colours and fonts. See Editor basics.
3.2 Importing an HTML page or a .zip
Bring in a site or HTML template you already have, with its images, CSS and fonts.
You can import:
A single .html page (up to 10 MB).
A .zip of a whole website or an HTML template you've bought — up to 1 GB. Pages, CSS, JavaScript, images and fonts keep their folder structure, so links between them keep working.
From the site's page
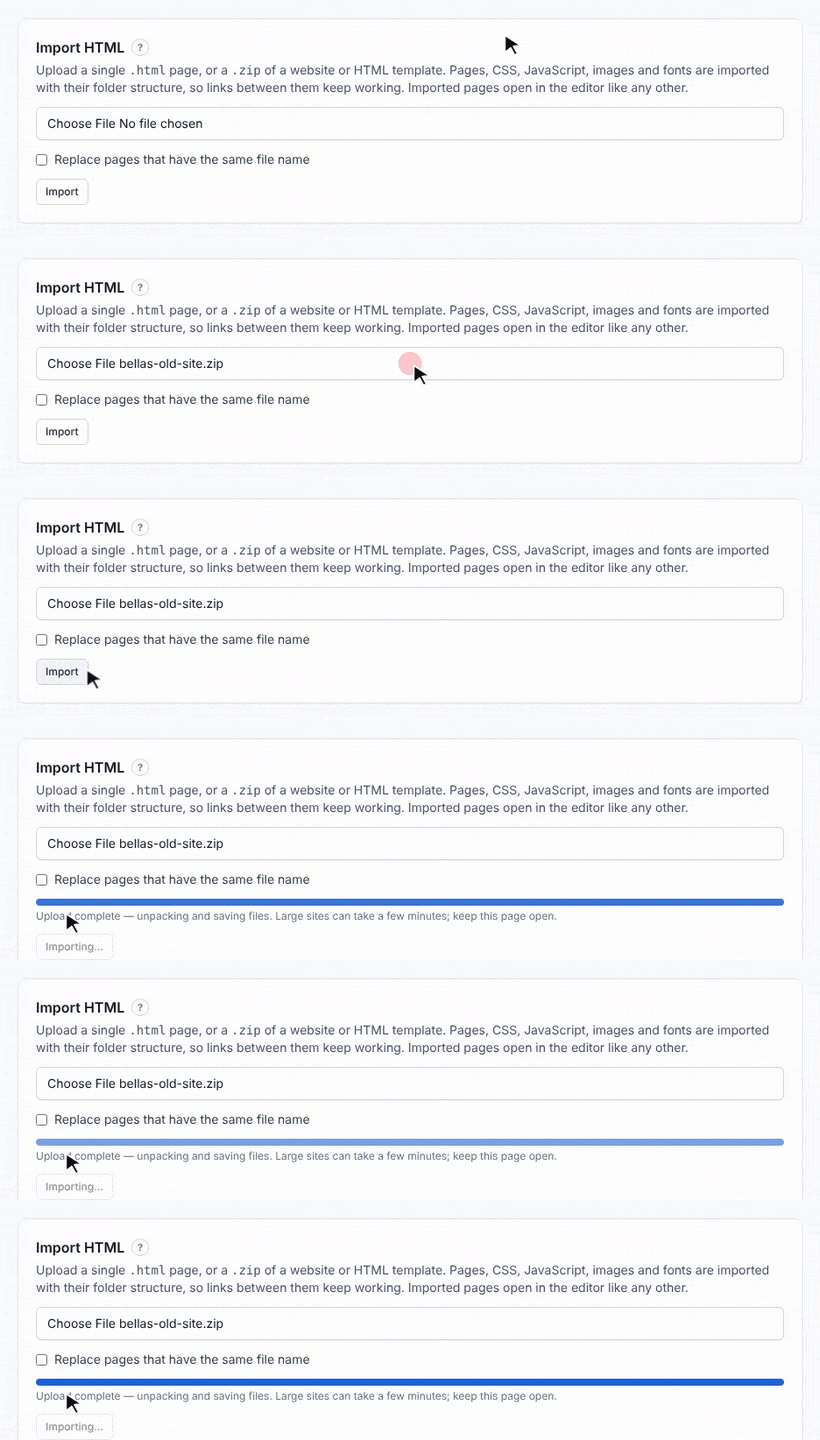
Importing a .zip of an old website
Go to the site's page (Manage) and find Import HTML.
Choose your file.
Click Import.
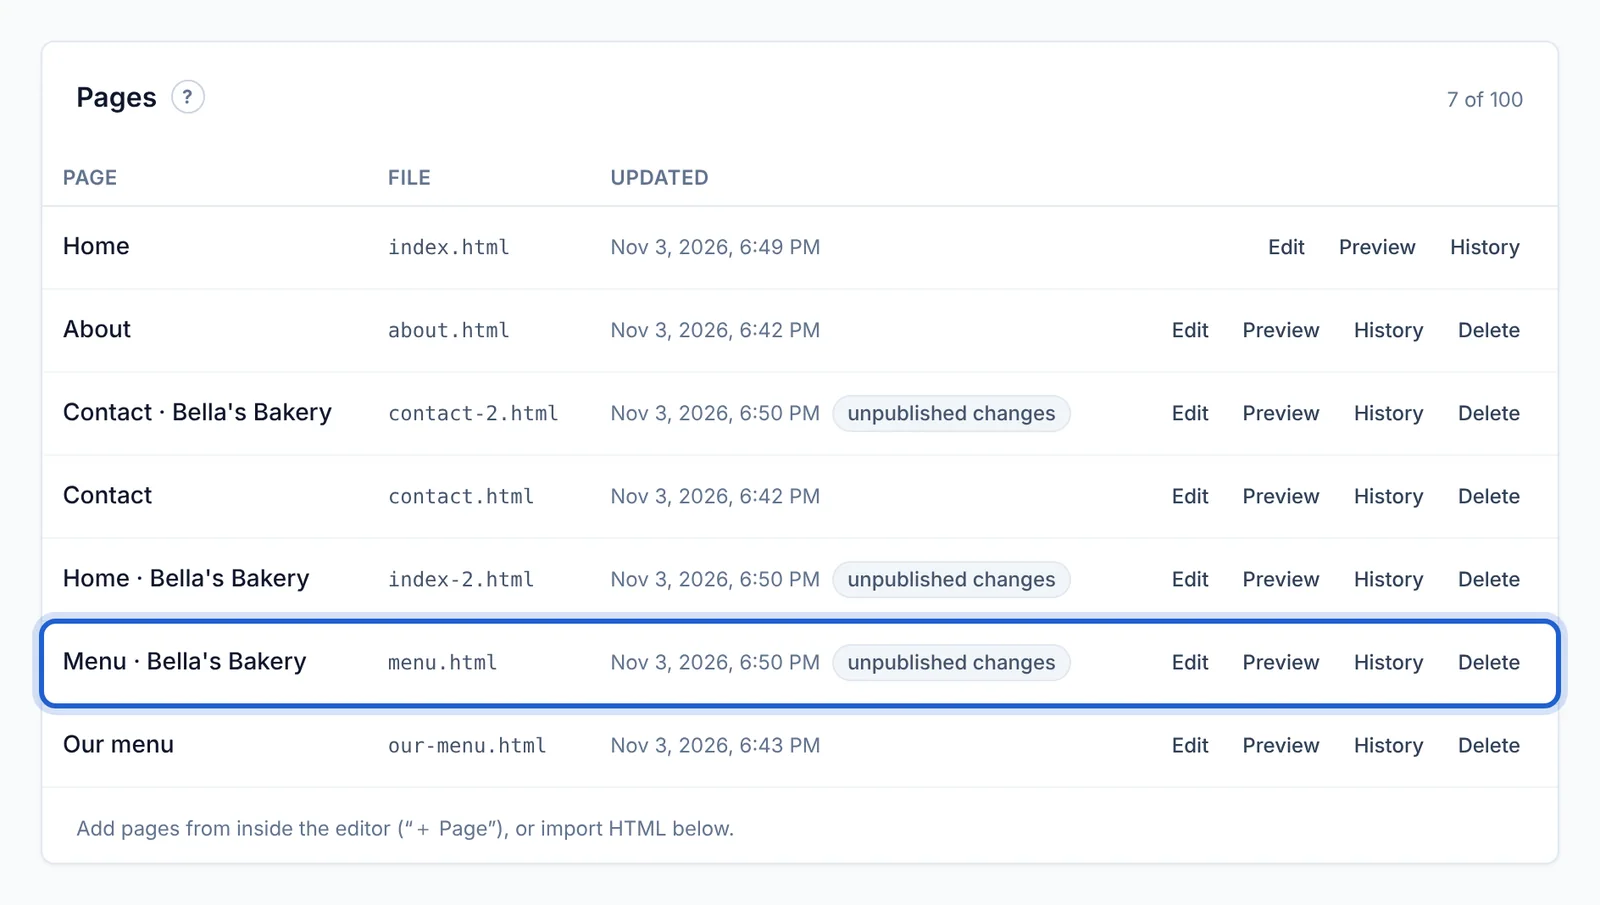
The new pages appear in the Pages list straight away:
Imported pages
From the editor
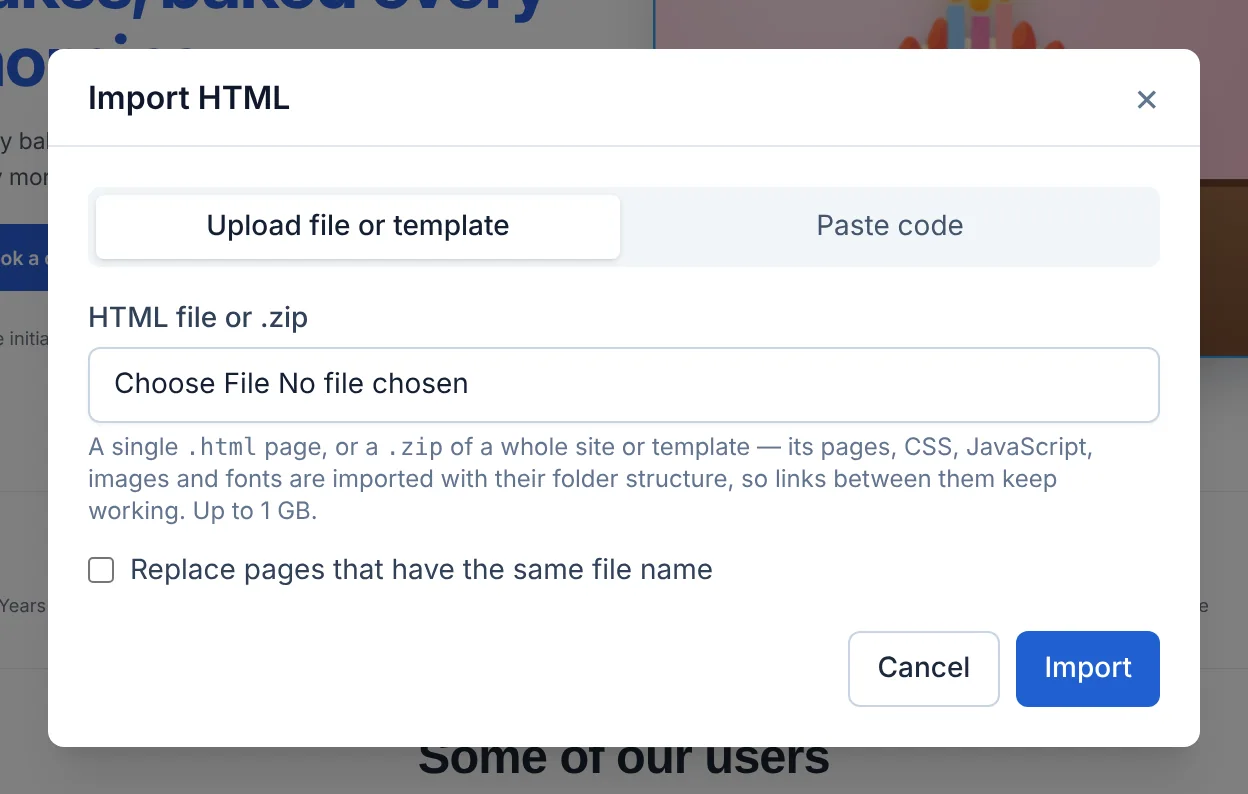
Click Import in the toolbar. Upload a file, or switch to Paste code to paste HTML (with optional <style> tags) straight into a page.
Import in the editor
Pages with the same name
By default, if a page with the same file name already exists, the imported one is added alongside it with a number (e.g. about-2.html). Tick Replace pages that have the same file name to overwrite them instead — you can still get an old version back from History.
Tips for .zip files
The .zip can hold the site at the top level or inside one folder — both work.
Make sure the home page is called index.html.
Pages count towards your plan's page limit, and files towards your storage. See Plans and limits.
Bring in pages from a web address — your own existing site, or a layout to start from.
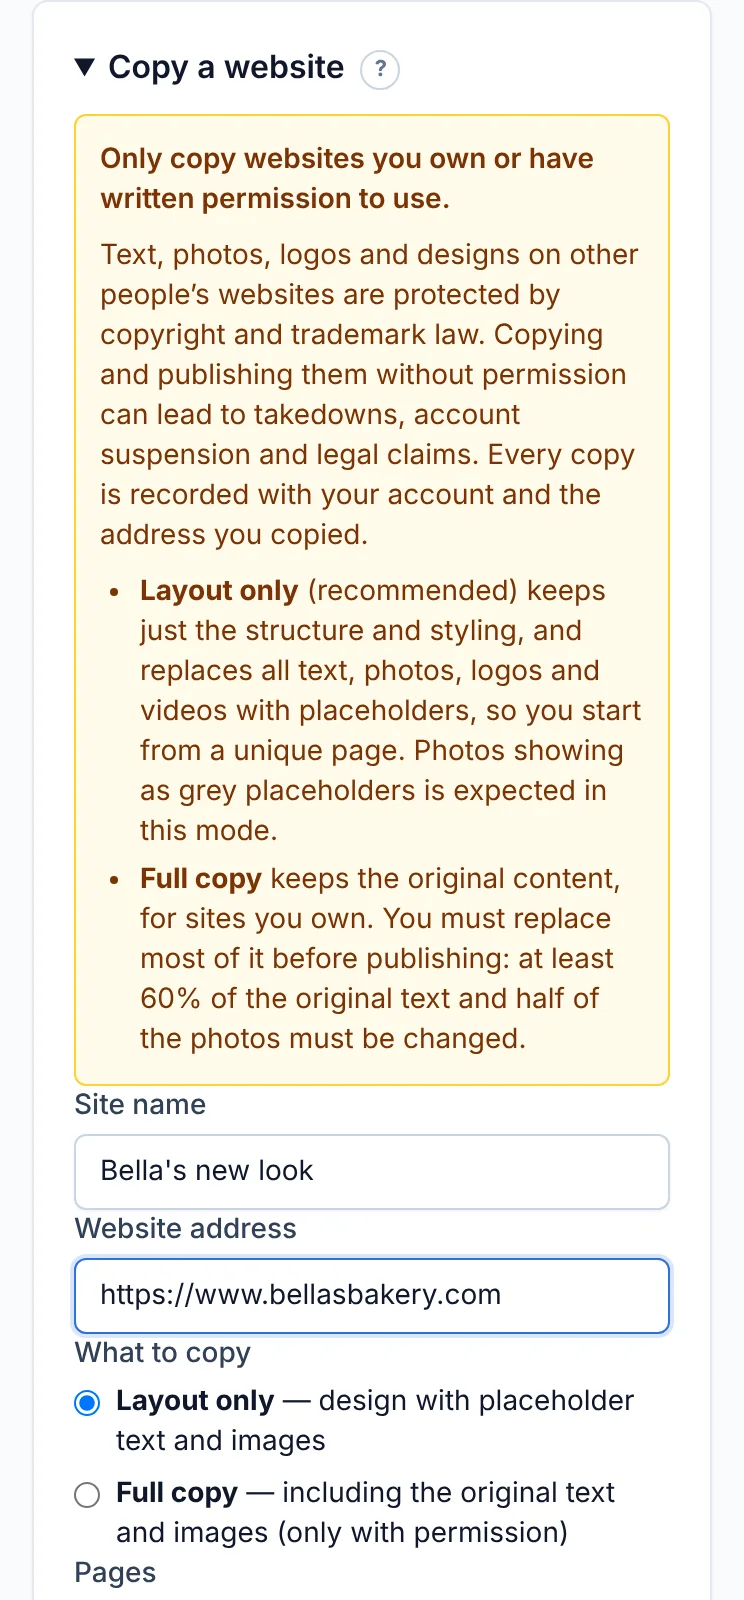
Only copy websites you own or have written permission to use. Text, photos, logos and designs on other people's websites are protected by copyright and trademark law. Every copy is recorded with your account and the address you copied.
Watch it in action:
▶ Video: Copying an old website into a new site — watch it at https://build.xsitebuilder.com/help/copy-website
Where to find it
As a new site: on the Sites page, open Copy a website on the right.
Into an existing site: on the site's page (Manage), scroll to Copy a website.
The Copy a website form
Choose what to copy
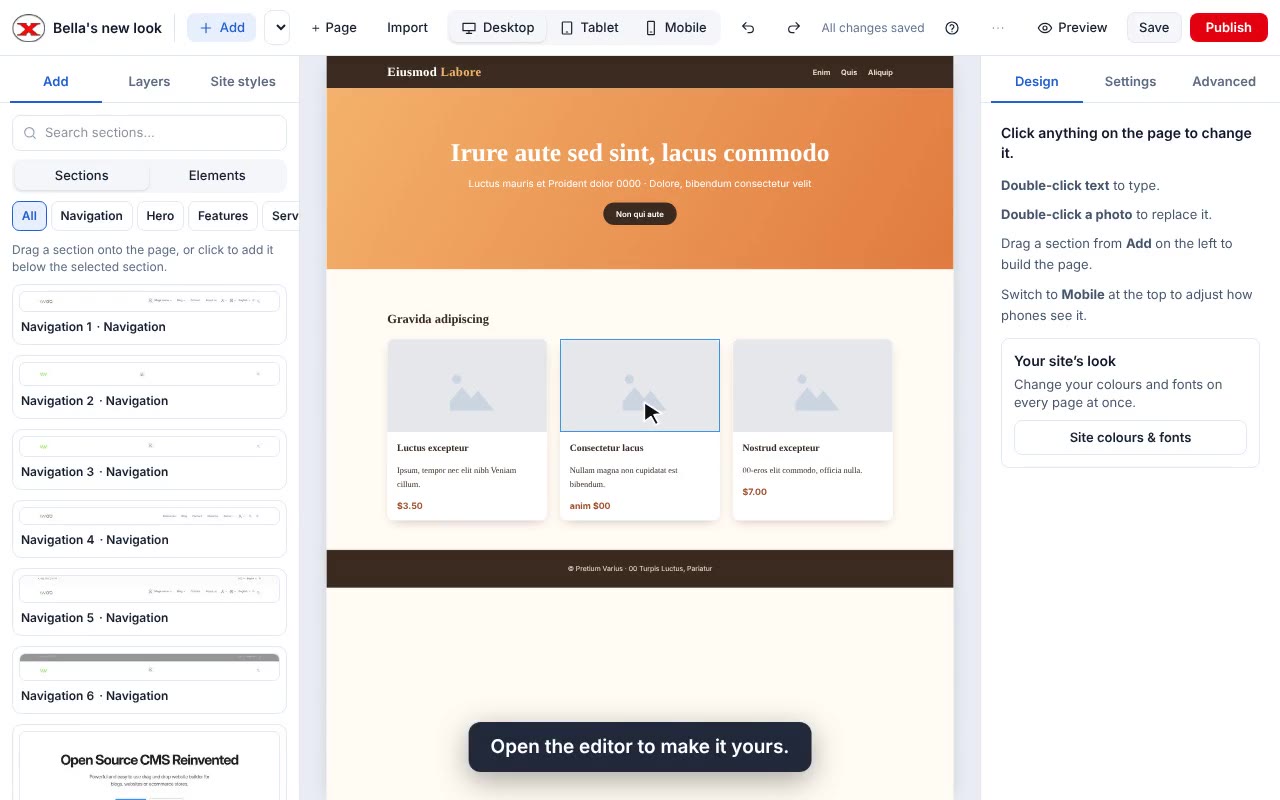
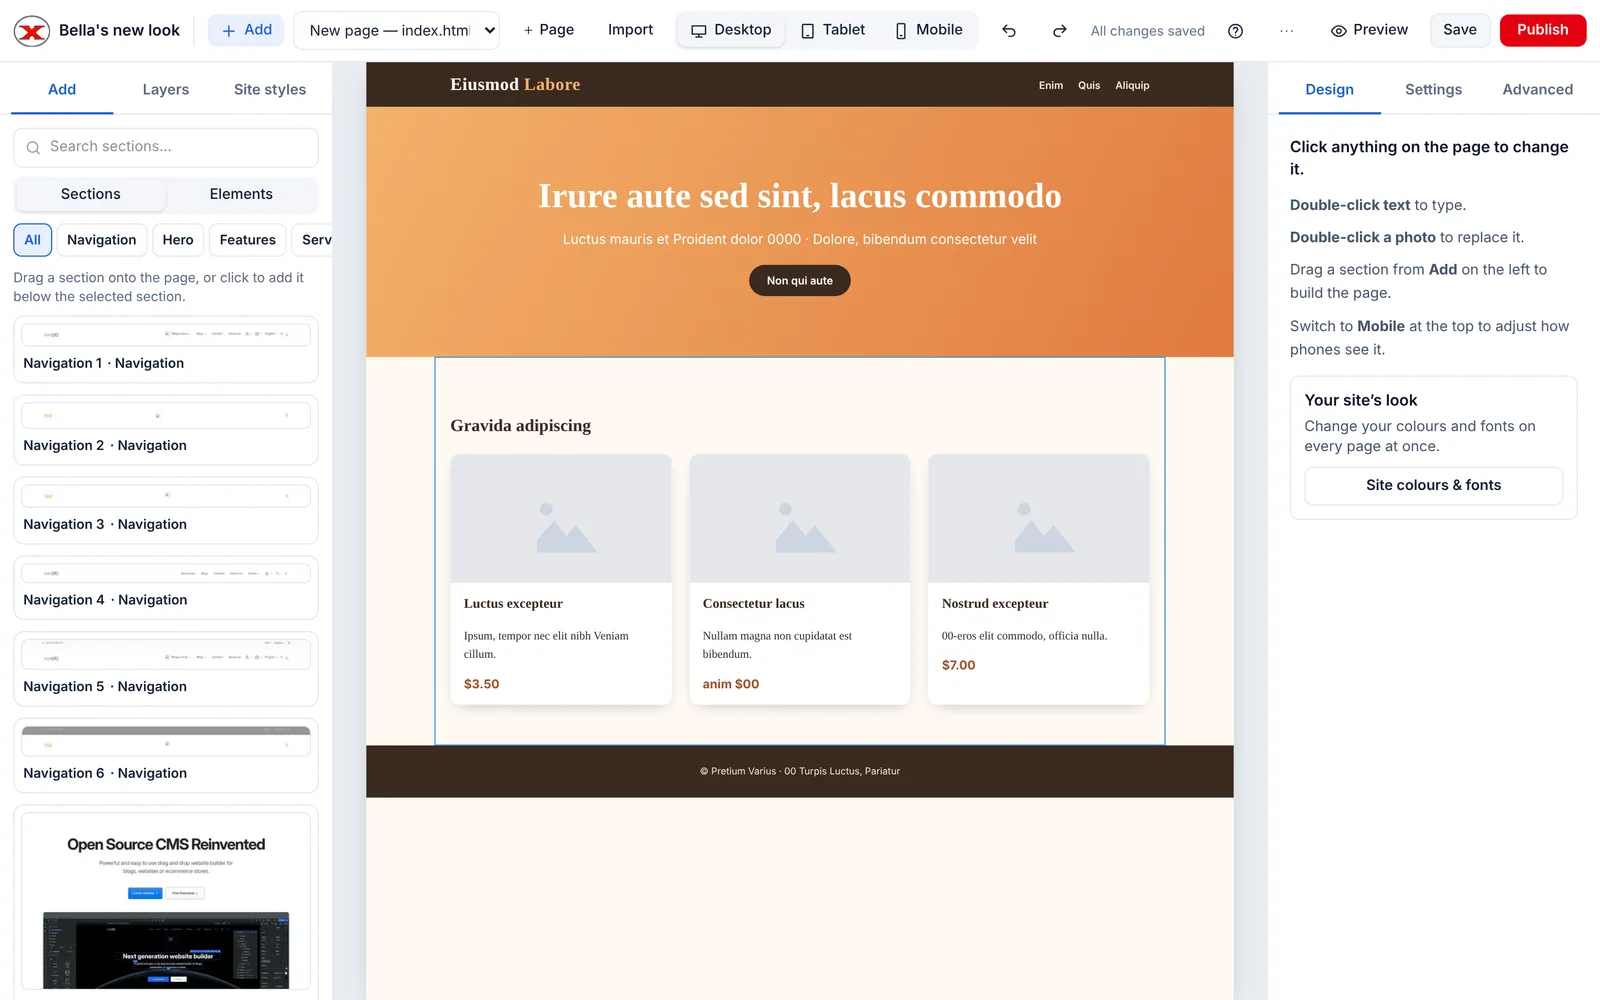
Layout only (recommended) keeps the structure and styling, and swaps all text, photos, logos and videos for placeholders — a unique page ready for your own content:
A copied page in the editor: same design, placeholder content
Full copy keeps the original content — for moving a site you own. You'll need to replace most of it before you can publish; see Making copied pages your own.
Choose how many pages
Pages copies just the address you entered, or that page plus up to 19 pages it links to (20 in total), starting with the main menu.
Tick the box to confirm you have permission, then click Copy into a new site (or Copy website). It takes from a few seconds to a few minutes for big sites — keep the tab open.
What can't be copied
Things that run on the website's own server: shop checkouts, logins, search, booking systems and databases. You get how they look, not how they work.
Content that only appears after scrolling or clicking may be missing.
3.4 Making copied pages your own (before publishing)
Why a "Full copy" can't be published straight away, and how to see what's left to change.
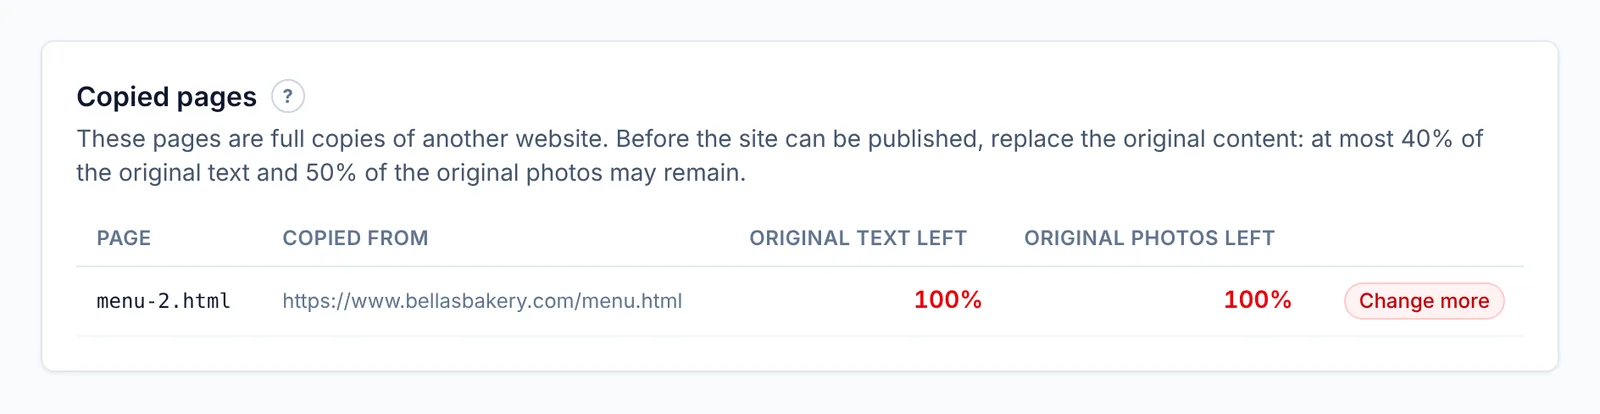
When you copy a website with Full copy, its pages still contain someone's original text and photos. To protect website owners, a site with copied pages can only be published once most of that content has been replaced:
At least 60% of the original text must be changed.
At least half of the original photos must be replaced.
Checking your progress
On the site's page (Manage), the Copied pages section shows each copied page:
The Copied pages check
Original text left and Original photos left — red until they're low enough.
Ready once a page passes, or Change more if it doesn't yet.
When every page shows Ready, you can publish.
Tips
Rewrite headings and paragraphs in your own words — small edits to a sentence still count as the original.
Replace photos with your own (double-click a picture). See Images and media.
Deleting sections you don't need counts too.
Pages copied with Layout only don't need any of this — they start with placeholders.
4. Publishing & domains
4.1 Publishing your site
Make your changes visible to visitors, and take a site offline again.
You edit a private draft; Publish puts it live
Your edits are saved as a draft. Visitors see the published version, which only changes when you publish.
Publish
Either:
Click Publish in the editor toolbar (it saves first), or
Click Publish site (or Publish changes) on the site's page (Manage).
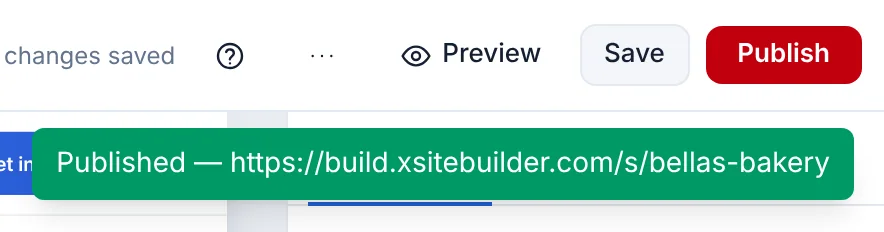
The editor confirms with your site's address
Publishing makes all pages of the site live at once, and the site gets a green Live badge.
Unpublished changes
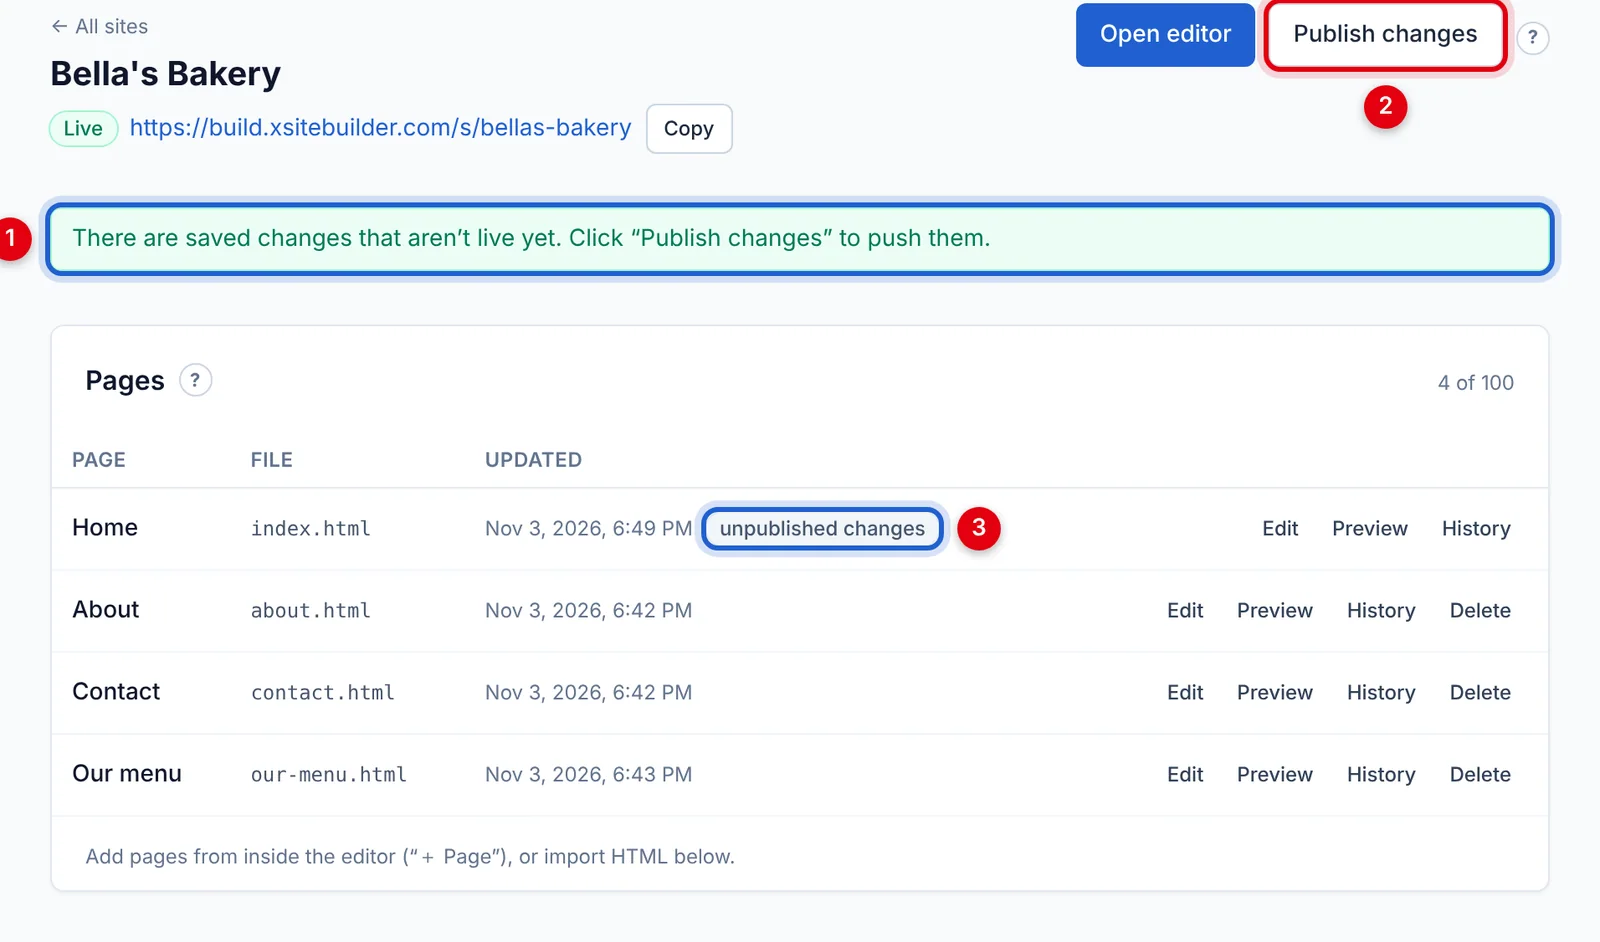
After the first publish, the site's page tells you when there are saved changes that visitors can't see yet:
Saved changes waiting to be published
A reminder that some changes aren't live yet.
Publish changes puts them live.
Each changed page is marked unpublished changes.
Take a site offline
On the site's page, under Danger zone, click Unpublish. Visitors will see "not found"; your drafts are kept and you can publish again any time.
The Danger zone
A custom "page not found"
Add a page with the file name 404.html and publish. Visitors who follow a broken link will see it instead of the standard message.
4.2 Your site's web address
Where your site lives, and how to change its address.
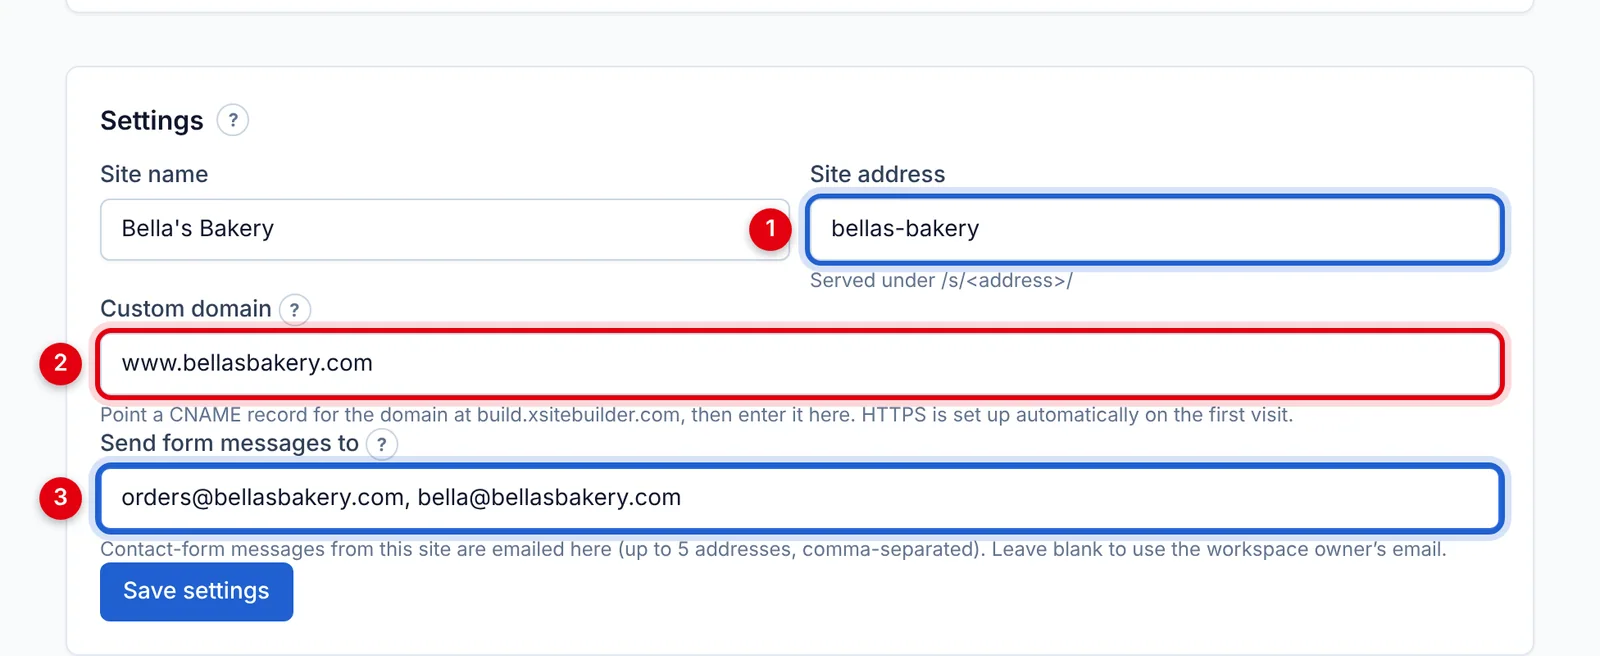
Every site gets a free address based on its site address (for example bellas-bakery). The full link is at the top of the site's page (Manage) — click Copy to copy it.
Change the address
Go to the site's page (Manage) → Settings.
Change Site address (1) — lowercase letters, numbers and dashes, 3 to 48 characters.
Click Save settings.
Site settings
The old address stops working straight away, so update any links you've shared. Only workspace owners and admins can change this.
Connect a domain like www.yourbusiness.com to your site, with automatic HTTPS.
Custom domains are available on paid plans. You'll need a domain name from a registrar such as GoDaddy, Namecheap, Cloudflare or Squarespace Domains.
▶ Video: Connecting www.bellasbakery.com — watch it at https://build.xsitebuilder.com/help/custom-domainThe two steps
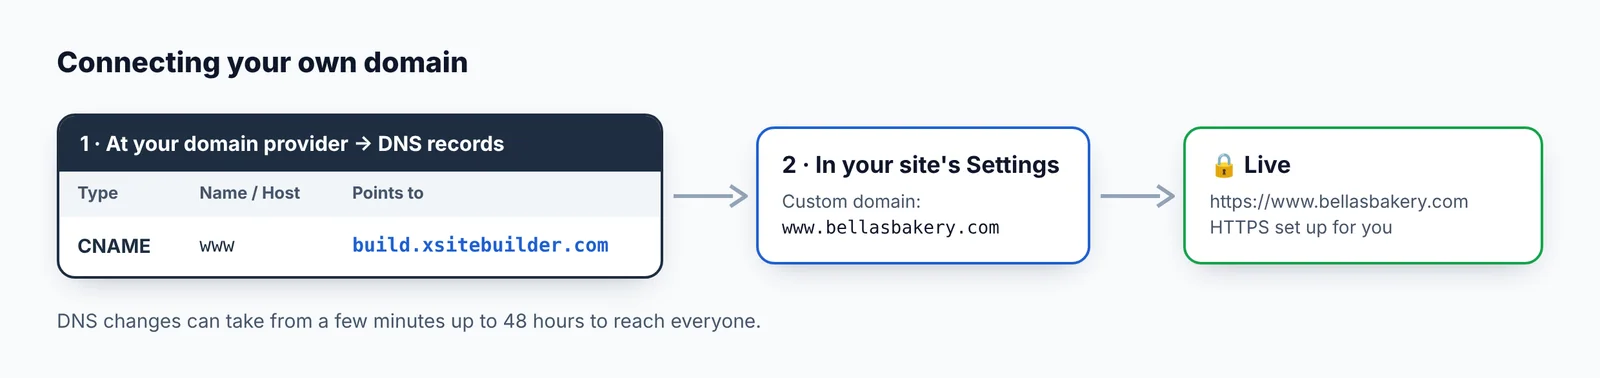
Step 1 — Add a DNS record at your domain provider
Sign in where you bought your domain and find its DNS settings. Add this record:
Type
Name / Host
Value / Points to
CNAME
www
build.xsitebuilder.com
If there's already a www record, edit it instead of adding another.
Step 2 — Enter the domain in XSiteBuilder
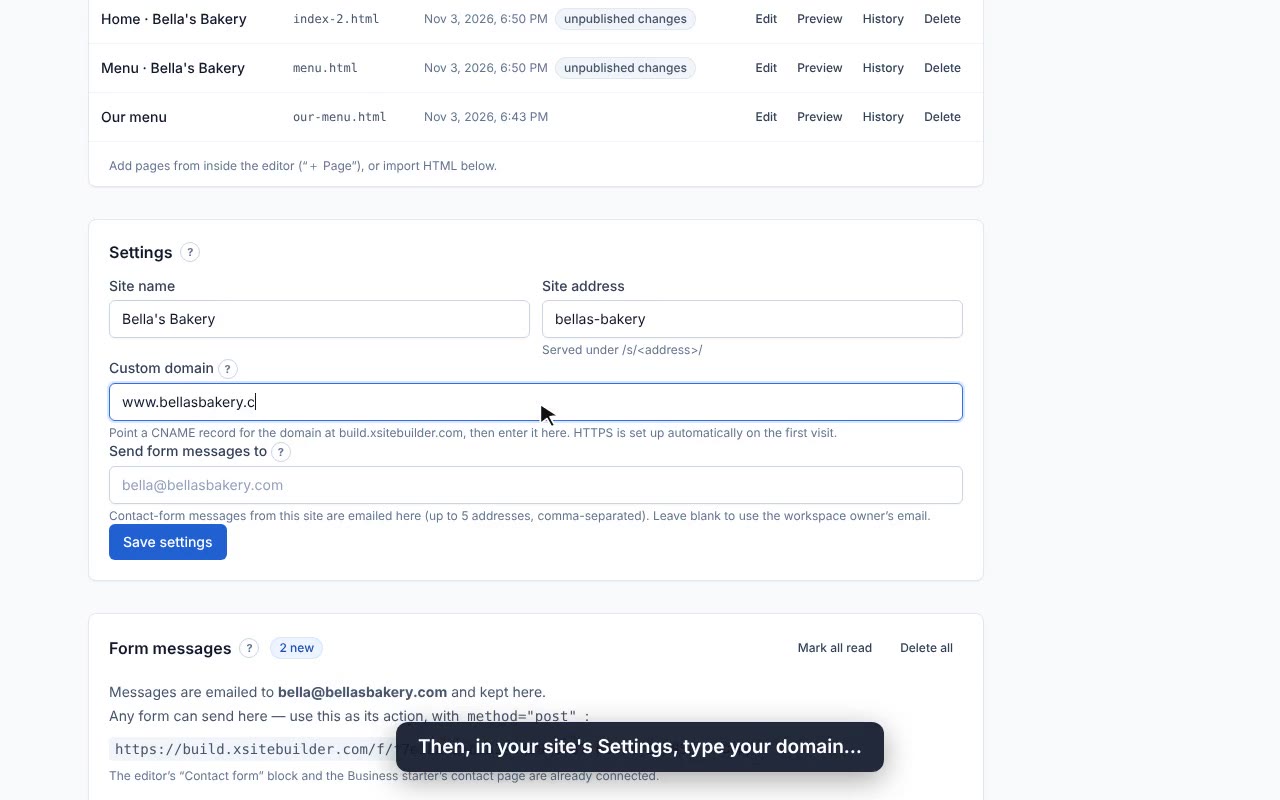
Go to the site's page (Manage) → Settings.
Type your domain in Custom domain, e.g. www.yourbusiness.com.
Click Save settings.
The Custom domain setting
That's it. The first time someone visits, a free security certificate (HTTPS) is set up automatically — the very first visit can take a few extra seconds.
Good to know
DNS changes can take anywhere from a few minutes to 48 hours to reach everyone.
Most providers don't allow a CNAME on the bare domain (yourbusiness.com without www). Use your provider's redirect or forwarding feature to send the bare domain to https://www.yourbusiness.com.
Still not working? Check the record with a free tool such as dnschecker.org — the www name should point to build.xsitebuilder.com.
4.4 Downloading (exporting) your site
Get a .zip of your site as plain HTML to keep as a backup or host elsewhere.
On the site's page (Manage), find Export:
Export
Download draft (.zip) — your latest saved version.
Download published (.zip) — exactly what's live right now.
The .zip contains every page as an HTML file plus all images, CSS, JavaScript and fonts, ready to upload to any web host.
Contact forms in an exported site keep sending to XSiteBuilder while the site exists here. If you delete the site, switch your forms to another service.
4.5 Deleting a site
Permanently remove a site with its pages and media.
The Danger zone
Go to the site's page (Manage) and scroll to Danger zone.
Type the site's address in the box exactly as shown.
Click Delete site and confirm.
This permanently deletes the site, its pages, version history, form messages and media. It can't be undone. To keep a copy, export it first.
Just want it offline for a while? Use Unpublish instead — nothing is deleted.
Only workspace owners and admins can delete sites.
5. Forms & email
5.1 Adding a contact form
Put a working contact form on your site and read the messages visitors send.
▶ Video: Adding a contact form, sending a message, and reading it — watch it at https://build.xsitebuilder.com/help/contact-forms
Add the form
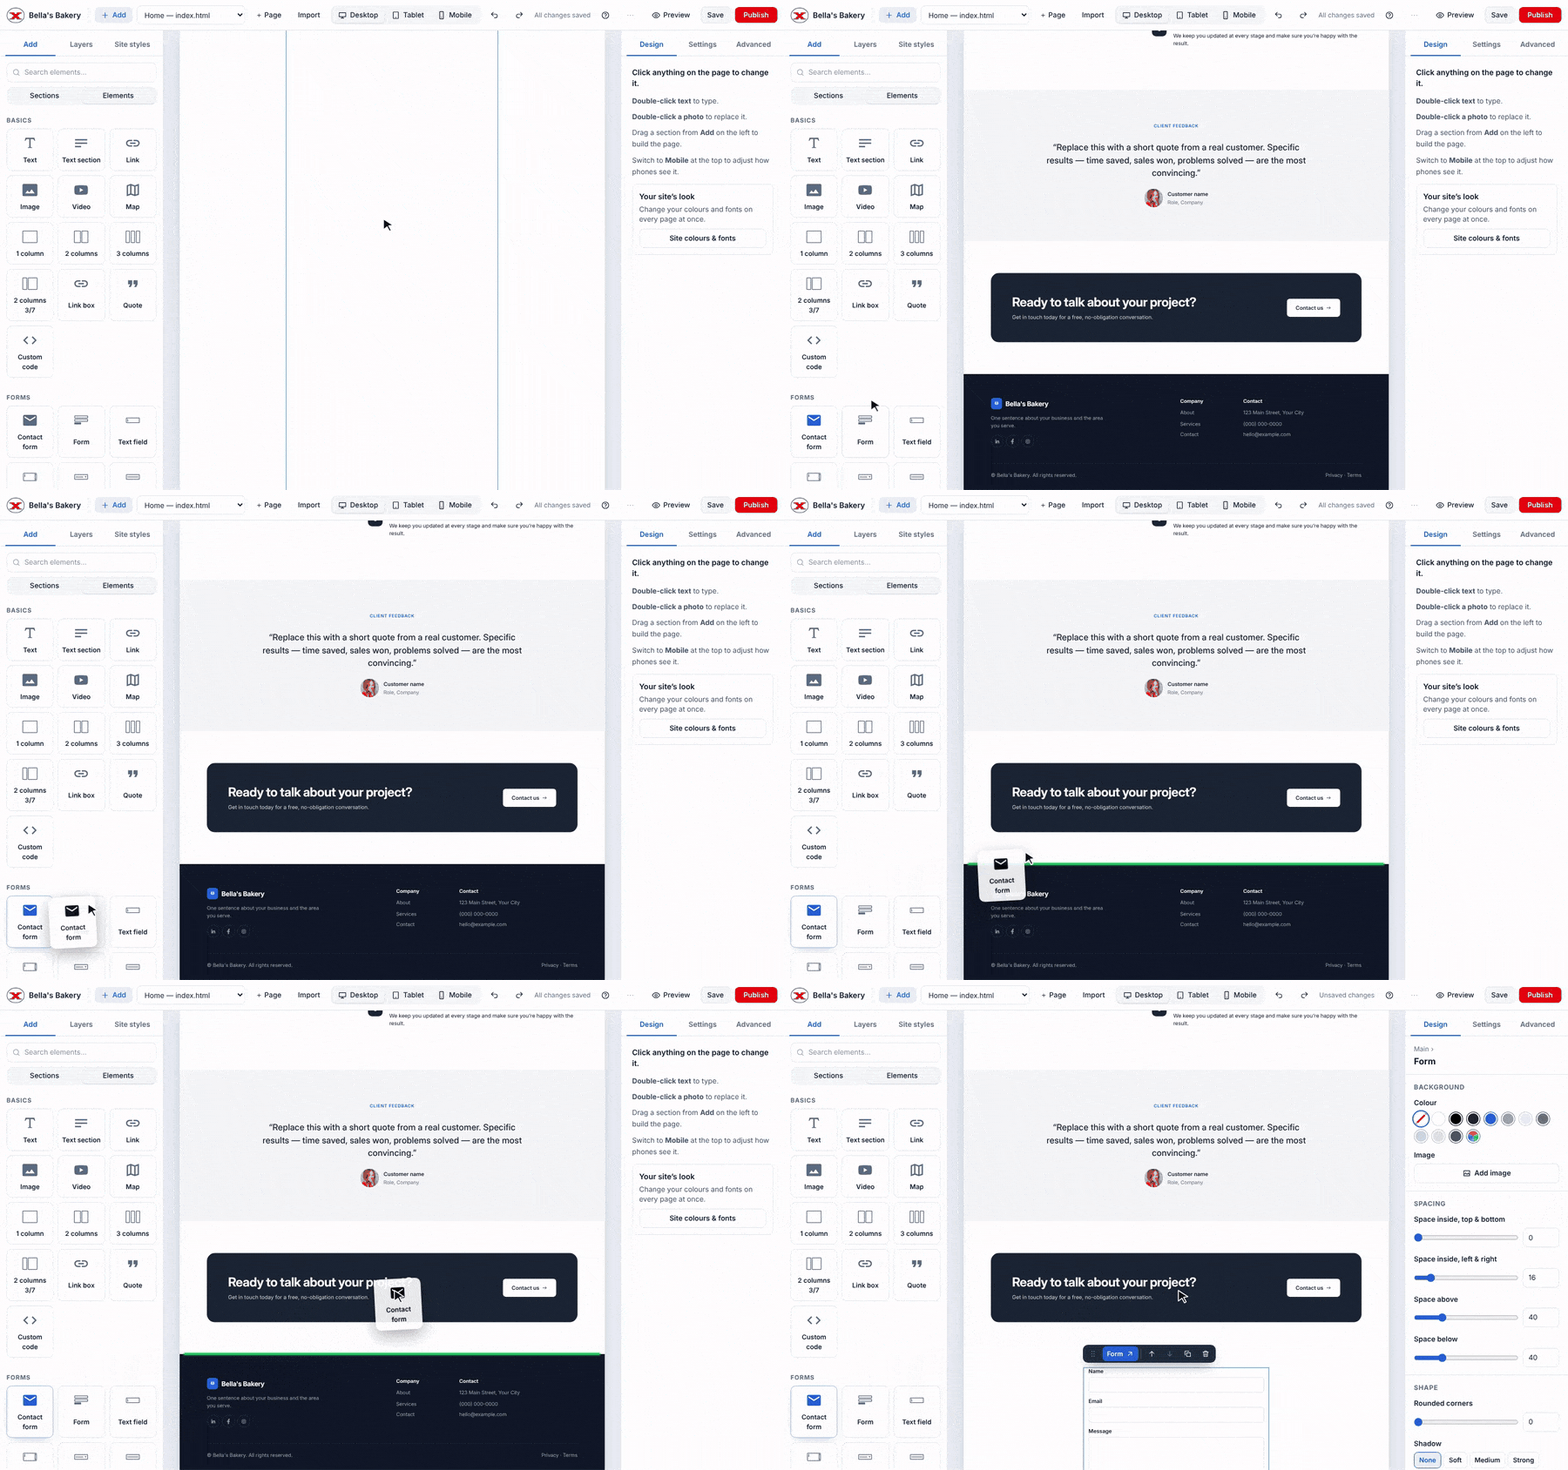
Dragging the Contact form block onto a page
In the editor, open Add on the left and switch to Elements.
Under Forms, drag Contact form onto your page (or click it to add it below the selected section).
Change the heading, labels and button text if you like, then Publish.
That's all — the form is already connected. The Business starter template's contact page is connected too.
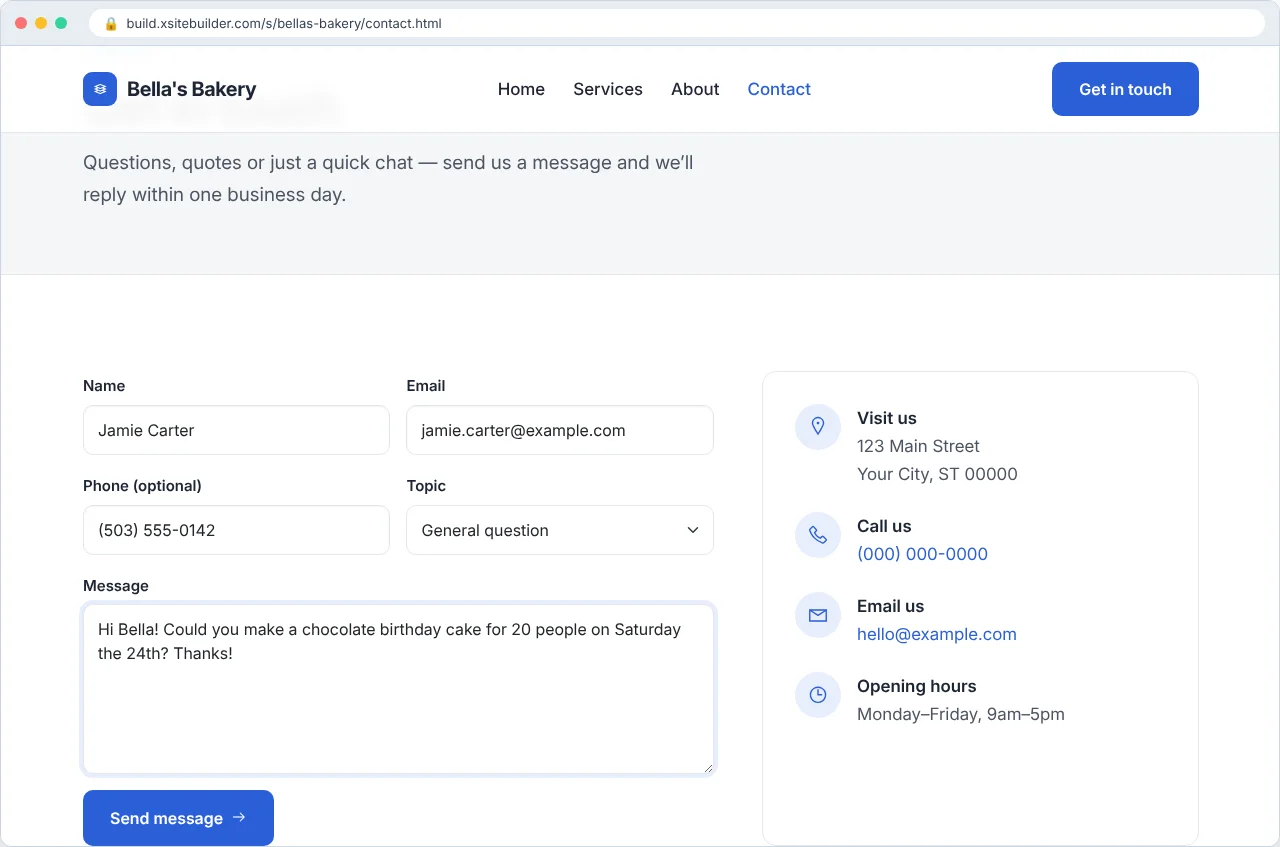
What visitors see
A contact page on the live site
After sending, they see a thank-you message (or your own thank-you page — see below).
Reading messages
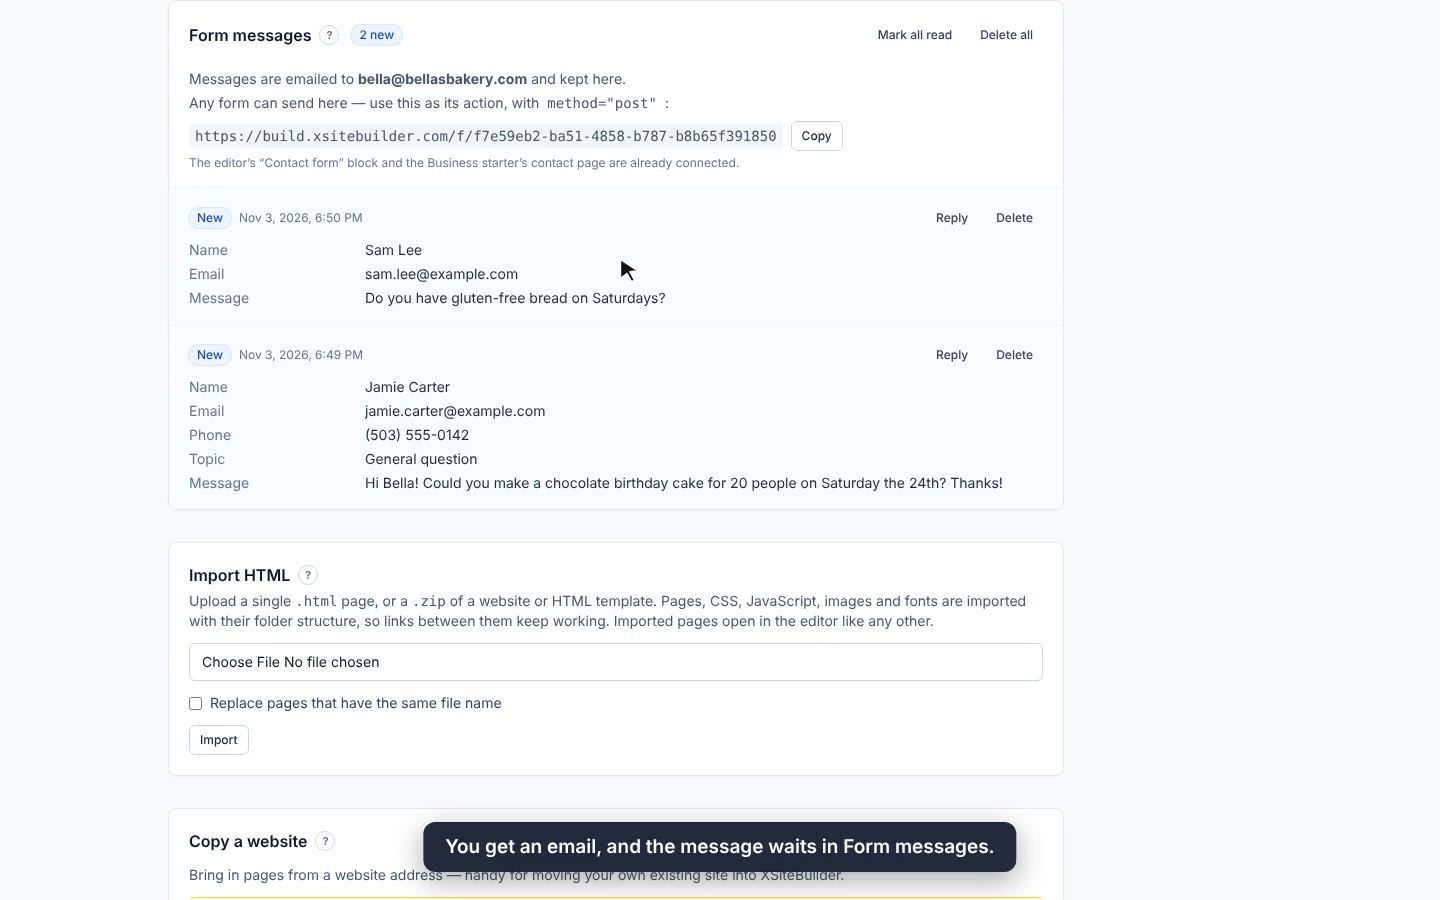
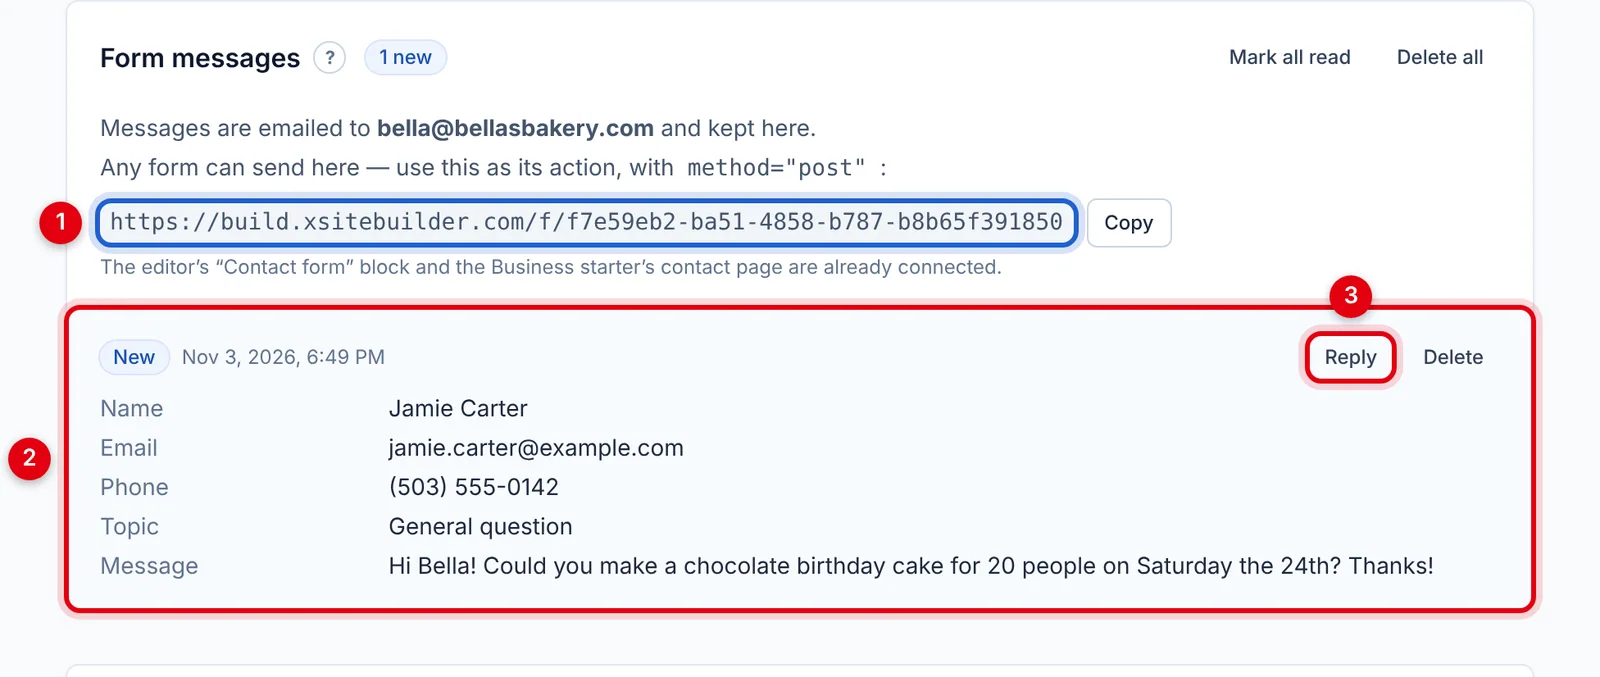
Messages appear on the site's page (Manage) under Form messages, newest first:
Any form on your site can send messages here. Select the form, open Settings on the right and set:
Action — the address shown under Form messages (click Copy next to it).
Method — POST.
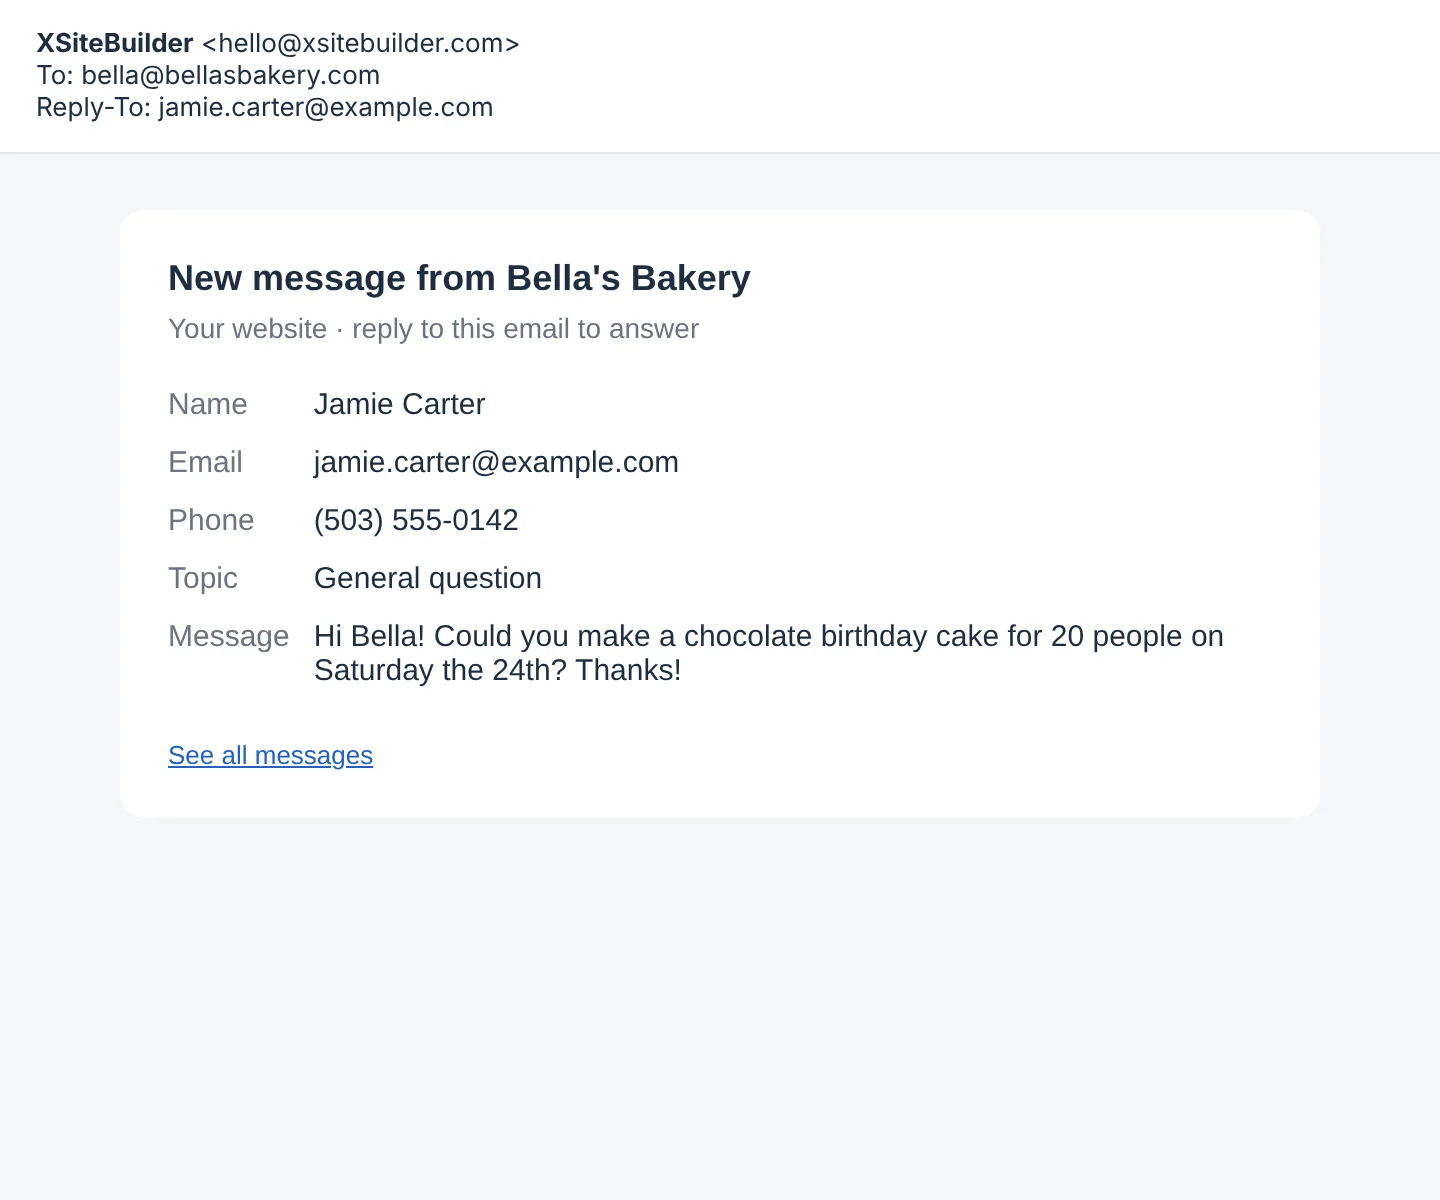
Give every field a name (e.g. name, email, phone, message) — that's the label you'll see in the message. A field called email becomes the reply-to address.
Optional extras
Your own thank-you page: add a hidden field named _redirect with a page on your site as its value, e.g. thanks.html.
Extra spam protection: add a hidden, empty field named _gotcha. People can't see it, but spam robots fill it in and their messages are ignored. (The Contact form block already has one.)
Each visitor can send up to 5 messages every 10 minutes, which stops floods of spam.
5.2 Who receives form emails
Choose which email addresses get your sites' contact-form messages.
By default, contact-form messages are emailed to the workspace owner.
To send them somewhere else:
Go to the site's page (Manage) → Settings.
In Send form messages to (3), enter one or more addresses separated by commas — up to 5.
Click Save settings.
Settings → Send form messages to
Each site can have different recipients. Every message is also kept under Form messages on the site's page, even if an email doesn't arrive.
5.3 Sending form emails through your own email account
Use your own mail server (Gmail, Google Workspace, Microsoft 365 or your web host) so form emails come from your address.
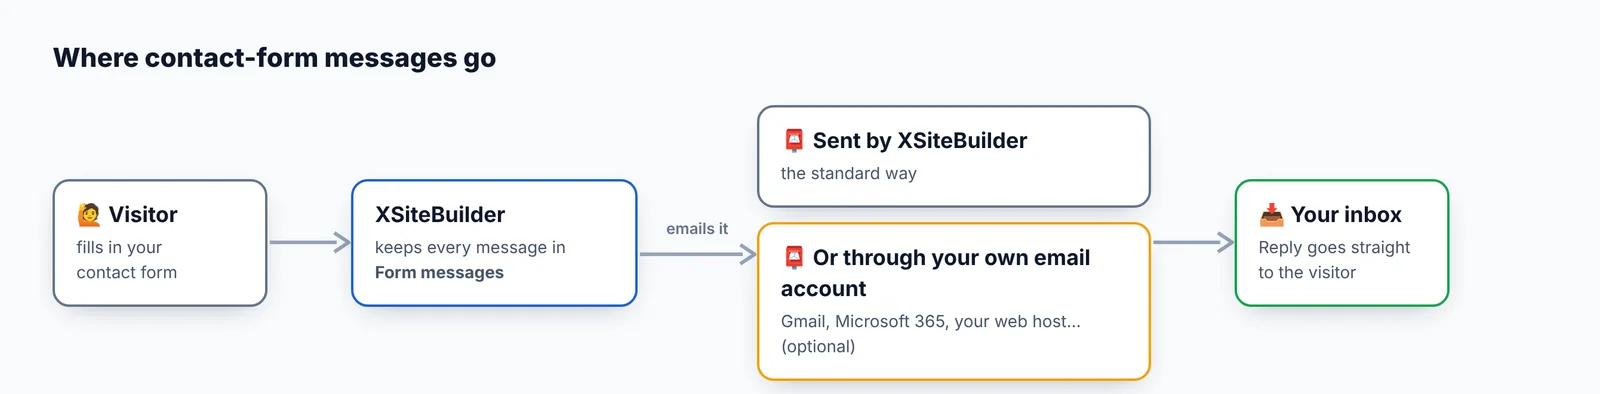
Form emails are sent by XSiteBuilder — or, if you like, through your own email account
Normally contact-form emails are sent by XSiteBuilder. You can send them through your own email account instead: they then come from your own address and are less likely to land in spam.
Set it up
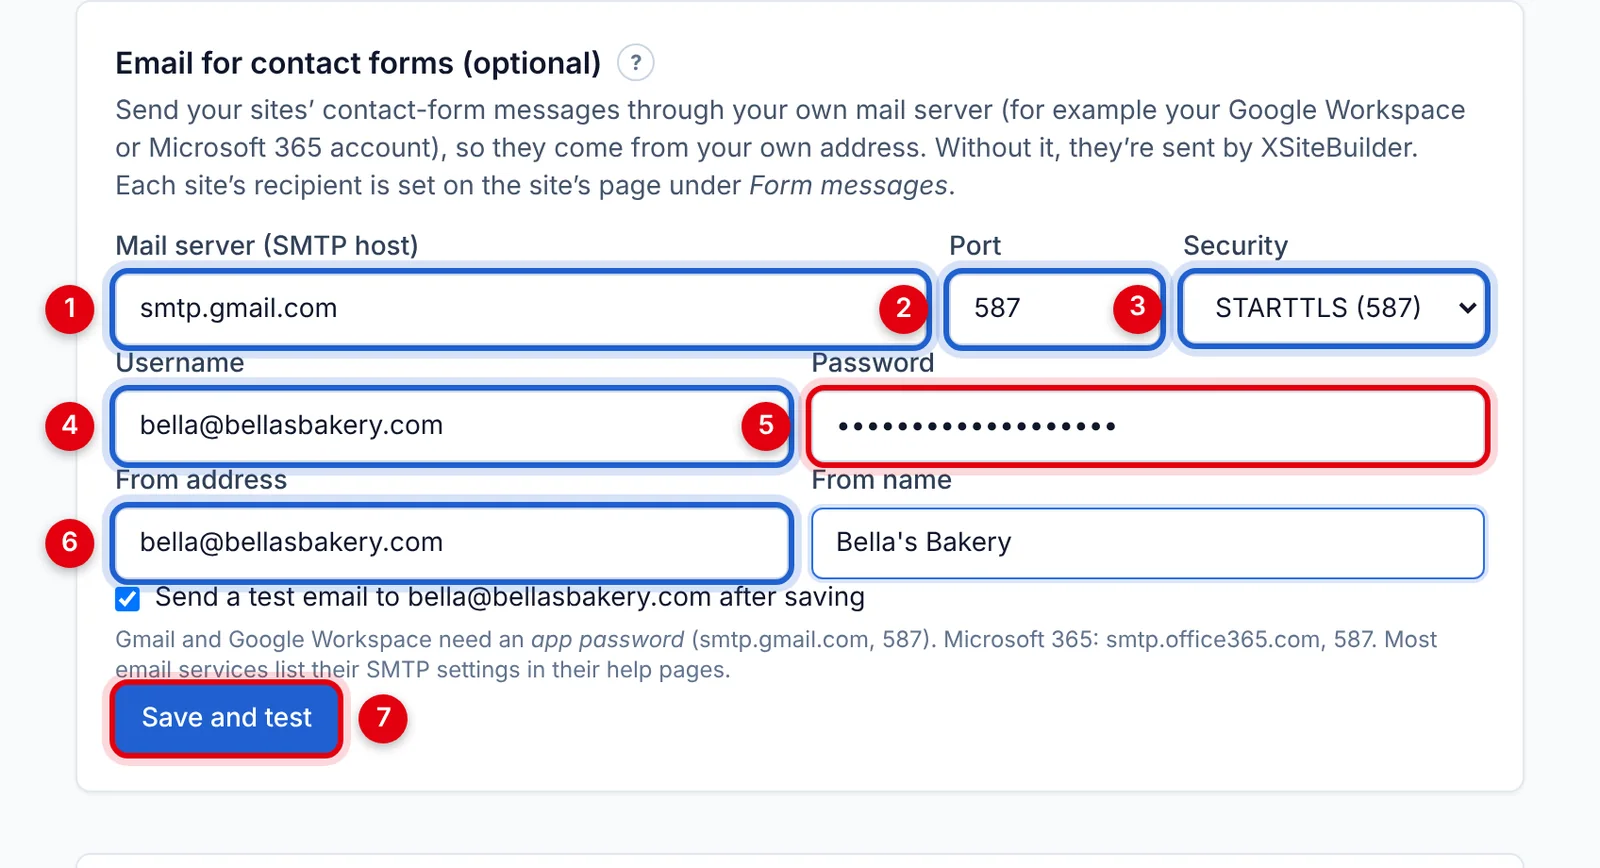
Go to Settings → Email for contact forms (optional):
Filled in for a Gmail account
Mail server (SMTP host) — see the table below.
Port
Security
Username — usually your full email address.
Password — for Gmail, an app password (below).
From address and From name — who the emails appear to come from.
Leave Send a test email … after saving ticked and click Save and test.
We connect to your mail server before saving, so you'll know straight away if something's wrong. Your password is stored encrypted. Only workspace owners and admins can change this, and it applies to every site in the workspace.
Common settings
Provider
Server
Port
Security
Gmail / Google Workspace
smtp.gmail.com
587
STARTTLS
Microsoft 365 / Outlook
smtp.office365.com
587
STARTTLS
Zoho Mail
smtp.zoho.com
465
SSL/TLS
Your web host
ask your host (often mail.yourdomain.com)
465 or 587
SSL/TLS or STARTTLS
Gmail and Google Workspace need an app password, not your normal password: turn on 2-Step Verification in your Google Account, go to Security → App passwords, create one, and paste the 16-letter code into Password.
Microsoft 365 mailboxes may need "Authenticated SMTP" turned on by your Microsoft 365 administrator.
Allowed ports are 25, 465, 587 and 2525.
If your mail server fails
If your server rejects a message, we send it through XSiteBuilder instead so you don't miss it. The message on the site's page is then marked "sent via … — your mail server failed", with the reason.
Stop using it
Click Stop using it in the same section. Emails go back to being sent by XSiteBuilder.
5.4 Form emails not arriving
What to check when contact-form messages don't reach your inbox.
First, check the site's page (Manage) → Form messages. Every message is kept there, even if the email failed — nothing is lost.
Form messages on the site's page
If the message is there
Look at the small note next to the message's date:
No note — the email was sent. Check your spam or junk folder, and add the sender to your contacts.
"email not sent (…)" — the reason is in brackets. Often it's a wrong password or server setting in your own mail server settings.
"sent via …" — your own mail server failed, so we sent it another way. The reason is shown.
Also check Settings → Send form messages to on the site's page — is the address right?
If the message isn't there
Has the site been published since you added the form?
Is the form connected? The Contact form block always is. Your own forms need the right Action and Method POST.
Sent lots of test messages quickly? Each visitor can send 5 messages per 10 minutes.
Turn on AI site and page writing by connecting your own OpenAI or Anthropic (Claude) API key.
AI is completely optional — everything else in XSiteBuilder works without it. Once connected, you can generate a whole site, or a single page, from a short description.
AI uses your own API key from an AI provider, so usage is billed by them directly to you.
Get an API key
Anthropic (Claude): sign in at console.anthropic.com → API Keys → Create Key. Add some credit under Billing.
OpenAI: sign in at platform.openai.com → API keys → Create new secret key. Add credit under Billing.
Copy the key — you'll only see it once.
Connect it
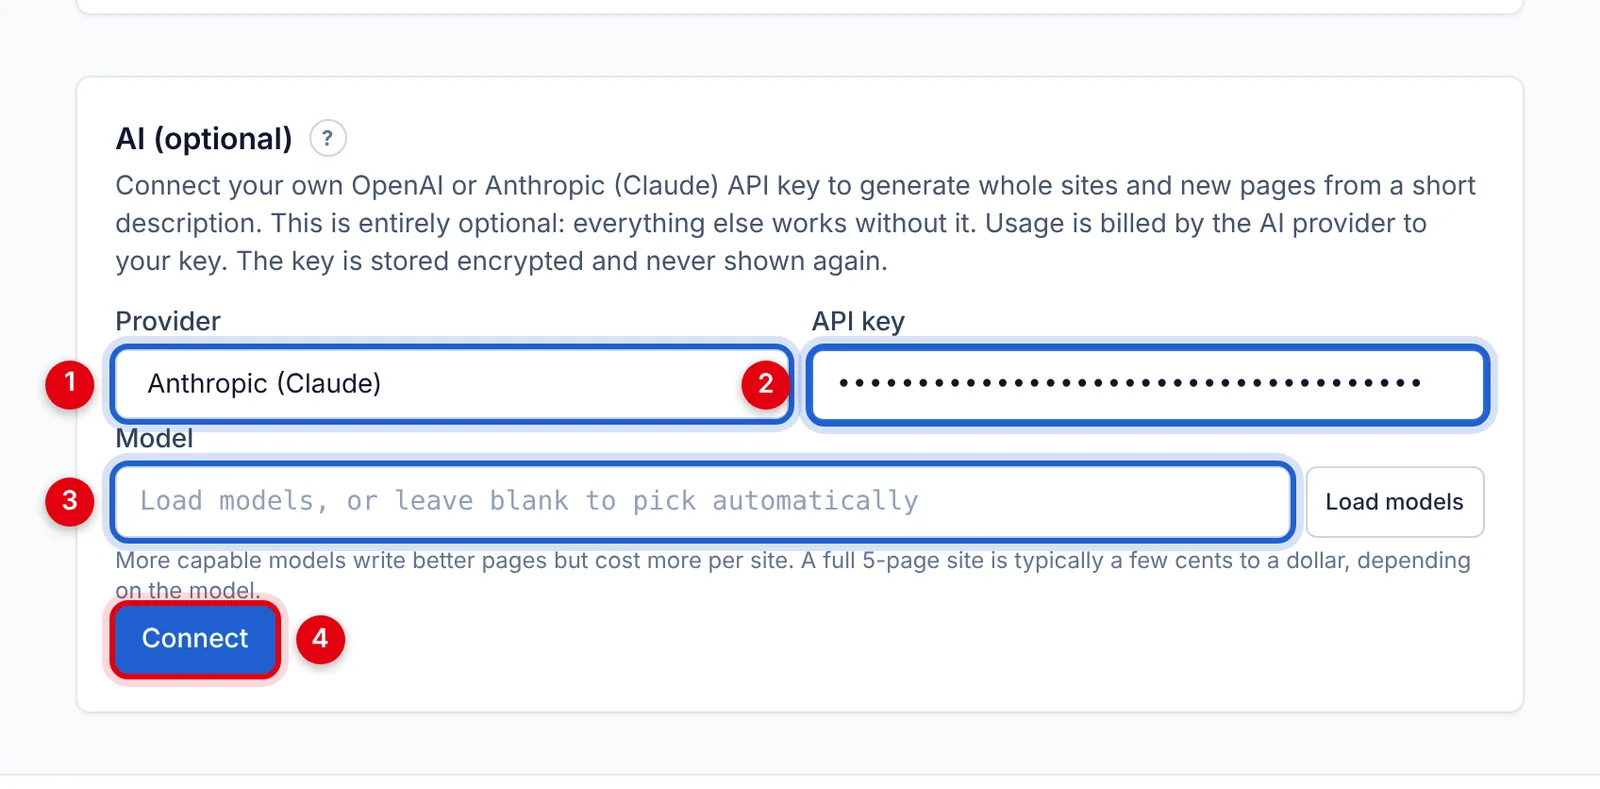
Go to Settings → AI (optional):
Connecting an Anthropic key
Choose your Provider.
Paste your API key.
Optionally click Load models and pick a Model — or leave it blank and a good one is chosen for you.
Click Connect.
We check the key works before saving. It's stored encrypted and never shown in full again:
Connected
Only workspace owners and admins can connect or change it. To stop using AI, click Disconnect.
What does it cost?
More capable models write better pages but cost more. A full 5-page site typically costs a few cents to a dollar on your provider's bill, depending on the model. One page costs a fraction of that.
Privacy
To write pages, the provider you chose receives your description, your site's name and its page names. When writing a single page, your home page is also sent so the new page can match its header, footer and style. Nothing else from your workspace is sent.
6.2 Generating a site with AI
Describe your business and get a complete, editable multi-page site in a few minutes.
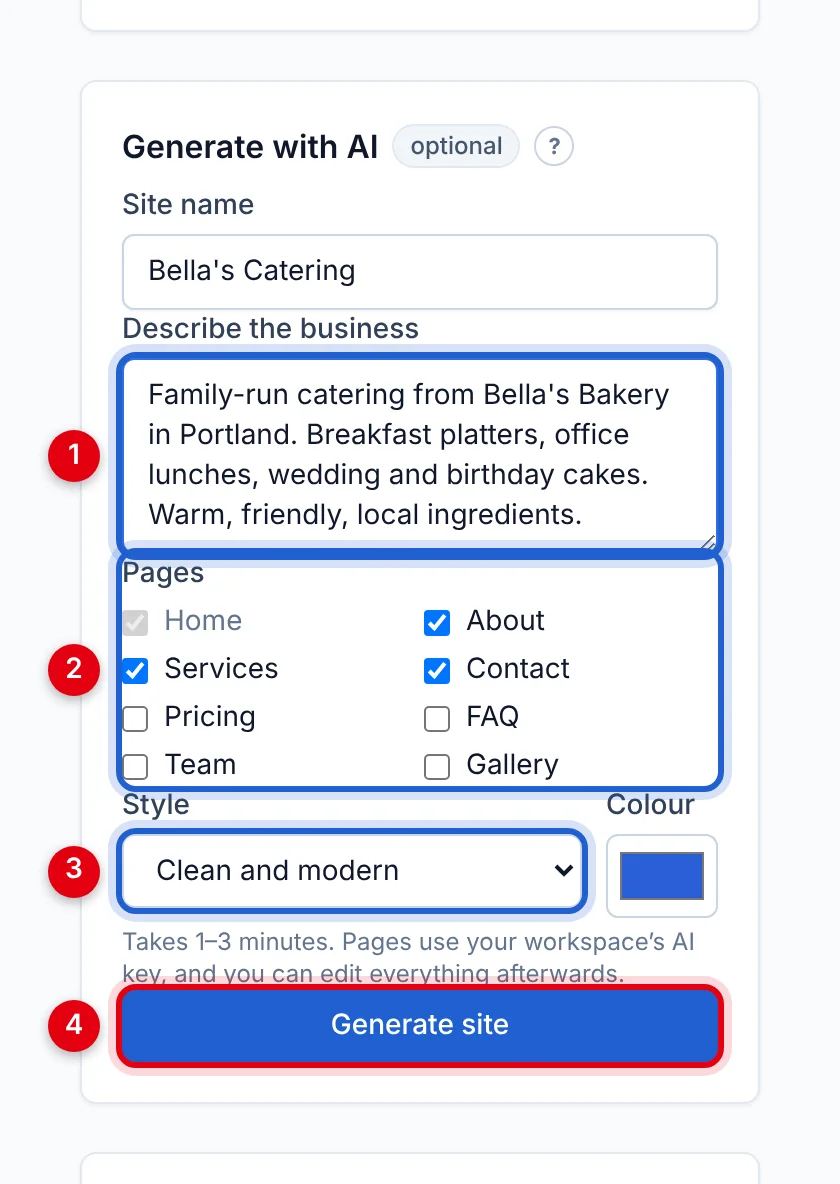
First connect your AI key. Then, on the Sites page, find Generate with AI on the right:
Generate with AI
Describe the business — a few sentences: what you do, where, for whom, what makes you different. (Fill in the Site name above it too.)
Pages — Home is always included; tick the others you want.
Style and Colour — the overall feel and main colour.
Click Generate site.
It takes 1–3 minutes. Then the new site is ready to edit like any other — its contact page's form is already connected.
Tips for a better result
Mention your location, services, prices, opening hours and tone of voice.
Check every fact before publishing — AI can invent details.
Replace the placeholder photos with your own. See Images and media.
6.3 Writing a page with AI
Add one new page to an existing site, written by AI to match your description.
Settings → General: change the name and click Save.
7.3 Inviting your team and roles
Add teammates or clients to a workspace, and choose what they can do.
▶ Video: Inviting a teammate — watch it at https://build.xsitebuilder.com/help/team-roles
Roles
Role
Can do
Owner
Everything, including billing. Each workspace has one owner.
Admin
Manage sites, settings and team members; publish.
Editor
Create, edit and publish sites and pages.
Viewer
Look at sites and previews only — can't make changes.
Invite someone
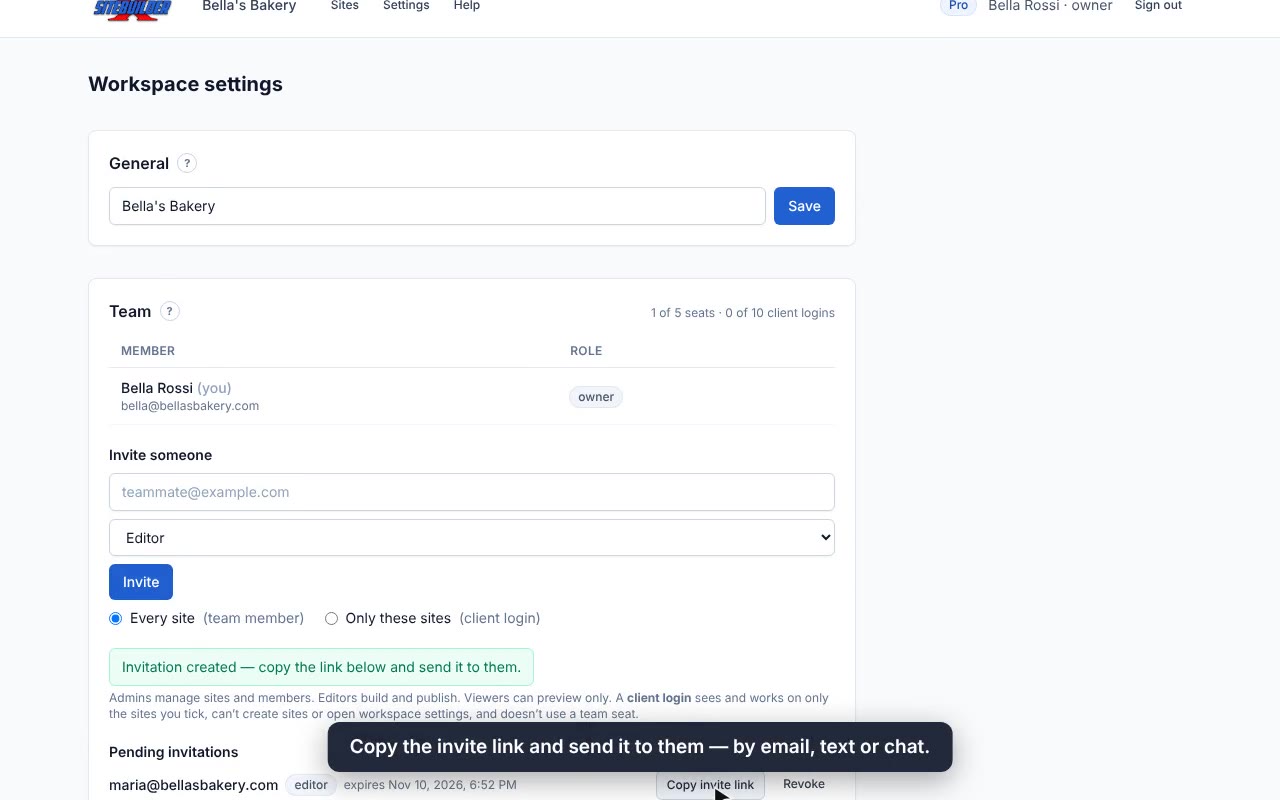
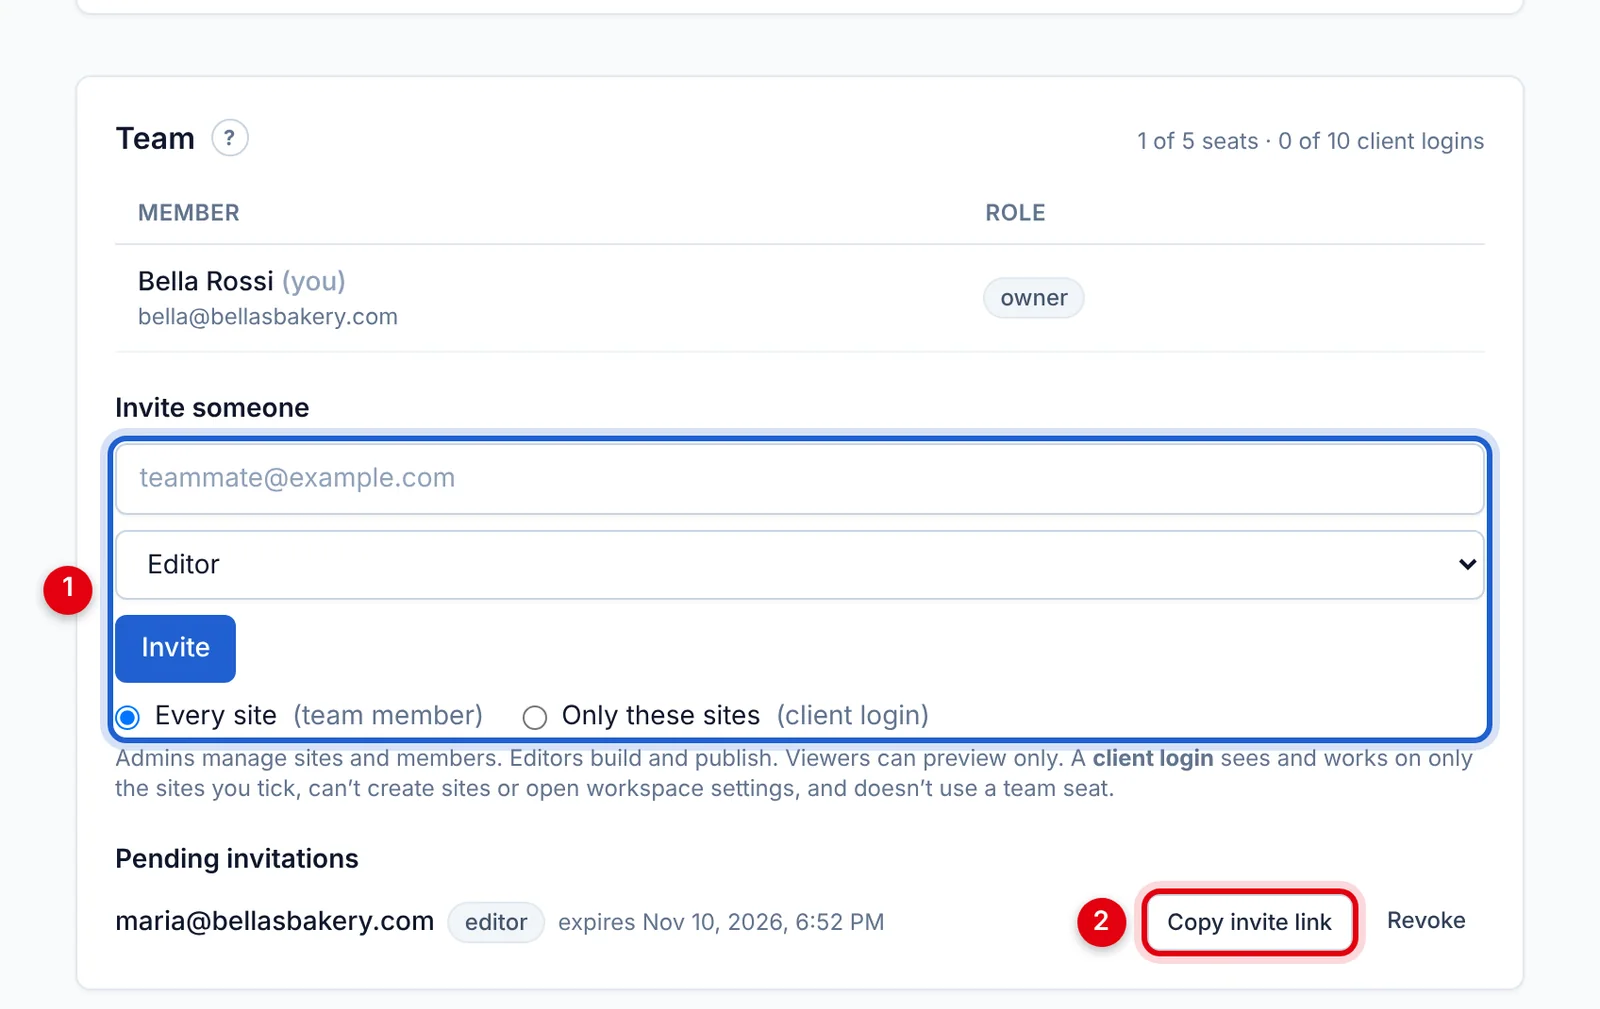
Go to Settings → Team:
Team settings with a pending invitation
Under Invite someone, enter their email address, choose a role and click Invite.
Under Pending invitations, click Copy invite link and send the link to them yourself — by email, chat or text.
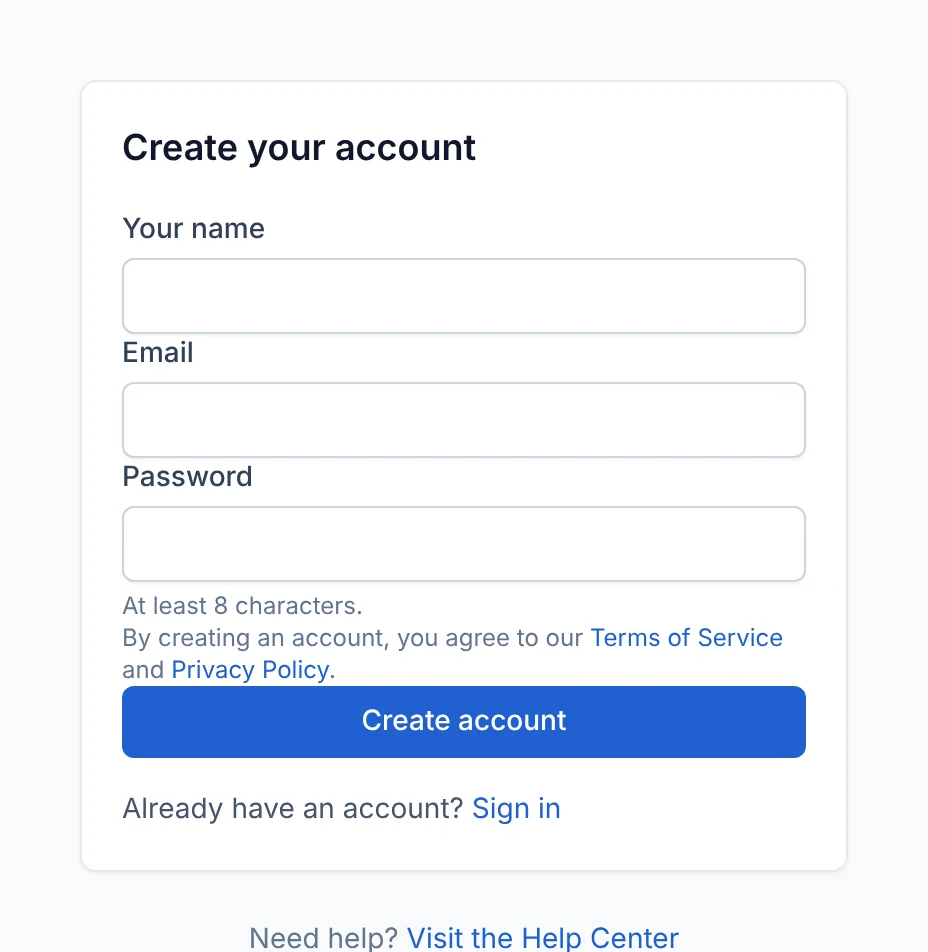
When they open the link, they sign in or create an account with the email address you invited, and join the workspace. Invite links work for 7 days; Revoke cancels one.
What your teammate sees when they open the link
How many members you can have depends on your plan.
Change a role or remove someone
In the Team list, pick a new role and click Update, or click Remove. To leave a workspace yourself, click Leave next to your own name.
Give a client their own login (Pro and Agency)
Building sites for clients? Give each client a login that opens only their own site:
Under Invite someone, enter the client's email address and choose Editor (they can edit and publish) or Viewer (preview only).
Choose Only these sites (client login) and tick their site.
Click Invite, then copy the invite link and send it to them.
A client login:
sees only the sites you ticked, under Your sites;
can't create sites, see your other clients' sites, or open workspace settings, team or billing;
doesn't use one of your team seats. You can have up to one client login per site your plan allows (10 on Pro, 100 on Agency).
To change which sites someone can open, click Change site access under their name in the Team list. Choose Every site to make them a full team member again.
Contact-form messages go to the workspace owner by default. To send a client's form messages to them, put their email address in the site's Settings → Send form messages to.
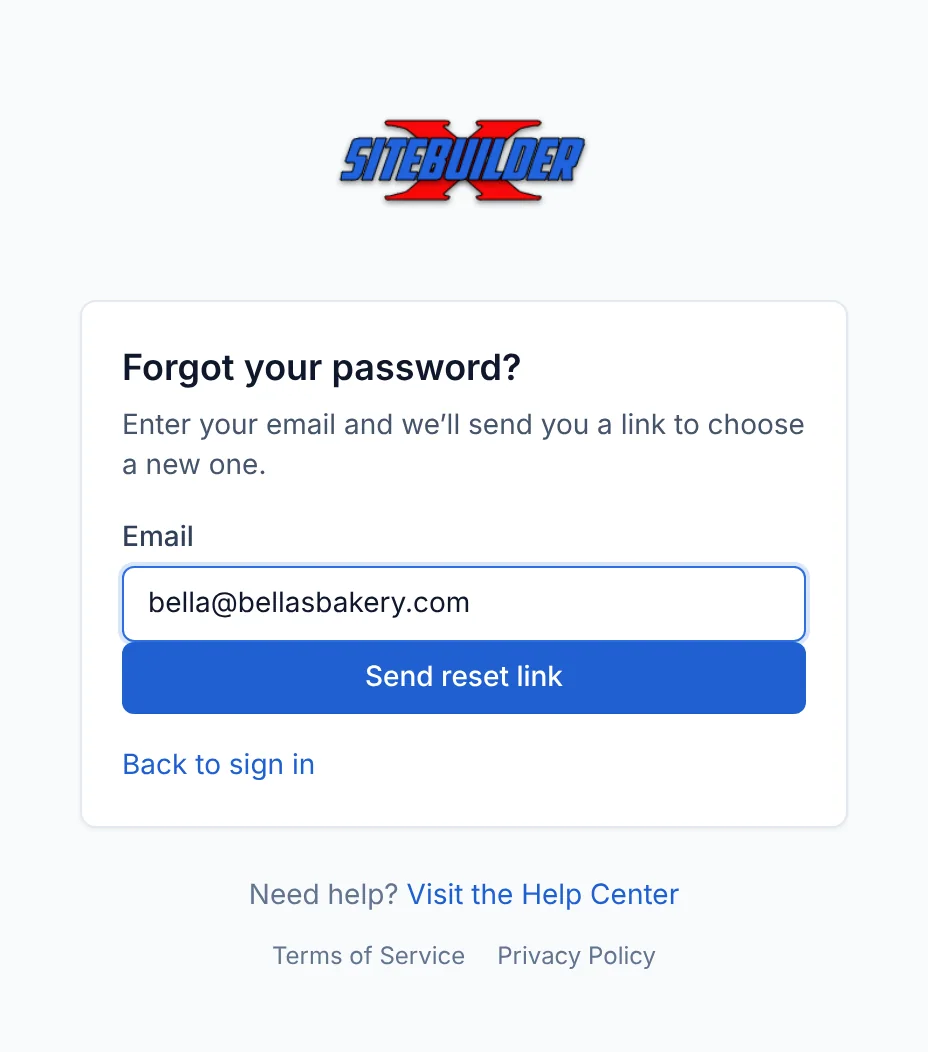
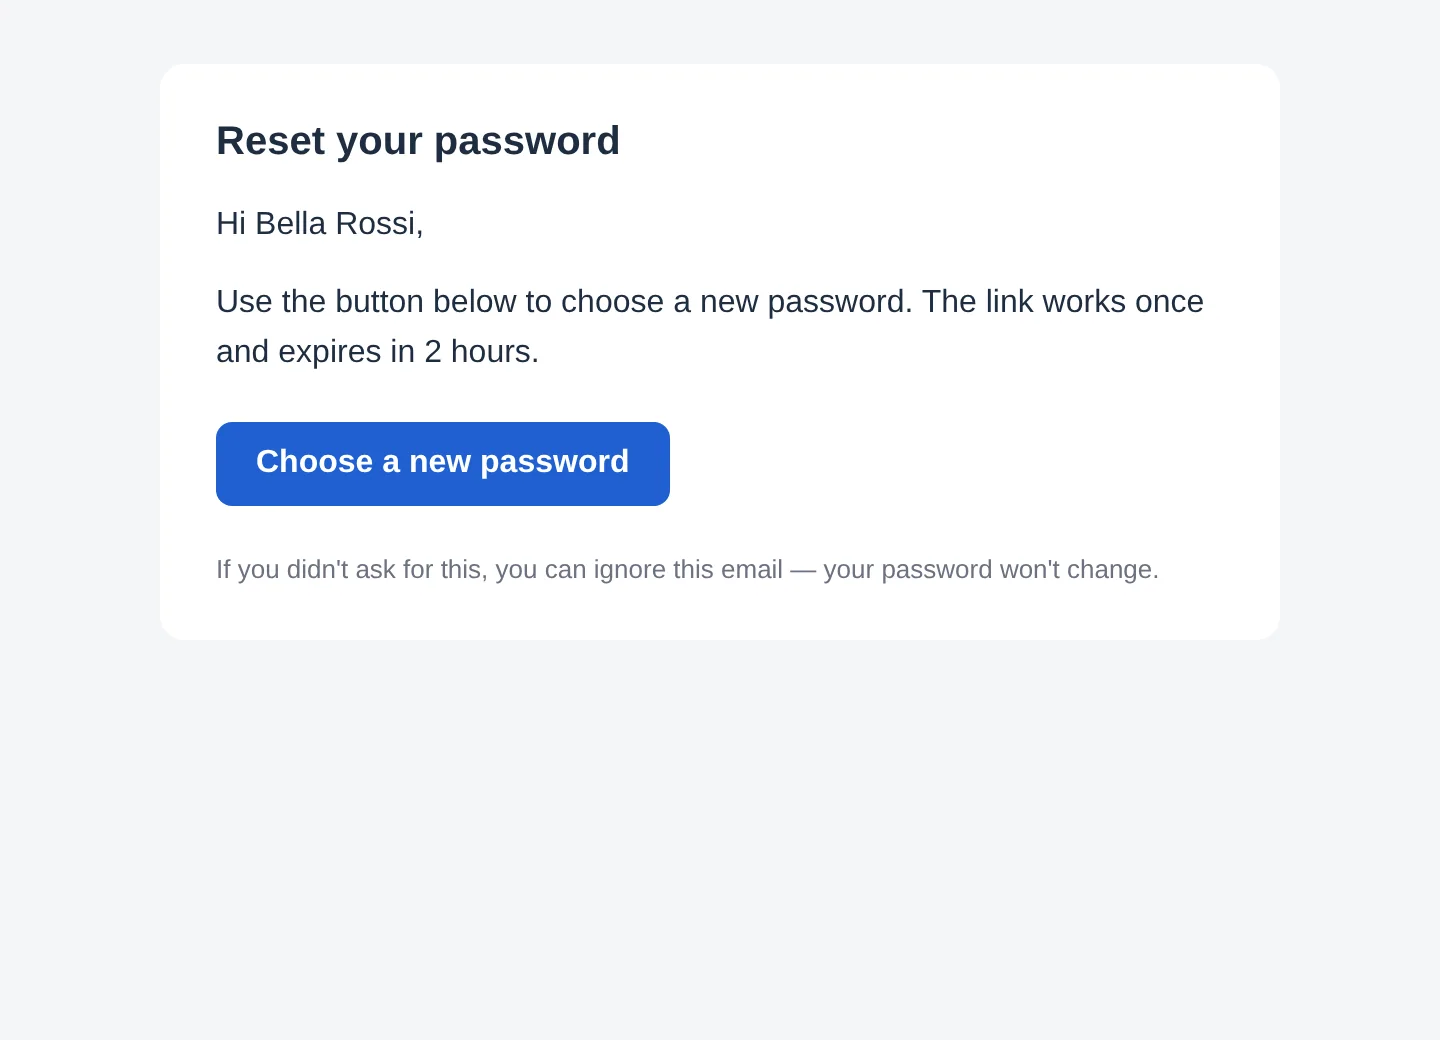
7.4 Resetting your password
Forgot your password, or want to change it? Here's how.
Enter your brand name (this switches the white label on) and, if you like, a support email.
Upload your logo: PNG, JPEG, WebP or GIF, up to 1 MB. A wide logo works best.
Add links to your own Terms of Service and Privacy Policy if you have them.
Click Save white label.
Use your own dashboard address (optional)
Pick an address on a domain you own, for example sites.youragency.com.
At your domain provider, add a CNAME record for that name pointing to build.xsitebuilder.com.
Type the address into Dashboard domain and click Save white label.
The Status line tells you when the record is in place; DNS changes can take up to an hour. The security certificate (HTTPS) is set up automatically the first time someone opens the address.
Once it's set up, invitation links you copy from Settings → Team open on your address. On your address, new accounts can only be created from your invitations.
Want client emails to come from your own email address too? Set up Settings → Email for contact forms. White-labelled emails use it when it's there.
8. Troubleshooting
8.1 The editor looks different from my live site
Why sliders, animations, pop-ups and widgets look different while editing — and how to check the real thing.
Moving parts are paused in the editor, and run in Preview and on your live site
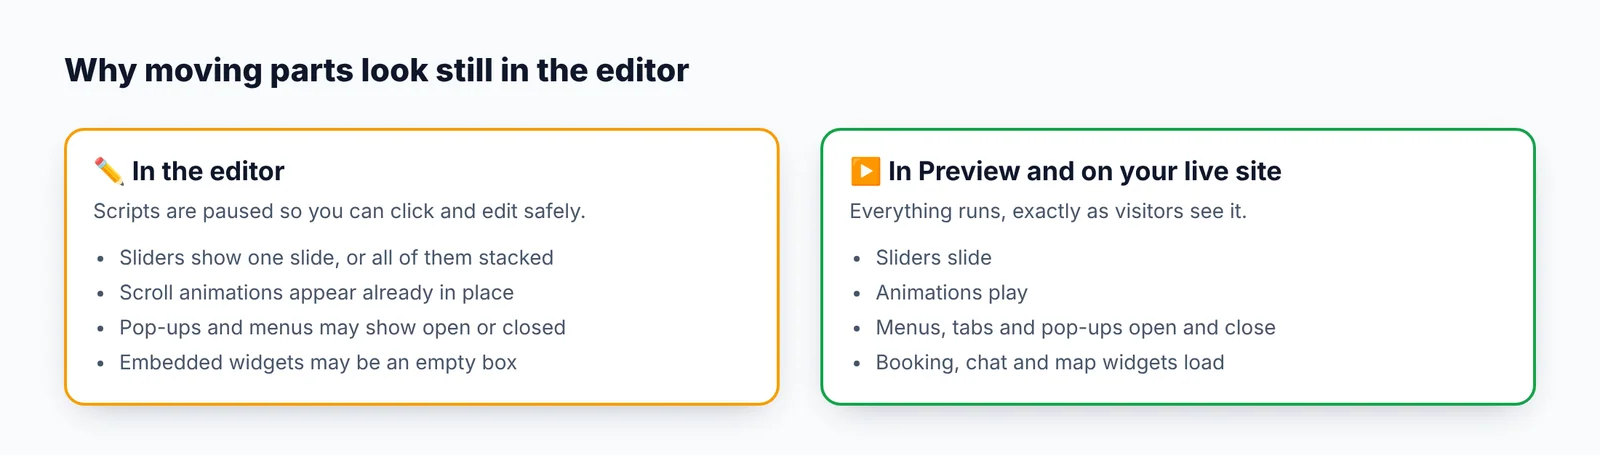
The editor shows your page with its scripts paused. That keeps editing safe and lets you click on anything, but it means interactive parts look different while you edit:
Sliders and carousels may show all their slides stacked, or only the first one.
Animations (things that fade or slide in as you scroll) appear already in place.
Pop-ups, menus and tabs may show open, or closed.
Embedded widgets (booking, chat, social feeds, maps from code) may show as an empty box.
Mobile menus — the "hamburger" button may not open.
None of this affects your live site. Click Preview to see the page with everything working:
Preview opens your draft in a new tab, with everything working
Things that should look the same
Text, images, colours, fonts and layout should match the preview. If they don't:
Press Save, then reload the editor (your browser's refresh button).
Check you're in the right view — Desktop, Tablet or Mobile.
What to do when pictures don't appear in the editor, the preview or the live site.
On a site copied with "Layout only"
That's expected — photos are swapped for placeholders so the page is your own. Double-click each one to upload your own photo.
A copied page: same design, placeholder content
On a copied or imported site
Some websites protect their images, load them in unusual ways, or block copying. If an image didn't come across:
Save it from the original site (if you have the right to use it), or use your own.
In the editor, double-click the empty image and upload it.
Upload in the media library
For a background image, select the section and use Design → Background → Change image. See Images and media.
For an imported .zip, check the images were inside the .zip, in the folders the pages expect. Images linked from another website only show if that website allows it.
Upload fails
Files must be under 25 MB each and 100 MB per upload.
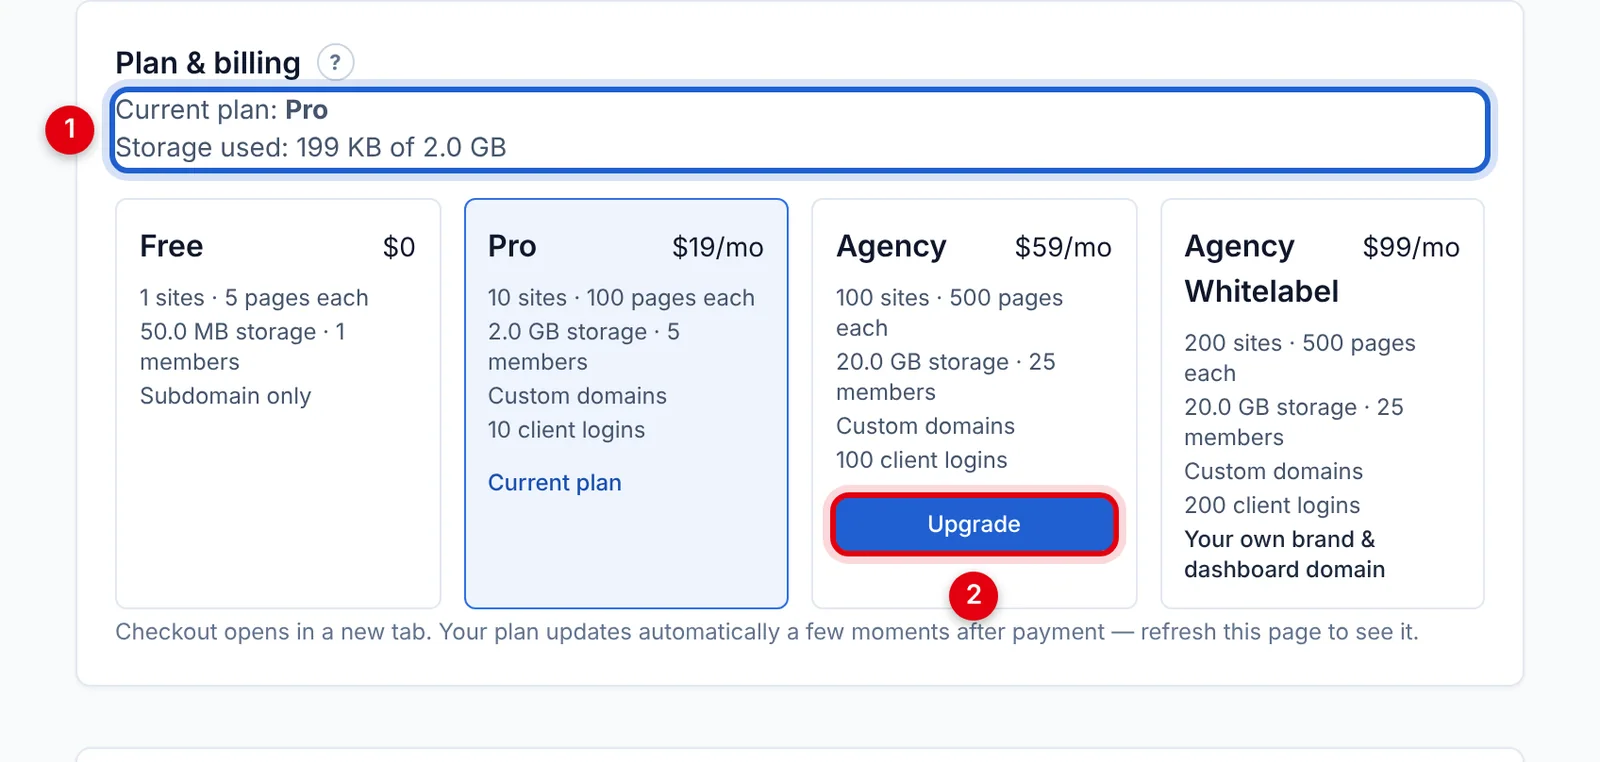
Check Settings → Plan & billing — if your storage is full, delete unused files or upgrade.
Only pictures, video, audio, fonts and similar web files can be uploaded.
Shows in the editor but not on the live site
You probably haven't published since adding it. Click Publish. See Publishing your site.
8.3 Import problems
Common reasons an HTML or .zip import fails, and how to fix them.
Import HTML on the site's page
"Upload an .html file or a .zip" — only .html, .htm and .zip files can be imported. Other archive types (.rar, .7z, .tar) need converting to .zip first.
The upload is too big — a .zip can be up to 1 GB, and a single HTML page up to 10 MB. Remove files you don't need (original photos, videos, design files) from the .zip.
Page limit reached — the import would take the site over your plan's page limit. Delete pages you don't need, import fewer, or upgrade.
Storage full — the files would take you over your plan's storage. See Plans and limits.
Pages look unstyled — the CSS files weren't in the .zip, or the pages expect them in a different folder. Keep the folder structure exactly as it was on the original website.
Built with React, Vue or Angular — these need "building" first. Import the built files (usually a dist or build folder), not the source code.
Copying a website failed — the website may block copying, need a login, or be very slow. Try fewer pages, or just the start page.
8.4 Still need help?
How to get in touch with us.
If you can't find the answer here, we're happy to help.
Reply to any email you've received from us, or contact the person who set up your account.
To help us help you faster, please include:
Your account's email address.
The site's name or address.
What you were trying to do, what you expected, and what happened instead.
A screenshot, if you can. (On Windows press Windows + Shift + S; on a Mac press ⌘ + Shift + 4.)