Editor basics
The toolbar, the panels, and how to select, change, move and delete things on a page.
Open the editor from Open editor on the Sites page, or Edit next to a page on the site's page. Here's a one-minute tour:
The four areas
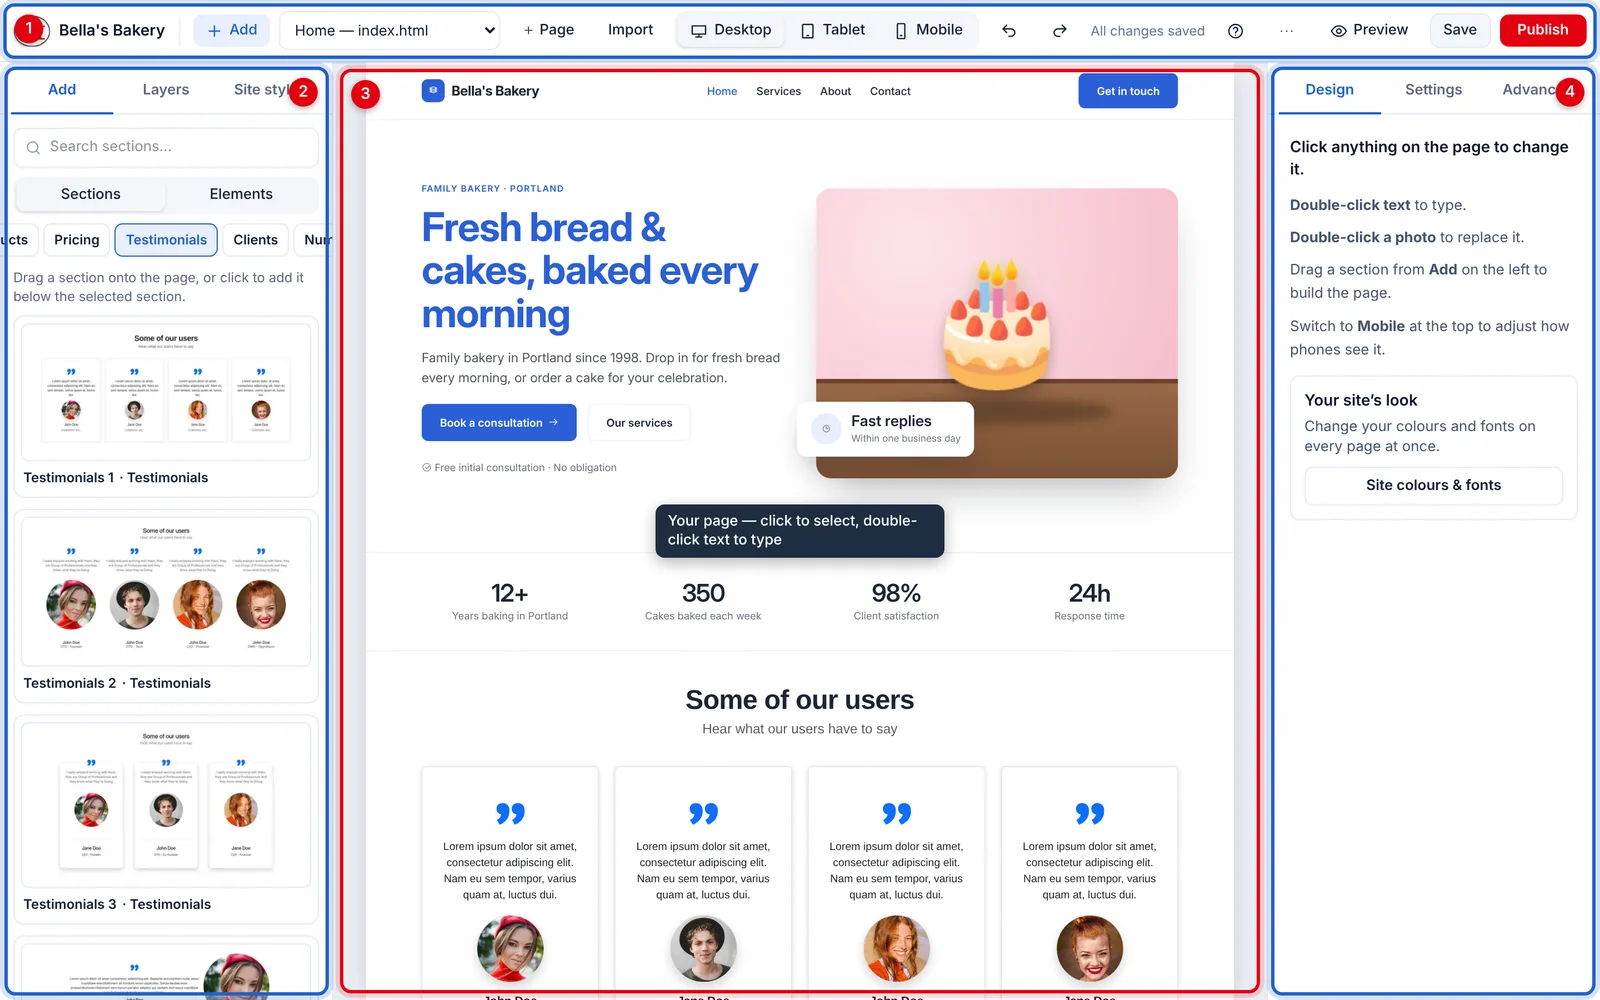
- The toolbar: pages, screen sizes, saving and publishing.
- Add, Layers and Site styles (left): sections and elements to add, an outline of the page, and your site's colours and fonts.
- Your page, exactly as visitors will see it. Click to select, double-click text to type.
- Design, Settings and Advanced (right): change whatever you've selected.
The toolbar

- Your logo: back to your dashboard.
- Add: show or hide the left-hand panel (for more room to work).
- Page menu: switch to another page of the site.
- + Page: add a page. See Adding and managing pages.
- Import: bring in an HTML file, a .zip, or pasted code.

- Desktop / Tablet / Mobile: see the page at different screen sizes. See Mobile and tablet views.
- ↶ ↷: undo and redo.
- Save status: "All changes saved", "Unsaved changes" or "Saving…".
- ?: opens this Help Center.
- ⋯ More: show outlines around every element, or view the page's code.
- Preview: the page as visitors see it, in a new tab.
- Save: save now (it also happens automatically).
- Publish: put your changes live.
The panels
On the left:
- Add: ready-made sections (with pictures, so you can see them first) and single elements like text, images and buttons. See Adding sections.
- Layers: an outline of everything on the page. It's handy for picking something that's hard to click, or for dragging things into a new order.
- Site styles: your site's colours and fonts, changed on every page at once. See Site colours and fonts.
On the right, for whatever you've selected:
- Design: text, colour, background, spacing, corners, shadow and links, in plain words. See Changing styles.
- Settings: details like a picture's description, a video's address, or a form's options.
- Advanced: every style setting there is, for when you need more control.
The Design panel shows what you've selected and the items around it at the top, for example Container › Row › Column › Heading. Click any of them to select it instead.
Selecting, moving and deleting
Click anything to select it. A blue outline and a small toolbar appear above it:
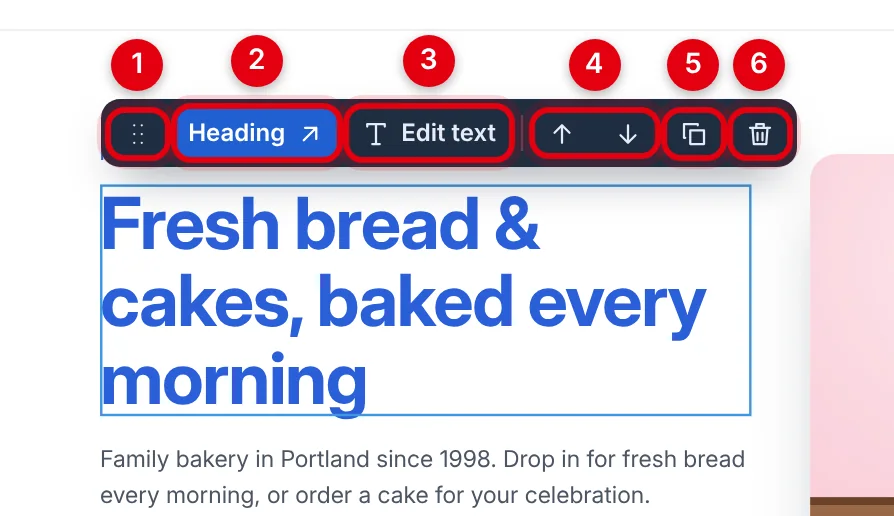
- Drag handle: drag it to move the item somewhere else.
- Its name, e.g. "Heading". Click it to select the item it sits inside (its "parent").
- Edit text for text, Replace for a picture, or Link for a link or button.
- Move up and Move down: swap it with the item before or after it.
- Duplicate: put a copy just after it.
- Delete: remove it.
Double-click text to type. A text toolbar lets you add bold, italic, underline and links.
Keyboard shortcuts
| Shortcut | What it does |
|---|---|
| Ctrl/⌘ + S | Save now |
| Ctrl/⌘ + Z | Undo |
| Ctrl/⌘ + Shift + Z | Redo |
| Ctrl/⌘ + C, Ctrl/⌘ + V | Copy and paste the selected item |
| Delete | Delete the selected item (when you're not typing in it) |
Updated Nov 4, 2026, 2:59 PM
Didn’t find what you need? Contact support.